292930
HEATED 20” BIRD BATH
Item # 600
Miller Manufacturing, Glencoe, MN 55336 USA • www.miller-mfg.com
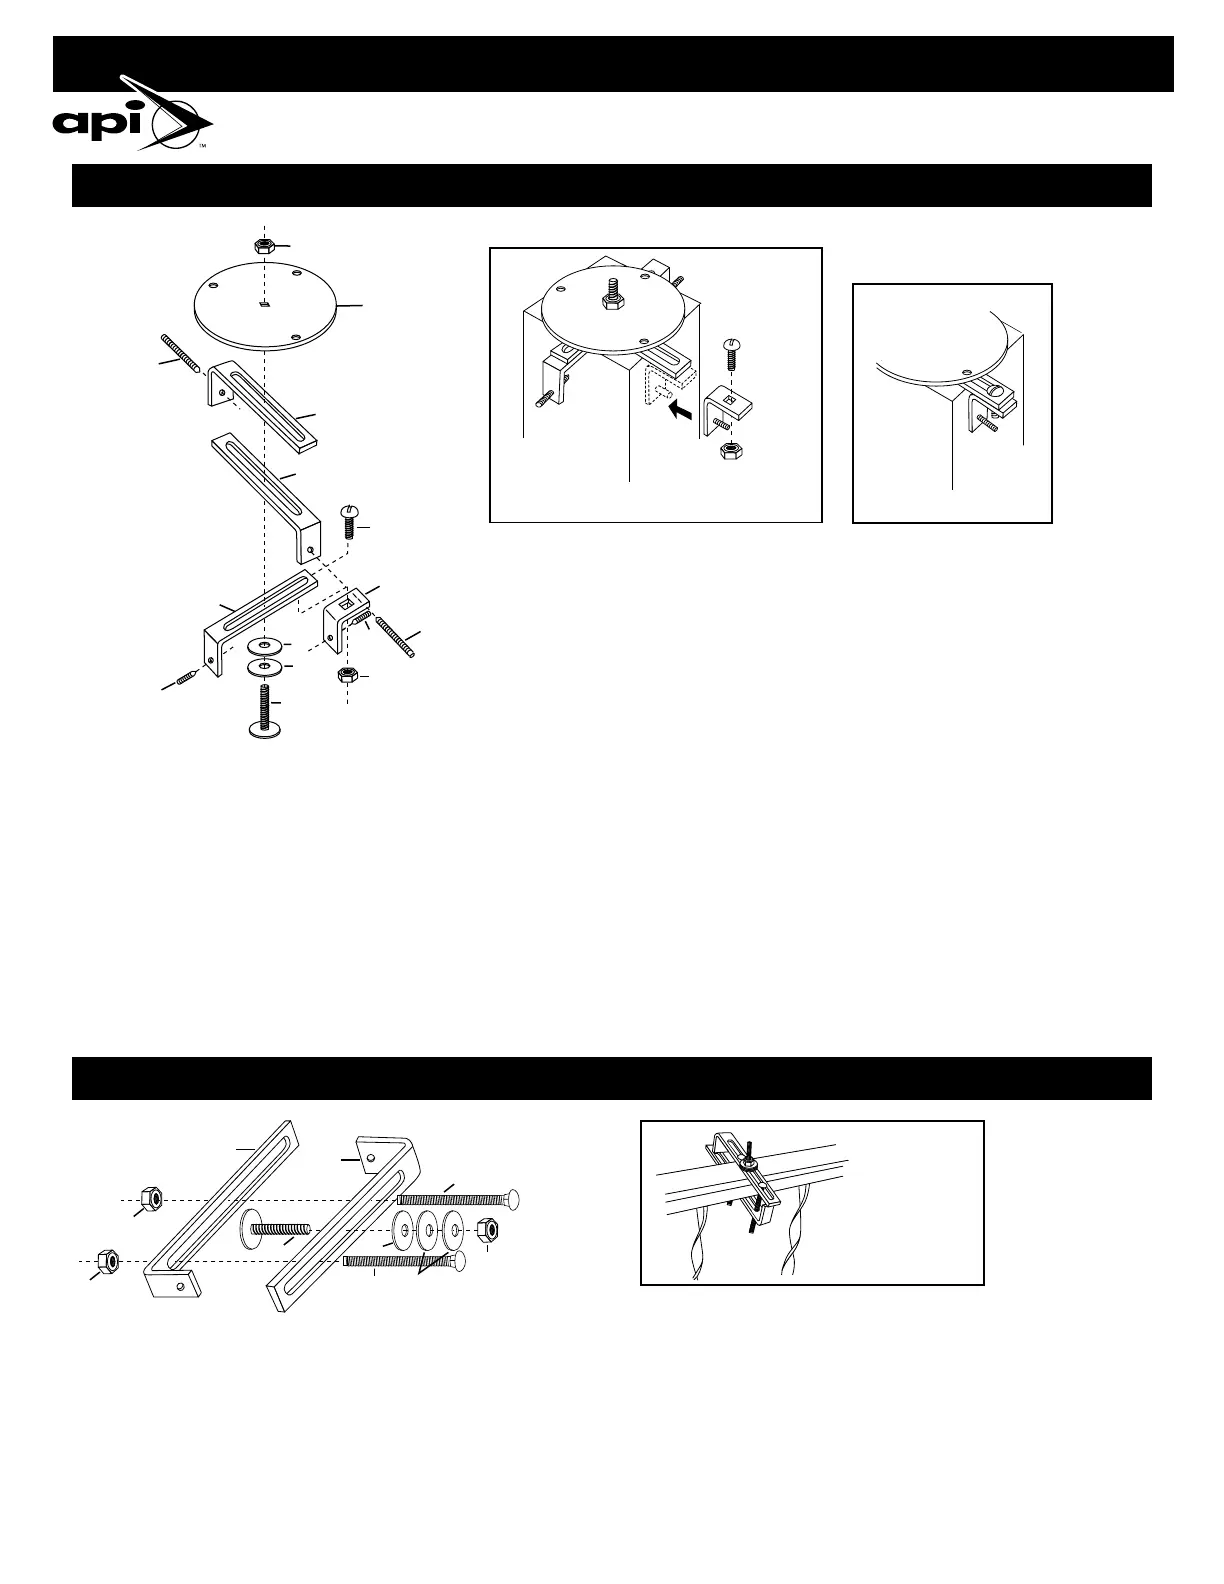
Mounting to wooden post
1. Assemble mount, with exception of part #J, and leave the center nut
(part #E) loose enough so that you can move the 3 arms (part #A) to fit
the post.
2. Place the mount on the center of the pedestal and center the mount so
the center bolt (part #D) is directly in the center of the pedestal.
3. Make sure the arm (part #A) with the short set screw (part #F) is flush
against the side of the post with the set screw (part #F) backed out as
far as possible. The other two arms (part #A) with the longer set screws
(part #G) should be pushed together as far as possible. There will be a
gap between these two arms and the side of the post.
1. Assemble mount to metal rail as shown in exploded diagram. Sandwich
rail between arms (part #A).
2. When attaching mount make sure the carriage bolts (part #M) are
“hugging” the sides of the metal rail. They must be as close against the
rail as possible.
3. Use a wrench to tighten the nuts on the carriage bolts (part #M). Do not
over-tighten because excessive tightening will cause the arms (part #A)
to bend. A slight bend is okay.
4. Make sure the center bolt is still positioned in the center of your
pedestal. If the center bolt is misaligned with the center of your
pedestal – reposition the mount and repeat step #3 again.
5. Using a wrench, tighten the center nut (part #E) as tight as possible.
6. Use a screwdriver to tighten the three set screws. While tightening
these make sure that the mount remains level. Do not over-tighten the
set screws because this will cause the mount to bend. Tighten the set
screws only enough to slightly dig into the wood.
7. After your mount is fastened tightly, add angle bracket (part #J) to the
end of the arm (part #A) containing the small set screw (part #F). Attach
part #J so there is not an air gap between the wooden post and part #J
(to eliminate an air gap you must back the small set screw out of part #J
to the end of the arm (part #A).
8. Tighten the set screw (part #F) in the angle bracket (part #J).
9. Place the bath on the center screw and rotate the bath clockwise until
tight against the round disc (part #C).
10. If your bath sits crooked, you may remove the bath by rotating
counterclockwise. Then loosen the proper set screw (part #F or part #G)
and adjust the mount by moving the corresponding arm upward. Re-
tighten the set screw before placing your bath back on the mount.
4. Do not be concerned if you can still “twist” the mount back and forth.
This “twisting” will be eliminated once the bath is “spun” onto the mount.
5. Set the bath onto the center screw (part #H) and “spin” the bath into
place. It should be spun until the bottom surface of the bath rests tight
against the surface of the railing and there is no wobble.
4” X 4” WOODEN POST OR “LOOKER” MFG. STAND
MOUNTING TO A METAL DECK RAILING
MOUNTING TO A METAL DECK RAILING
(Finished Diagram)
(Finished Diagram)
(Assembly of Part J)
(Exploded Diagram)
L
F
J
I
G
A
F
K
K
D
A
A
C
G
E
(Exploded Diagram)
(Finished Diagram)
M
M
L
L
A
K
K
H
E
A