Apollo Twin Hardware Manual Chapter 3: Controls & Connectors 22
Tip: Indicators (6) and (8) determine which volume (monitor or headphone) is be-
ing controlled with the Level knob (1).
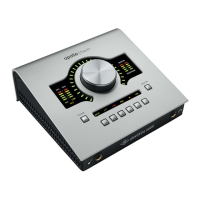
(11) Preamp Option Buttons
These six buttons control the preamp options (a – f below) when the input channel is
selected (3). The option is enabled when its indicator is lit.
Note: These controls are unavailable when Monitor (6) or Headphone (8) is se-
lected.
(a) Input Select
Press to alternate between the mic and line inputs for the channel. The current selection
is displayed by the input type indicators (5).
The Hi-Z input is selected automatically when a ¼” mono (tip-sleeve) plug is connected
to the front panel’s Hi-Z Instrument jack (12).
Note: Hi-Z input is available for channel 1 only.
(b) Low Cut Filter
Enables a low cut (high pass) rumble filter with a cutoff frequency of 75 Hz.
(c) +48V
Enables 48-volt phantom power for the mic input. Phantom power is typically needed for
condenser microphones.
Caution: To avoid potential microphone damage, do not enable phantom power
unless it is required by the mic.
(d) Pad
Attenuates (lowers) the input signal level by 20 dB.
Note: Pad is unavailable for the Hi-Z instrument input (12).
(e) Polarity Ø
Inverts the polarity (aka phase) of the input signal.
(f) Link
Links inputs 1 & 2 so both channels are adjusted simultaneously as a stereo pair.
Note: Link cannot be activated when the Hi-Z input (12) is in use.