ENGLISH
IMPORTANT SAFEGUARDS
TECHNICAL SPECIFICATIONS
Please read this instruction manual carefully before using the appliance.
Save the instruction manual as you may require it in future.
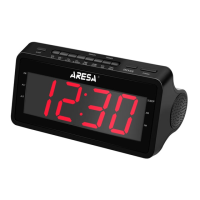
This device is designed to receive and display information about the current date and time,
as well as to receive radio signals in the AM and FM bands. For household use, not suitable for industrial use.
The device is intended for use only for domestic purposes in accordance with this Instruction Manual.
After unit transportation or storage at low temperature it is necessary to keep it for at least 4 hours at room temperature before switching on.
Supply voltage: 220-240 V ~ 50 Hz
Power consumption: 1,5 W
Frequency range: AM: 522-1620 KHz,
FM: 64-108 Mhz
Power: 2 х AAA
Attention! Incorrect installation of batteries may result in an explosion. Batteries should only be replaced with the same or equivalent type.
Please read this manual carefully before using the device to avoid damage during use. Incorrect handling can lead to damage to the product,
cause material damage or cause damage to the health of the user.
• Before initial start-up, check that the product specifications match the mains supply.
• The device is not intended for use by persons (including children) with reduced physical, sensory or mental capabilities, or lack of experience or
knowledge, unless they are under the control or instructed about the use of the device by the person responsible for their safety
• Do not use the appliance if the cord or plug is damaged, or if the appliance is damaged or defective. Take it to a service center.
• If the power cord is damaged, it must be replaced by the manufacturer, the after-sales service or similar qualified personnel to avoid danger.
• The appliance must be repaired only by an authorized service center. Do not repair the appliance yourself.
• To avoid electric shock, do not immerse the casing or power cord in water or other liquids. If this happens, immediately disconnect the device
from the mains and, before using it further, check the operation and safety of the device from qualified specialists.
• In the event of using a power plug or an instrument connector as a disconnect device, the disconnect device must remain readily accessible.
• Do not let the cord hang over the edge of the table or over hot surfaces. Do not allow the power cord to touch sharp edges or hot surfaces.
• The device should stand firmly on a dry, level surface. Do not place it on hot surfaces, or near heat sources (for example, gas or electric cookers).
• Children should be supervised to ensure that they do not play with the appliance.
• Do not use the appliance for purposes other than those specified in the instruction manual.
• Do not use outdoors.• This appliance is intended for household use only.
• Be extremely careful when children are near the appliance.
• Never move the appliance by pulling on the cord. Do not wind the power cord on the appliance and do not bend it. When disconnecting the
appliance from the mains, grasp the plug, and do not pull on the cord.
• The manufacturer reserves the right, without additional notice, to make minor changes in the design of the product, the algorithms that do not
radically affect its safety, operability and functionality.
• Save this instruction manual.
Service lifetime - 3 years
Warranty period - 12 months
INSTALLING AND REPLACING OF BATTERIES
TIME SETTING
1) In the time display mode, press the TIME button. The display will show 24H. To change the clock format from the 24-hour format to 12 hours,
press the 12 / 24H button.
2) Press the TIME button to save the settings. To set the hour and minute values, use the HOUR and MIN buttons. While the minute value is not
set, the seconds value will be zero, which allows you to set the clock more precisely.
1) In the time display mode, press the SLEEP button to enter sleep mode; (the device will automatically switch to radio mode);
2) Press the SLEEP button to select the number of minutes that the shutdown will occur. The time before the trip can take the following values:
120-> 110-> 100-> 90-> 80-> 70-> 60-> 50-> 40-> 30-> 20-> 10-> OFF (sleep mode is disabled).
1) In the time display mode, press AL1 to set the alarm. Press the HOUR or MIN button to set the hour or minute values, respectively. After setting
the alarm time, press the AL1 button to turn on the first alarm. After turning on the alarm, the AL1 alarm indicator will be on;
2) During alarm settings, press AL MODE button to select the alarm mode BB / FM / AM;
3) In the alarm recap mode, the new alarm settings will be replaced with the old ones by default;
4) To turn off the alarm, press the ALL OFF button. After disabling the alarm, the alarm will only turn on the next day at the same time;
5) If the alarm sounds 30 minutes and you do not press any buttons, the alarm will automatically turn off and turn on only the next day at the same
time;
6) During alarm settings, press the AL OFF button, the alarm indicator will start blinking. Press the AL OFF button again to turn off alarm Al1.
After turning off the alarm, the AL1 alarm indicator should go off;
7) If you select the RADIO alarm mode and when the alarm goes off the device is already in radio mode, the alarm will not be played. The alarm
will only appear as a light indication, and the device will continue to operate in radio mode;
8) Alarm AL2 is configured in the same way as AL1 alarm clock;
9) This unit has two alarms. After the first alarm goes off, it becomes inactive.
SLEEPING MODE
ALARM CLOCK SETTING
Attention!
Danger of explosion! Do not expose batteries to high temperatures, direct sunlight or fire. Do not dispose batteries in a fire. The battery contains
chemicals, so it must be disposed of in accordance with the applicable disposal regulations.To prevent leakage of the electrolyte, which could
result in bodily injury, property damage or damage to the radio clock, observe the following rules.
• Install 2 AAA batteries (not supplied) correctly, observing the polarity indicated on the radio clock (+ and - signs).
• Remove the batteries if the radio clock is not used for a long time.
 Loading...