Do you have a question about the Argos pro fitness and is the answer not in the manual?
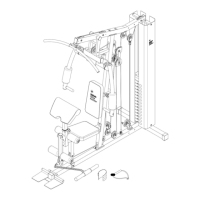
Guide rods are inserted into the rear stabilizer, secured with bolts and washers.
Base frame is attached to the rear stabilizer using carriage bolts, bracket, washers, and nuts.
Front stabilizer connects to leg developer holder, which attaches to the base frame.
Weight plates and select rod are slid onto guide rods for the weight stack assembly.
Vertical frame is attached to the base frame using carriage bolts, bracket, washers, and nuts.
Upper frame connects to guide rods and vertical frame with bolts, washers, and nuts.
Front press base is attached to the upper frame using an axle, washers, and nuts.
Butterfly arms attach to the front press base, with foam rolls added to the ends.
Backrest pad attaches to the vertical frame, and seat pad attaches to the base frame.
Leg developer attaches to the base frame, with foam roll tubes and foam rolls installed.
Preacher pad assembly attaches to the base frame, and swivel pulley brackets to the vertical frame.
Weight cover is fixed to the upper frame and bottom parts using plates, bolts, washers, and nuts.
Routing upper cable, attaching pulleys, bushings, and covers to the frame.
Butterfly cables are hooked to butterfly arms, with pulleys and brackets installed.
Lower cable is fed through, with pulleys, bushings, and covers attached to the frame.
Lat bar attaches to upper frame hooks, pull bar connects to lower cable with chain and clips.
Exercise for pectoralis: push front press handles away from body to full extension.
Exercise for pectoralis: rotate arms forward by contracting chest, using fly pads.
Biceps exercise: curl pull bar upwards by pivoting from the elbow with palms up.
Biceps exercise: curl pull bar upwards with elbows at side, pivoting from elbows.
Outer thigh exercise: wrap ankle strap, kick leg out to the side, pivoting from hip.
Abs/Core exercise: lean torso forward and pull-in with abs, using lat bar behind head.
Quadriceps exercise: extend legs forward by pivoting from the knees.
Inner thigh exercise: kick leg towards front of the other leg, pivoting from hip.
Guidance on starting an exercise program, including doctor consultation and realistic goals.
Using heart rate to determine proper exercise intensity and target zones.
Diagrams showing targeted muscle groups for front and back of the body.