Do you have a question about the Ariens Path-Pro and is the answer not in the manual?
Open box, remove all parts, and verify there is no damage or missing parts before proceeding with assembly.
Assemble the handlebar by loosening knobs, rotating to position, inserting the pivot bolt, and tightening knobs.
Attach the remote discharge chute handle assembly by securing the bracket to the handlebar.
Attach the discharge chute, water guard ring, and chute handle using screws, ensuring proper alignment.
Add 16 oz. of 5W-30 oil to the oil fill and check the level on the dipstick.
Open fuel and oil door, add 16 oz. of 5W-30 oil to the oil fill, and check the level.
This document outlines the assembly and initial setup procedures for the Ariens Path-Pro snow thrower, a compact and efficient machine designed for clearing snow from various surfaces. The manual provides step-by-step instructions to ensure the device is correctly assembled and ready for operation, emphasizing safety throughout the process.
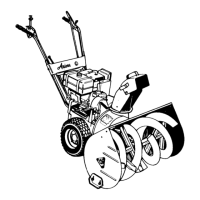
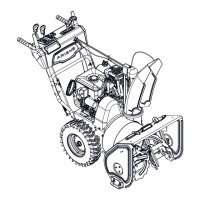
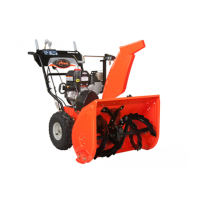
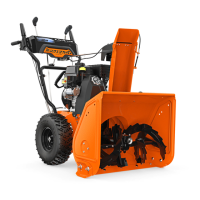
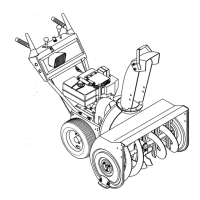
The Ariens Path-Pro is a single-stage snow thrower primarily designed for residential use, capable of clearing snow from driveways, sidewalks, and patios. Its main function is to collect snow using a rotating auger paddle and then discharge it through an adjustable chute, effectively removing snow from the desired area. The machine is powered by an engine, which drives the auger and allows for efficient snow removal. The design focuses on ease of use and maneuverability, making it suitable for navigating tighter spaces and handling moderate snowfalls.
The Path-Pro incorporates several features to enhance its usability and operational efficiency. The handlebar assembly is designed for user comfort and control, allowing the operator to steer and maneuver the machine effectively. The handlebar can be adjusted to an operating position by loosening and tightening knobs, ensuring a comfortable height for different users. A key feature is the auger control bar, which engages and disengages the auger paddle. This control is crucial for safe operation, allowing the user to stop the auger quickly when needed. The manual emphasizes checking the auger control cable for proper tension and slack, ensuring it functions correctly without excessive tension when engaged or disengaged.
The snow thrower includes a discharge chute system that allows the operator to direct the expelled snow. Depending on the model, this can be managed by a remote discharge chute handle or a direct chute handle. For models with a remote discharge chute handle (e.g., Model 938033), the handle assembly is mounted on the handlebar, providing convenient access to adjust the chute's direction. This remote control allows the user to change the snow discharge direction without stopping or reaching down to the chute itself, enhancing operational convenience and safety. The manual details the attachment of this handle, including securing it with flange nuts and ensuring its full range of motion for proper operation. For other models (e.g., 938030, 031, 032, 034), a direct chute handle is positioned on top of the discharge chute, which is then secured to the machine. The discharge chute itself is designed to be positioned onto a water guard ring, ensuring a secure fit and preventing snow from escaping in unintended directions. The assembly process for the discharge chute involves aligning holes and securing it with screws, with a strong recommendation not to overtighten to prevent damage. After assembly, users are instructed to move the chute handle or remote handle to ensure the discharge chute operates smoothly and effectively, allowing for proper snow direction control.
The machine's compact size and design contribute to its maneuverability, making it easier to navigate around obstacles and in confined spaces. The recoil starter handle is used to manually start the engine, a common and reliable method for small engines. The fuel cap and tank are easily accessible for refueling, and the fuel and oil door provides access to the engine's oil fill points for maintenance. Pivot bolts and knobs are used for securing various components, such as the handlebar, ensuring stability and rigidity during operation. Water guard rings are integrated into the design to protect internal components from snow and moisture, contributing to the machine's durability and longevity.
The Ariens Path-Pro is designed with straightforward maintenance procedures to ensure its longevity and reliable performance. A critical aspect of maintenance highlighted in the manual is the addition and checking of engine oil. The manual differentiates between models regarding the location of the oil fill. For Models 938030 and 938034, the oil fill is directly accessible, requiring the user to remove a cap, add 16 oz. of 5W-30 oil, and then check the oil level using the dipstick to ensure it is at the proper operating level. This process is essential for lubricating the engine and preventing wear. For Models 938031, 938032, and 938033, access to the oil fill is through a fuel and oil door. Users must open this door, remove the cap from the oil fill, add the specified amount of 5W-30 oil, and then check the dipstick. After adding oil, the cap must be replaced, and the door closed securely. These instructions emphasize the importance of consulting the Owner's Manual for detailed instructions on checking oil levels and other maintenance tasks.
The manual also mentions an oil drain plug, indicating that the machine is designed for easy oil changes, a fundamental maintenance task for any engine-powered equipment. The inclusion of a 16 oz. bottle of 5W-30 oil with the product suggests that the machine is shipped without oil in the engine, making the initial oil fill a crucial first step before operation.
Beyond oil, the manual implicitly suggests other routine maintenance tasks through its identification of components. For instance, the auger paddle, being the primary snow-moving component, will require periodic inspection for wear and tear. Similarly, the discharge chute and its associated handles and cables will need to be checked for proper function and any signs of damage or obstruction. The auger control cable assembly, as mentioned in the setup, will require occasional adjustment to maintain the correct tension and ensure safe operation. The pivot bolts and knobs, which secure the handlebar and other adjustable parts, should be checked periodically for tightness to ensure structural integrity.
The overall design of the Path-Pro, with accessible oil fill points and clearly identified components, facilitates routine maintenance. The emphasis on reading and understanding the entire Owner's Manual before proceeding with operation or maintenance underscores the importance of following manufacturer guidelines for optimal performance and safety. The tools required for assembly, such as 7/16" and 3/8" wrenches or sockets, are standard, indicating that general maintenance tasks will likely not require specialized tools. This user-friendly approach to maintenance helps ensure that the snow thrower remains in good working condition for many seasons.
| Engine Brand | Ariens AX |
|---|---|
| Start Type | Recoil |
| Fuel Type | Gasoline |
| Type | Single-stage |
| Clearing Width | 21 inches |
| Drive System | Auger-propelled |
| Starting System | Recoil |