10
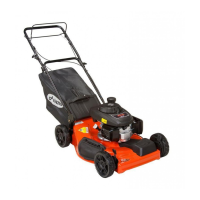
MULCHING MOWING TIPS
IMPORTANT: For best performance,
keep mower housing free of built-up
grass and trash. See “CLEANING” in the
Maintenance section of this manual.
• The special mulching blade will recut
the grass clip pings many times and
reduce them in size so that as they fall
onto the lawn they will disperse into
the grass and not be noticed. Also, the
mulched grass will bio de grade quick ly
to provide nu tri ents for the lawn. Always
mulch with your highest engine (blade)
speed as this will provide the best recut-
ting action of the blades.
• Avoid cutting your lawn when it is wet.
Wet grass tends to form clumps and
in ter feres with the mulch ing action. The
best time to mow your lawn is the early
afternoon. At this time the grass has
dried, yet the newly cut area will not be
exposed to direct sunlight.
• For best results, adjust the lawn mower
cutting height so that the lawn mower
cuts off only the top one-third of the
grass blades. If the lawn is over grown it
will be nec es sary to raise the height of
cut to reduce pushing effort and to keep
from over load ing the engine and leaving
clumps of mulched grass. For ex tremely
heavy grass, reduce your width of cut
by overlapping previously cut path and
mow slowly.
• Certain types of grass and grass
con di tions may re quire that an area be
mulched a second time to com pletely
hide the clip pings. When doing a sec-
ond cut, mow across (perpendicular) to
the fi rst cut path.
• Change your cutting pattern from week
to week. Mow north to south one week
then change to east to west the next
week. This will help prevent matting and
graining of the lawn.
MOWING TIPS
CAUTION: Do not use de-thatcher
blade attachments on your mower. Such
attachments are hazardous, will damage
your mower and could void your warranty.
• Under certain conditions, such as very
tall grass, it may be nec es sary to raise
the height of cut to reduce pushing
effort and to keep from overloading the
engine and leaving clumps of grass clip-
pings. It may also be necessary to re-
duce ground speed and/or run the lawn
mower over the area a sec ond time.
• For extremely heavy cutting, re duce the
width of cut by over lap ping previously
cut path and mow slowly.
• For better grass bagging and most cut-
ting conditions, the engine speed should
be set in the FAST po si tion.
• Pores in cloth grass catchers can be-
come fi lled with dirt and dust with use
and catchers will collect less grass. To
prevent this, reg u lar ly hose catcher off
with water and let dry before using.
• Keep top of engine around starter clear
and clean of grass clippings and chaff.
This will help engine air fl ow and extend
engine life.
MAX 1/3
39
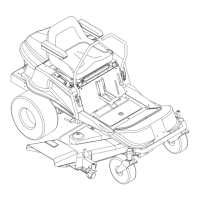
NOTE: All component dimensions given in U.S. inches. 1 inch = 25.4 mm.
IMPORTANT: Use only Original Equipment Manufacturer (O.E.M.) replacement parts. Failure to do so could be hazardous, damage your lawn mower and void your warranty.
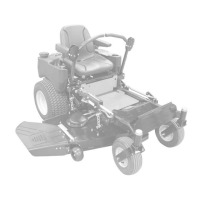
ARIENS ROTARY LAWN MOWER - - MODEL NUMBER 961469 (MFG. I.D. NO. 96142011400)
32 /atch, Mulcher Door
33 0ulcher Door
34 %racket, Grassbag
35 .it, Wheel Adjuster, Rear, RH
36 +inge Bracket Assembly
38 'ischarge Defl ector
39 +andle Bracket, LH
40 +andle Bracket, RH
41 %olt, Engine
42 6pring, Torsion
43 1ut, Hex, Nylock
44 .it, Lawn Mower Housing
45 5od, Hinge
46 %lade Adapter / Pulley
47 %lade, 22"
48 :asher, Hardened
49 :asher, Helical
50 6crew, Machine, Hex Head
3/8-24 x 1-3/8 Grade 8
51 )ront Baffl e
52 'ecal, Danger
53 6crew, Semi-Gimlett Point
1/4-20 x 1/2
KEY PART
NO. NO. DESCRIPTION
1 21548464 Upper Handle
2 21548429 Cable, Engine Zone Control
3 %racket, Upstop
4 *uide, Cable
6 +andle Knob
7 6crew #10-16 x 5/8
8 &ontrol Bar
9 5ear Door Assembly
11 +airpin, Door/Handle Pivot
13 3lug, Handle Bar
17 5ear Baffl e
18 .
eps Locknut 1/4-20
19 5ope Guide
20 5ear Skirt
21 6pring, Rear Door, LH, Black
22 6crew, Panhead, Torx #20
24 6pring, Rear Door, RH, Grey
25 1ut, Hex, Flanged
26 6crew, Rear Door/Handle Pivot
27 :heel & Tire Assembly, Rear
28 %olt, Carriage 5/16-18 x 5/8
31 6elector Knob
KEY PART
NO. NO. DESCRIPTION
55 1ut, Hex
56 6crew, Hex Washer Head
#13 x 3/4
57 1ut, Hex
58 %ar, Lower Handle
59 +andle Bolt
62 %elt Retainer
64 - - - Engine, Honda, Model
Number GCV190-LAS3A
(For engine service
and replacement parts,
call Honda Engines
at 1-800-426-7701)
68 .it, Wheel Adjust, Rear, LH
83 6crew
84 )astener, Push
85 0ounting Bracket,
Rear Skirt
96 &lip, Cable
- - 2wner’s Manual,
English / Spanish
- - 2wner’s Manual, French
KEY PART
NO. NO. DESCRIPTION
 Loading...