12
LAWN MOWER
Always observe safety rules when per-
form ing any main te nance.
TIRES
• Keep tires free of gasoline, oil, or insect
control chemi cals which can harm rub-
ber.
• Avoid stumps, stones, deep ruts, sharp
objects and other hazards that may
cause tire damage.
DRIVE WHEELS
Check front drive wheels each time be fore
you mow to be sure they move freely.
The wheels not turning freely means trash,
grass cuttings, etc. are in the drive wheel
area and must be cleaned to free drive
wheels.
If necessary to clean the drive wheels, be
sure to clean both front wheels.
1. Remove hubcaps, locknuts & washers.
2. Remove wheels from wheel ad just ers.
3. Remove any trash or grass cuttings
from inside the dust cover, pinion and/
or drive wheel gear teeth.
4. Put wheels back in place.
NOTE: If after cleaning, the drive wheels
do not turn freely, contact a qualifi ed
service center.
BLADE CARE
For best results, mower blade must be
kept sharp. Re place a bent or dam aged
blade.
CAUTION: Use only a replacement
blade approved by the manufacturer of
your mower
. Using a blade not approved
by the manufacturer of your mower is haz-
ardous, could damage your mower and
void your warranty.
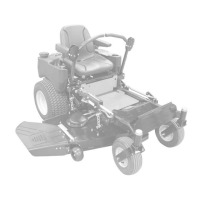
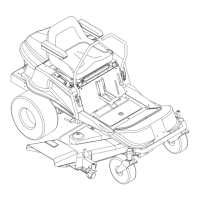
TO REMOVE BLADE
1.
Disconnect spark plug wire from spark
plug and place wire where it cannot
come in contact with plug.
2. Turn lawn mower on its side. Make
sure air fi
lter and carburetor are up.
3. Use a wood block between blade and
mower hous ing to prevent blade from
turning when re mov ing blade bolt.
NOTE: Protect your hands with gloves
and/or wrap blade with heavy cloth.
4. Remove blade bolt by turning counter-
clockwise.
5. Remove blade and attaching hard-
ware (bolt, lock wash er and hardened
wash er).
NOTE: Remove the blade adapter and
check the key inside hub of blade adapter.
The key must be in good condition to work
properly. Replace adapter if damaged.
TO REPLACE BLADE
1. Position the blade adapter on the en-
gine crank shaft. Be sure key in adapter
and crankshaft keyway are aligned.
2. Position blade on the blade adapter.
IMPORTANT: To ensure proper as sem bly,
center hole in blade must align with star
on blade adapter.
3. Be sure the trailing edge of blade (op-
posite sharp edge) is up toward the
engine.
4. Install the blade bolt with the lock
washer and hardened washer into
blade adapter and crankshaft.
5. Use block of wood between blade and
lawn mower housing and tighten the
blade bolt, turning clockwise.
• The recommended tightening torque is
35–40 ft. lbs.
IMPORTANT: Blade bolt is heat treated.
If bolt needs replacing, replace only with
approved bolt shown in the Repair Parts
section of this manual.
TO SHARPEN BLADE
NOTE: We do not recommend sharp en-
ing blade - but if you do, be sure the blade
is balanced. An un bal anced blade will
cause eventual damage to lawn mower or
engine.
• The blade can be sharp ened with a fi le
or on a grinding wheel. Do not attempt
to sharpen while on the mower.
• To check blade balance, you will need a
5/8" diameter steel bolt, pin, or a cone
balancer. (When using a cone bal anc er,
follow the in struc tions supplied with
bal anc er.)
NOTE: Do not use a nail for balancing
blade. The lobes of the center hole may
appear to be centered, but are not.
Blade
bolt
Crankshaft
keyway
Hardened
washer
Lockwasher
Blade adapter Key
Blade
Trailing edge
Crankshaft
Belt
retainer
37
Vibración 1. Cuchilla desgastada, doblada 1. Cambie la cuchilla. Apriete el
excesiva o suelta. perno de la cuchilla.
2. Cigueñal del motor doblado. 2. Póngase en contacto con su centro
de servicio cualifi cado.
Cordón 1. El freno del volante del motor 1. Presione la barra de control
arrancador está aplicado cuando se hacia el mango superior antes
difícil de tirar suelta la barra de control. de tirar el cordón arrancador.
2. Cigueñal del motor doblado. 2. Póngase en contacto con su centro
de servicio cualifi cado.
3. Adaptador de la cuchilla quebrado. 3. Cambie el adaptador de la cuchilla.
4. La cuchilla se arrastra en 4. Mueva la segadora a un lugar
el césped. en donde el césped ha sido
cortado o a una superfi cie fi rme
para hacer arrancar el motor.
Recogedor de 1. Altura de corte demasiado baja. 1. Eleve la altura de corte.
césped no se 2. Levantamiento de la cuchilla 2. Cambie las cuchillas.
llena (si viene desgastado.
equipado) 3. Recogedor sin ventilación de aire. 3. Limpie el recogedor de césped.
Difícil de 1. El césped está demasiado alto o la 1. Eleve la altura de corte.
empujar altura de la rueda demasiado baja.
2. Parte trasera de la 2. Eleve la parte trasera de la caja de
caja/cuchilla de la segadora la segadora (1) un lugar más alto.
arrastrándose en el césped.
3. Recogedor de césped 3. Vacíe el recogedor de césped.
demasiado lleno.
4. Posición de la altura del mango 4. Ajuste la altura del mango de
no adecuada para usted. modo que le acomode.
Pérdida de 1. Desgaste de la correa. 1. Re vise/cambie correa de impulsión.
impulsión 2. La correa está fuera de la polea. 2. Revise/vuelva a instalar la
o retardase 3. Cable de la impulsión usado o roto. 3. Cambie el cable de la impulsión.
de la 4. El sistema de control del 4. Ajuste el control del mecanismo
velocidad mecanismo impulsor “suelto”. impulsor.
PROBLEMA CAUSA CORRECCIÓN
SOLUCIÓN DE PROBLEMAS - Vea la sección apropiada en el manual amenos que
esté dirigido a un centro de servico cualifi cado.
 Loading...