Danger of damage originating from other causes
• Do not use the appliance in closed environments and in the presence of fumes
given off by oil-based paints, solvents or waterproong agents, or by ammable
power or other toxic or explosive fumes.
• When using on stairs, use extra caution.
• Fill up the tank with water before starting up the appliance. Be sure to unplug the
appliance before pouring water into the tank.
• Turn on the appliance only when it is in working position.
• Never leave the appliance unattended when it is connected to the power supply.
• When you have to leave for even a short period of time, always place the appli-
ance on its accessory for carpet cleaning (O). Turn off the appliance and always
unplug the electric power cord.
• Store indoors in a cool, dry area.
-
ENCE.
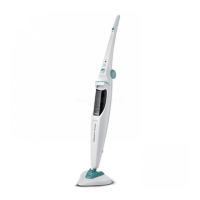
DESCRIPTION OF THE APPLIANCE (FIG.1)
A - Grip
B - Steam dispensing button
C - Handle
D - ON indicator light
E - Cord storage hook
F - Steam adjusting dial
G - Water tank
H - Filter
I - Motor body
L - Steam head
M - Floor washable cloth
N - Measuring cup
O - Attachment for carpet cleaning
P - Handle release button
Q - Steam discharge nozzle
R - Cloth xing Velcro
ASSEMBLING THE APPLIANCE
Proceed as follows after removing the appliance from the box:
Assemble the motor body to the steam head (Fig. 2). Tighten the screw supplied to lock the components (Fig. 3).
Warning!
Check the tightening of the screw from time to time.
Press the handle release button (P). Lift the handle until it is aligned with the motor body (Fig. 4-5).
INSTRUCTIONS FOR USE
Totally unwind the power cord by releasing it from apposite cord storage hooks (E). Remove the water tank (G) by slightly
pressing it downwards, then tilt and remove it (Fig. 6). Turn the tank upside-down and remove the cap (Fig. 7). Fill the tank
up to the MAX mark using the supplied measuring cup (N) - Fig. 8. Screw the cap back on without using too much force.
Warning!
NEVER ll the tank beyond the MAX level. If the tap water is particularly hard (higher than 20°f), use a mixture of
50% tap water and 50% demineralised water.