EasyManua.ls Logo

Assured Wireless AW12 - User Manual

Assured Wireless AW12
3 pages
Print Icon
To Next Page IconTo Next Page
Loading...
Copyright ©2021 Assured Wireless Corporation. All rights reserved. All information provided here is subject to change
without notice. Assured Wireless and the Assured Wireless logo are trademarks of Assured Wireless Corporation.
assured-wireless.com
aw12vehqsg211
VEHICLE INSTALLATION
This quick start guide gives the basic steps for installing the AW12 MegaRange unit in vehicles.
Note. The antennas can be purchased as separate units or as a single four-in-one unit. See our
recommendations for compatible antennas at assured-wireless.com/products/antennas.
1 Locate the SIM card slot on the top of the AW12 modem.
2 Use a small Phillips head screwdriver to remove the screw
on the SIM slot door.
3 Use the depression on the upper left corner of the SIM
slot door to pry the door off. You should now see the top
of the silver SIM tray.
4 Insert the inclued SIM extractor tool into the hole on the
SIM tray; the tray should pop partway out.
5 Remove the SIM tray completely.
6 Insert your activated FirstNet SIM card into the tray. Note
that the tray is notched, so the card can only be inserted
the correct way.
7 Re-insert the SIM tray into its slot.
8 Replace the SIM slot door and replace the screw, being
careful not to overtighten.
1
Ensure you have all the necessary equipment
2
Insert SIM card
AW12 Modem Vehicle Installation Kit
QUICK START GUIDE
The following should have been included in the vehicle installation kit:
AW12-DE modem
AW12-PC-EI USB to Ethernet converter
Vehicle mounting bracket
(2) M6 screws and (2) M6 lock washers
(4) M3 screws and (4) M3 lock washers
SIM extractor tool
Cat5e Ethernet cable
USB screwtight cable
DC power cable (4-pin Molex)
DC power cable (modem to Ethernet converter)
AC adapter
You will also need the following (not included in your kit):
GPS active/passive antenna
(2) LTE antennas
HPUE (B14) antenna
Activated FirstNet 3FF micro SIM card
Phillips #2
screwdriver
Phillips #00 screwdriver
Align notch and
insert in tray

Other manuals for Assured Wireless AW12

Question and Answer IconNeed help?

Do you have a question about the Assured Wireless AW12 and is the answer not in the manual?

Summary

Ensure you have all the necessary equipment

Insert SIM card

Mount modem and Ethernet converter on bracket

Connect power and communication between modules

Mount bracket in vehicle

Install antenna(s)

Connect power and Ethernet cables

Overview

The Assured Wireless AW12 Modem Vehicle Installation Kit provides a comprehensive solution for integrating the AW12 MegaRange unit into vehicles, ensuring robust connectivity. This kit is designed for easy installation and includes all necessary components for mounting the modem and its associated converter, connecting power, and installing antennas.

Function Description

The AW12 Modem Vehicle Installation Kit facilitates the installation of the AW12 MegaRange modem, which is a critical component for establishing reliable wireless communication in a vehicle. The modem, in conjunction with the USB to Ethernet converter, enables data transmission and reception, likely for applications requiring high-speed and secure connectivity, such as those used by first responders or in commercial fleet management. The kit ensures that the modem is securely mounted, properly powered, and connected to external antennas for optimal signal strength. It supports various antenna types, including LTE, HPUE (B14), and GPS/GNSS, allowing for diverse communication and location-based services. The system is designed to integrate with a vehicle's power source, providing continuous operation.

Important Technical Specifications

The kit includes several key hardware components:

  • AW12-DE modem: The core communication device.
  • AW12-PC-EI USB to Ethernet converter: This device bridges the USB output from the modem to an Ethernet connection, enabling network integration.
  • Vehicle mounting bracket: A custom bracket designed to securely hold both the modem and the USB to Ethernet converter within a vehicle.
  • Mounting hardware:
    • (2) M6 screws and (2) M6 lock washers for mounting the modem.
    • (4) M3 screws and (4) M3 lock washers for mounting the USB to Ethernet converter.
  • SIM extractor tool: Essential for installing and removing the SIM card.

Additional components required but not included in the kit highlight the system's capabilities:

  • Antennas:
    • GPS active/passive antenna: For location tracking.
    • (2) LTE antennas: For cellular data connectivity (LTE-1 and LTE-2).
    • HPUE (B14) antenna: For high-power user equipment on Band 14, likely for critical communications.
    • Note: Antennas can be purchased separately or as a single four-in-one unit.
  • Cabling:
    • Cat5e Ethernet cable: For connecting the converter to a router.
    • USB screwtight cable: Connects the modem to the USB to Ethernet converter.
    • DC power cable (4-pin Molex): For powering the system from the vehicle.
    • DC power cable (modem to Ethernet converter): A short cable for internal power distribution between the modem and converter.
  • Power source: An AC adapter is provided for AC power sources, while the system is primarily designed for vehicle DC power.
  • SIM card: An activated FirstNet 3FF micro SIM card is required for cellular service, indicating a focus on public safety and critical communications.
  • Tools: Phillips #2 screwdriver and Phillips #00 screwdriver are needed for installation.

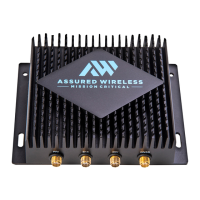
The modem features specific RF jacks for antenna connections:

  • PRI port: Connects to the LTE-1 cable.
  • B14 port: Connects to the B14 cable.
  • DIV port: Connects to the LTE-2 cable.
  • GNSS port: Connects to the GPS/GNSS cable.

The USB to Ethernet converter has a PoE+ RJ-45 port for Ethernet connectivity and a PWR IN port for DC power.

Usage Features

The AW12 Modem Vehicle Installation Kit is designed for straightforward deployment in a vehicle.

  • Integrated Mounting: The included vehicle mounting bracket allows for a compact and secure installation of both the modem and the USB to Ethernet converter. The design ensures that the SIM door and USB port are oriented correctly for accessibility and cable management.
  • Modular Connectivity: The system uses distinct cables for power and data, simplifying troubleshooting and replacement. The USB-C cable with thumb screws ensures a secure connection between the modem and the converter.
  • Antenna Flexibility: The support for multiple antenna types (GPS, LTE, HPUE) allows for a tailored communication setup based on specific operational needs. The recommendation for at least one meter of separation between antennas on the vehicle roof aims to optimize signal performance and minimize interference.
  • Power Options: The kit supports both vehicle DC power and includes an AC adapter for alternative power sources, offering versatility in deployment scenarios.
  • FirstNet Compatibility: The requirement for an activated FirstNet 3FF micro SIM card highlights its intended use in critical communication networks, providing reliable and prioritized service.

Maintenance Features

While the manual primarily focuses on installation, several aspects contribute to ease of maintenance:

  • Accessible SIM Card Slot: The SIM card slot is located on the top of the AW12 modem, making it relatively easy to access for SIM card insertion or replacement using the provided SIM extractor tool and a small Phillips head screwdriver. The notched design of the SIM tray ensures correct card orientation, preventing damage.
  • Secure Connections: The use of thumb screws for the USB-C cable and twisting connectors for power and antenna cables ensures secure connections that are less prone to accidental dislodgement, reducing the need for frequent re-connections.
  • Clear Labeling: Ports on the modem and converter are clearly labeled (e.g., USB, Modem, PWR IN, PWR OUT, PoE+, WAN, PRI, B14, DIV, GNSS), simplifying initial setup and future troubleshooting.
  • Modular Design: The separate components (modem, converter, cables, antennas) allow for individual replacement if a specific part fails, rather than requiring an entire system overhaul.
  • Documentation and Support: The quick start guide provides clear, step-by-step instructions, and the reference to "assured-wireless.com/products/antennas" indicates ongoing support and recommendations for compatible accessories, which is crucial for long-term system health. The copyright information and version number (aw12vehqsg211) suggest a commitment to updated documentation.

Assured Wireless AW12 Specifications

General IconGeneral
BrandAssured Wireless
ModelAW12
CategoryModem
LanguageEnglish

Related product manuals