This document serves as a Quick Installation Guide for ASUSTOR NAS devices, specifically models FS6706T and FS6712X. It provides comprehensive instructions for setting up, configuring, and maintaining these network-attached storage systems, ensuring users can effectively deploy and manage their data. The guide covers various aspects from initial hardware installation to software configuration and troubleshooting, making it an essential resource for both new and experienced users.
Function Description
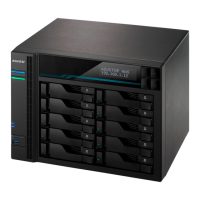
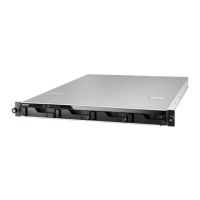
The ASUSTOR FS6706T and FS6712X are network-attached storage (NAS) devices designed to provide centralized data storage, sharing, and management capabilities. These devices function as a personal cloud, allowing users to store, access, and share files from anywhere with an internet connection. They support multiple M.2 SSDs, offering high-speed storage solutions suitable for demanding applications and large data sets. The NAS acts as a server, enabling various services such as file sharing, backup, multimedia streaming, and surveillance. It is built to be a reliable and secure hub for digital assets, catering to both home and small business environments. The core function revolves around providing a robust platform for data integrity and accessibility, ensuring that user data is protected and readily available. The devices are designed to operate continuously, providing 24/7 access to stored information. They integrate seamlessly into existing network infrastructures, offering a versatile solution for modern data management needs.
Usage Features
The ASUSTOR FS6706T and FS6712X offer a rich set of usage features that enhance user experience and data management efficiency.
Hardware Installation:
- M.2 SSD Installation: The guide details the process of installing M.2 SSDs into the NAS. For FS6706T and FS6712X, SSDs are installed sequentially into slots 1-6. For FS6712X only, additional SSDs can be installed into slots 7-12. This involves using a Phillips head screwdriver to remove the bottom cover, aligning the M-key M.2 SSD with the M-key notch of the slot at a 45-degree angle, pushing the SSD down until it is flush with the motherboard, and securing it with the SSD locking lever. If heatsinks are needed, they should be installed now. The cover is then returned to its original position and secured with screws.
- Securing the Power Cord: To prevent accidental disconnection, the power cord can be secured using a provided cable tie. This involves taking the cord bracket out of the accessories box, inserting the power cord cable tie into the cable tie socket, and fastening the cable tie onto the AC adapter cord. The buckle is then tightened in the direction of the arrow.
- Connecting and Powering on the NAS: Users connect the NAS to its power supply, then to a router, switch, or hub using an Ethernet cable. The power button is pressed to turn on the device. The guide explains the LED indicator behavior: a blue power indicator light means the NAS is powered on, a green system indicator light flashes when booting up and stops flashing when the NAS has successfully booted up.
Software Installation and Configuration:
- Download Center Installation (Windows Users): ASUSTOR Control Center (ACC) is used to scan the network for ASUSTOR NAS devices. Once detected, users can select their NAS and follow the installation wizard's instructions to complete the configuration process.
- Mac Users: Similar to Windows, ASUSTOR Control Center is used to scan the network for NAS devices. Users select their NAS from the list and follow the installation wizard's instructions.
- Web Installation: If the NAS's current IP address is known, users can open a web browser and enter the IP address (e.g., http://192.168.1.168:8000) to begin initialization. The installation wizard then guides them through the configuration process.
- Installation Using a Mobile Device: The "AiMaster" app can be downloaded from Google Play or the Apple App Store. After installation, users ensure their mobile device is connected to the same local network as the NAS. They then open AiMaster, select the icon from the toolbar, and choose "Auto Discovery" to scan for the NAS. Once found, they select their NAS from the list and tap "Start initialization" to begin the installation process.
Upgrading System Memory:
- Notes and Precautions: The guide emphasizes several precautions for memory upgrades, including checking product warranty, avoiding damage to memory modules, ensuring proper handling to prevent static discharge, and using a screwdriver of the correct size. It also warns against inserting a memory module into the wrong direction or forcing it into the slot.
- Removing the Cover: Before upgrading memory, the NAS must be shut down from the ADM User Menu. All cables and devices connected to the NAS, including the power cord, must be disconnected. A screwdriver is used to loosen three screws on the rear of the NAS, and the cover is gripped from both sides and gently pushed back to remove it.
- Installing Memory: RAM slots are located on the motherboard. Users insert a DIMM into an empty slot at a 45-degree angle and align the notches. The DIMM is then gently pushed down until both latches click into place, ensuring the RAM is flush with the motherboard.
- Replacing the Cover: After memory installation, the cover is replaced and tightened with the screws. All cables are reconnected, and the NAS is powered on.
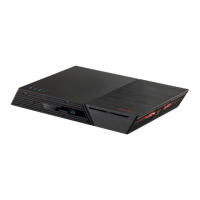
Rear Panel Features:
- FS6706T: Features include K-Lock, S/PDIF, USB 2.0 Ports (x2), 2.5G RJ45 Ports (x4), HDMI Port, USB 3.2 Gen 2 Port (x2), Power cord cable tie socket, Reset Button, and DC Input.
- FS6712X: Features include K-Lock, S/PDIF, USB 2.0 Ports (x2), 10G RJ45 Ports (x2), HDMI Port, USB 3.2 Gen 2 Port (x2), Power cord cable tie socket, Reset Button, and DC Input.
Maintenance Features
The ASUSTOR FS6706T and FS6712X are designed with several maintenance features and guidelines to ensure long-term reliability and optimal performance.
Safety Precautions:
- Electrical Safety: Users are advised to unplug the product from the power source before cleaning. Only the bundled power adapter should be used, and users should ensure they plug the power adapter into the correct power input rating.
- Operation Safety: The product should be placed on a flat and stable surface in an environment with an ambient temperature between 0°C and 40°C. Air vents should not be blocked to ensure proper ventilation. Users should avoid inserting any object or spilling liquid into the air vents. If technical problems arise, a qualified service technician or retailer should be contacted.
- Disposal: The product should not be thrown in municipal waste. The crossed-out wheeled bin symbol indicates that the product (electrical and electronic equipment) should not be placed in municipal waste. Local regulations for disposal of electronic products should be checked.
LED Indicators:
- The guide provides a detailed table explaining the meaning of the LED indicators for Power, System Status, Network, and Hard Disk.
- Power LED: Blue (steadily lit) indicates power on; Blue (flashing) indicates waking from sleep mode (S3); Orange (steadily lit) indicates sleep mode (S3) (FS6712X does not support S3 sleep); Orange (flashes every 10 seconds) indicates LED night mode.
- System Status LED: Green (flashing) indicates powering on; Green (steadily lit) indicates system ready.
- Network LED: Blue (steadily lit) indicates 1G/100M network port connected (FS6706T) or 5G/2.5G/1G/100M network port connected (FS6712X); Purple (steadily lit) indicates 2.5G network port connected (FS6706T) or 10G network port connected (FS6712X).
- Hard Disk LED: Green (steadily lit) indicates hard disk ready; Green (flashing) indicates data access in progress; Red (flashes every 10 seconds) indicates hibernation mode; Red (steadily lit) indicates hard disk abnormality.
Optional Step: Installing M.2 SSD Heatsinks (Sold Separately):
- The guide mentions that heatsinks can be purchased from the ASUSTOR Accessories Store. After installing M.2 drives, users remove protective film from the heatsink and align it with the M.2 heatsink screw holes on the motherboard, then fasten the screws. Up to three heatsinks can be installed per side.
Shutting Down Your NAS:
- To confirm the function settings for the power button, users navigate to [Settings] > [Hardware] > [Power] in ADM. This setting allows customization of what happens when the power button is held down for 1.5 seconds.
- To shut down the NAS, hold down the power button for 1.5 seconds. A "beep" from the system buzzer will indicate that the NAS will either shut down or enter sleep mode, depending on the configuration.
Troubleshooting:
- Cannot detect NAS using ASUSTOR Control Center:
- Check network connection.
- Ensure the computer and NAS are part of the same local area network.
- Check if the network LED indicator is lit. If not, try connecting your Ethernet cable to another network port or using a different Ethernet cable.
- Disable any firewalls that may be running on your computer. Then scan for your NAS again using ASUSTOR Control Center.
- If still unable to detect the NAS, connect your NAS to your computer using the provided RJ-45 network cable and change your computer's IP settings. This involves navigating to Control Panel > Network and Sharing Center > Change adapter settings, right-clicking on Local Area Connection, selecting Properties, then selecting Internet Protocol Version 4 (TCP/IPv4), and clicking Properties. Users then select "Use the following IP address" and set the IP address to 169.254.1.10 and the Subnet mask to 255.255.0.0. After this, open ASUSTOR Control Center to scan for the NAS.
- For further assistance, users can contact ASUSTOR Customer Service or browse the ASUSTOR Knowledgebase.