EasyManua.ls Logo

ATAGO PAL-pH - User Manual

ATAGO PAL-pH
2 pages
Print Icon
To Next Page IconTo Next Page
Loading...
Important: Please Read and Follow Instructions Carefully Before Initial Use
  Place plenty of tap water and leave it for a while.
※Dry electrodes will result in abnormal measurement values.
Calibration points  -1- 
Calibration can be done at 3 points (pH 4.01, pH 6.86, and pH 9.18).
If the sample is above pH 6.9, calibration can be done at 2 points (pH 6.86 and pH 9.18).
If the sample is less than pH 6.9, calibration can be done at 2 points (pH 4.01 and pH 6.86).
Press the CAL button to perform calibration for either pH 4.01, pH 6.86, or pH 9.18.
*If the power is not turned on, press the START button to turn on the power, then perform the following procedure.
Calibration points  -2- 
Calibration can be done at 3 points (pH 4.01, pH 7.00, and pH 10.01).
If the sample is above pH 7.0, calibration can be done at 2 points (pH 7.00 and pH 10.01).
If the sample is less than pH 7.0, calibration can be done at 2 points (pH 4.01 and pH 7.00).
Press the CAL button to perform calibration for either pH 4.01, pH 7.00, or pH 10.01.
*If the power is not turned on, press the START button to turn on the power, then perform the following procedure.
*Turning excessively may
cause malfunction.
Open Close
O
P
E
N
C
L
O
S
E
O
P
E
N
C
L
O
S
E
【Caution】
Do not scratch the electrode.
The instrument is water-resistant, not waterproof, and
should not be submerged.
CAL
Place plenty of tap water
and leave it for a while.
◇The insufficient amount of sample will result
in abnormal measurement or calibration.
O
P
E
N
C
L
O
S
E
O
P
E
N
C
L
O
S
E
Press to set date, time,
and delete data history.
START button & CAL button
tap water
At least 0.6mL.
1.Wipe off the sample. 2.Apply tap water. Wipe off the tap water. 
(Remove the sample (Repeat several times.)
with a plastic pipette.)  
1.Wipe off the sample. 2.Rinse with tap water. 3.Wipe off the tap water. 
(Remove the sample
with a plastic pipette.) 
Or
PAL-H
Cat.No. 4311
【Caution】
◇Perform calibration before initial use and at least once a month to maintain precision and accuracy.
◇Measure a standard calibration solution. When the measurement value falls outside of the expected range, perform
calibration.
◇When the time lapsed since last measurement is more than 2 weeks, it is recommended to calibrate the instrument.
◇If the ambient temperature changes during the daily work with this instrument, it needs the calibration again.
【Caution】
◇Do not splash water above 50℃. The plastic may warp, which may compromise the water resistance.
・When measuring hot samples, place only the necessary amount and do not let it overflow from the sample stage well.
When hot water is necessary to clean off hardened samples, use water-soaked gauze around the sample stage and keep
hot water away from the body case.
◇I
n rare cases, a measurement value may be displayed even if there is not sample placed on the electrode section. In such
instances, simply place some sample on the electrode section and press the START button. Measurements will be taken normally.
When measuring samples such as strong acids and high alkaline, take a quick measurement and rinse off any remaining
sample with tap water.
<LCD Auto Shut-off>
The instrument will turn itself off after 5 minutes of inactivity. To manually turn it off, hold down the START button for more
than 2 seconds.
The following messages alert the user when an operation has failed.
L o
The battery is low.
Display will turn off after 10 seconds.
L L L
The sample measured is outside the
measurement range.
The START button was pressed with nothing
on the electrode section.
H H H
The sample measured is outside the
measurement range.
The START button was pressed with nothing
on the electrode section.
A A A
The CAL button was pressed with nothing
on the electrode section.
E E E
The START button was pressed with nothing
on the electrode section.
The detection temperature was over 45℃. A
pH value was displayed (accuracy is not
guaranteed).
The detection temperature was less than
5℃. A pH value was displayed (accuracy is
not guaranteed).
H H H
LLL
Digital Hand-held "Pocket" pH Meter
R
ATAGO instruments are rigorously inspected to ensure each unit meets the highest standards of quality assurance.
Safety Instructions
Read and follow all safety instructions before operating the instrument. Failure to comply with the following instructions may
result in personal injury or property damage.
WARNING
◇Ensure safety when handling hazardous materials. Observe precautionary measures and use protective equipment, Be
aware of the hazards of such chemicals and emergency response guidelines.
◇ATAGO may not be held liable for any injury or damage arising in connection with handling of hazardous materials during
the use of the instrument.
◇Do not drop the instrument or subject it to strong physical shock.
◇Do not attempt to repair, modify, or disassemble the instrument.
Thank you for purchasing the instrument. Carefully read and follow all instructions. Keep this manual for future reference.
A small amount of solution may leak from the reference electrode. This is normal and does not affect the unit's performance.
〈International Protection Classification IP65〉
◇The instrument is water-resistant, not waterproof, and should not be submerged.
〈Chemical Resistance of Body Case〉
◇The body case is made of PC. Do not expose it to water vapor or solvents. See the list of “Solvents Harmful to Body
Case.”
◇Do not use metal tools, such as a spoon, as they may scratch
the glass electrode, resulting in erroneous measurements.
◇Do not measure organic solvents, oils, adhesives, cement,
alcohol, surfactants,, polymer solvents or hydrogen flouride.
◇Do not use water above 50℃ to rinse the instrument.
◇Only use the specified battery type. Observe proper polarities,
properly aligning the anodes and cathodes.
◇Store the instrument away from direct sunlight/heat sources
and excessive amounts of dust/debris.
◇Do not expose the instrument to a rapid change in ambient
temperature.
◇Do not subject the instrument to strong vibration.
◇Do not subject the instrument to extreme cold temperature.
◇Do not place the instrument under anything heavy.
◇Loosen the battery compartment cover for air transportation.
CAUTION
◇Carefully read this manual to have basic knowledge of
the function of each component.
◇ATAGO is not liable for any loss and damage caused by
the measurement and use of this instrument.
◇ATAGO shall not be held responsible for any or all
damages that may result from using the instrument for
those other than its intended purpose (measurement of
pH level of a liquid sample).
◇If the standard solution for calibration comes in contact
with hands or skin, immediately rinse with plenty of
water.
The glass electrode is fragile; be careful not to damage
it. Glass shards may cause injury.
【Caution】
Please remove the tape in the battery compartment before first use.
Fasten the battery compartment cover tightly to prevent water ingress or poor connection,
which will cause erroneous measurements. Push the cover in firmly and turn.
When the O-ring on the cover is dirty or damaged, the water resistance may be compromised.
When the battery icon indicates the low power level ( ), replace both batteries with a
brand new set of AAA alkaline batteries (1.5V).
Static images may occasionally appear on LCD. Such retained pixel charges do not indicate a
faulty display, consume the battery power, or affect the instrument’s performance in any way.
Check the expiration dates on batteries before purchase.
◇Calibrate the instrument after the batteries are replaced.
O-ring
1.
Insert a coin in the
groove on the battery
compartment cover. Turn
the coin counterclockwise
to remove the cover.
2.
Insert batteries,
observing the correct
polarity.
3.
Align the cover and push
it down.
4.
Close the battery
compartment cover by
pushing the cover in with a
coin in the groove and
turning it clockwise until it
stops.
Groove
Measurement results and remaining
battery charge are displayed.
Press to perform calibration.
Reference electrode
Glass electrode
Sample stage
CAL button
Lanyard hole
LCD
START button (Power button)
Place and remove batteries from here.
Battery compartment
Apply samples on the electrode in
the center of the sample stage.
Press to take measurements and hold
down to turn off the display.
Instruction Manual
Parts
Contents
Introduction
Measurement
Calibration
Replacing the Batteries
Cleaning
Error Messages
Main unit…1  Instruction Manual (this book)…1 Calibration Report
…1   AAA batteries…2
Standard solution for calibration……… pH4.01…1 pH6.86…1 pH9.18…1 PAL Silicone Cover…1
For samples containing oils or fats:
Clean oily residues on the electrode section with
ethyl alcohol. Then rinse the electrode section with
tap water throughly.
Ethyl
alcohol
3. After the
display flashes
"---",the
measurement
value is displayed.
2. Press the
START button.
*If the power is not turned on, press the START button to turn on the power, then perform the following procedure.
Repeat until measurement
values are stabilized.
1. Place enough sample to
cover the entire electrode
section.
At least 0.6mL of sample
<When measuring with higher precision>
b. Place the sample so
as to cover the entire
electrode section again.
a. Wipe away the
sample.
At least 0.6mL of sample
Perform the following procedure (a) and
(b) before step 2.
At least 0.6mL of standard
solution for calibration.
1. Place enough
standard calibration
solution to cover the
entire electrode
section.
2. Press the
CAL button.
3.
After the display flashes "---",the
standard calibration solution value will
flash approx 10 times, then change to
a fixed display of the value.
Calibrate at another point.
Flash   Light up
(The displayed value is an example.
Calibration is complete
Perform the following procedure (a) and
(b) before step 2.
<When performing more accurate calibration>
b. Place the standard
solution for calibration so as
to cover the entire electrode
section again and leave it for
approx. 30 seconds.
a. Wipe away the
standard calibration
solution.
At least 0.6mL of standard
solution for calibration.
Calibration and Measurement Guidelines
◇When the electrodes are dry after long
period of not being used
◇Do not damage the electrodes.
Do not use metal tools.
Be careful not to
scratch the electrodes.
Tap water
Additional refills of standard solutions for calibration can be purchased from ATAGO (sold separately).
Contact ATAGO for recommended standard solutions.
[Part No.]  Standard solution for calibration
RE-99210 pH4.01 (volume: 500mL per bottle)
RE-99211 pH6.86 (volume: 500mL per bottle)
RE-99213 pH9.18 (volume: 500mL per bottle)
RE-99230 10mL pH4.01/pH6.86/pH9.18
[Part No.]  Standard solution for calibration
RE-99210 pH4.01 (volume: 500mL per bottle)
RE-99212 pH7.00 (volume: 500mL per bottle)
RE-99214 pH10.01 (volume: 500mL per bottle)
RE-99231 10mL pH4.01/pH7.00/pH10.01
CAL
CAL
-1-
-1-
6.86
7.00
1. Press and hold the
CAL button for 5 seconds
(while the unit is powered on).
2. Press the START button to Select
a Calibration point.
3. Press the CAL button
to confirm the selection.
-2-
End
4. Calibration.
Calibration points
-1-
4.01 6.86 9.18
Calibration points
-2-
4.01 7.00 10.01
Select the Calibration option, either 1 or 2, according to values of the standards.
Calibration point display
How to Select a Calibration Option
END display
Now you can
proceed to
Calibration.
Initial measurements may fluctuate with hot or cold samples.
Wait for the instrument to acclimate to the sample
temperature, then press the START button. Alternatively,
press the START button multiple times until measurements
become stable.
Access now
4311-E12
In just
-
a
-
minute
1. It requires only 1 minute! Simply by answering questions, warranty period is extended from 1 year
to 2 years.
2.
ATAGO Logger NFC can also be downloaded at the same time.
(The registration page can be accessed from ATAGO website.)
From 1 year to2years
Free Extended Warranty

Other manuals for ATAGO PAL-pH

Question and Answer IconNeed help?

Do you have a question about the ATAGO PAL-pH and is the answer not in the manual?

Summary

How to Select a Calibration Option

Calibration Point Options

Details calibration modes using different standard pH points (pH 4.01, 6.86, 9.18 or 7.00, 10.01).

Calibration and Measurement Guidelines

Electrode Care and Battery Replacement

Advice on electrode handling, cleaning, and replacing the instrument's batteries.

Measurement and Cleaning Procedures

Performing a Measurement and Cleaning

Steps for taking pH measurements and cleaning the instrument after use.

Error Messages and Troubleshooting

Interpreting Error Indicators

Explains common error messages displayed on the LCD and their meanings.

Data Transmission and Storage

Accessing and Storing Data History

How to read and transfer stored measurement data via NFC to devices.

Storage and Maintenance Guidelines

Guidelines for proper instrument storage, environmental conditions, and avoiding harmful solvents.

Repair and Warranty Information

Warranty Conditions and Service

Details on warranty coverage, exclusions, and information on repair services.

Overview

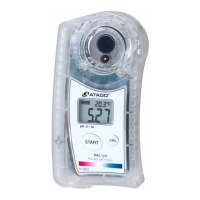
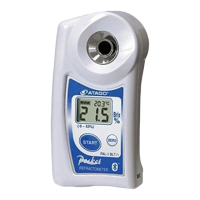
This document describes the ATAGO PAL-pH, a compact and portable pH meter designed for easy and accurate measurement of pH and temperature.

Function Description

The PAL-pH is a handheld digital pH meter that provides quick and precise readings. It features an electrode section for sample placement and a digital display for showing pH and temperature values. The device is equipped with NFC (Near Field Communication) technology, allowing it to store up to 100 measurement data points and transfer them to Android devices, iPhones, or PC-linked USB NFC Reader/Writers. This data history includes pH, temperature, and time stamps, making it easy to track measurements over time. The device also has an automatic temperature compensation range from 10 to 40°C, ensuring accurate pH readings despite temperature fluctuations. Calibration can be performed at three points (pH 6.86, 4.01, 9.18 or 7.00, 4.01, 10.01) to maintain accuracy. The backlight stays on for 30 seconds after any button is pressed, improving visibility in various lighting conditions.

Usage Features

The PAL-pH is designed for straightforward operation. To take a measurement, users simply place a sample (at least 0.6mL) on the electrode section and press the START button. The device will display the pH and temperature readings within approximately 3 seconds.

Calibration is a key feature for maintaining accuracy. The manual outlines a detailed 7-step calibration process for pH 6.86, 4.01, and 9.18 (or 7.00, 4.01, 10.01). This involves placing calibration solutions on the electrode, pressing the START button, and confirming the readings. The device provides visual cues on the display to guide the user through each step, indicating when to add the next solution or when calibration is complete. If a calibration error (AAA) occurs, the user is instructed to clean the electrode and repeat the process.

The device also allows for date and time setting, which is crucial for accurate data history logging. This is done by pressing the START and CAL buttons simultaneously for more than 2 seconds, then using the CAL button to adjust the year, month, day, hour, and minute.

Data history can be accessed by bringing the PAL-pH into contact with an NFC-enabled Android device, iPhone, or a PC-linked USB NFC Reader/Writer. Users need to install a compatible NFC reader app (like "NFC Reader" or "ATAGO Logger (NFC)") on their device. Once connected, the data history, including pH, temperature, and time stamps, can be read out. The device stores up to 100 measurements, overwriting the oldest data when the memory is full. There is also a function to delete all stored data history, which is performed by a specific button sequence involving the START and CAL buttons.

The PAL-pH is designed with safety in mind. It is water-resistant (IP65) and can be rinsed with water. However, it is important to avoid using organic solvents on the plastic body case. The manual includes a comprehensive list of solvents harmful to the plastic body case, such as aqua regia, chromic acid, nitric acid, and various other strong acids, bases, and organic compounds. Users are advised to wear protective gloves and eye protection when handling hazardous materials or performing maintenance.

Maintenance Features

Proper maintenance is essential for the longevity and accuracy of the PAL-pH. The electrode section, which is the most critical part for measurement, requires regular cleaning. After each measurement, users should rinse the electrode section with distilled water or tap water and gently wipe away any excess moisture with a soft tissue. For more thorough cleaning, especially if the electrode is dirty or if an "AAA" (calibration error) message appears, the manual suggests using a soft brush with neutral detergent or a 0.1% hydrochloric acid solution, followed by rinsing with distilled water. If the electrode is still dirty, a diluted household bleach solution (100 times diluted) can be used, followed by rinsing.

For storage, the instrument should be kept in a dry place away from direct sunlight. It is recommended to place distilled water or tap water on the electrode section to prevent it from drying out. The unit should be stored at a stable temperature with minimal fluctuations. Users are explicitly warned against using organic solvents like paint thinner, benzene, or gasoline on the plastic body case, as these can cause damage.

The device is powered by two AAA alkaline batteries. The manual provides instructions for replacing the batteries, emphasizing the importance of using new batteries and ensuring correct polarity. If the device is not used for an extended period, the batteries should be removed to prevent leakage and damage.

The PAL-pH comes with a one-year warranty from the date of purchase. The warranty is void if the instrument shows evidence of disassembly by unauthorized personnel, damage to the electrode section, water damage, misuse, or battery leakage from non-included batteries. Repair services are available for a fee after the warranty expires, and users are advised to have the serial number ready when contacting customer service.

ATAGO PAL-pH Specifications

General IconGeneral
ModelPAL-pH
ManufacturerATAGO
Measurement RangepH 0.00 to 14.00
ResolutionpH 0.01
Sample Volume0.3 mL
Weight100 g
Waterproof RatingIP65
Temperature CompensationAutomatic (ATC)
Battery LifeApprox. 5000 measurements
Dimensions55 x 31 x 109 mm

Related product manuals