Quick reference guide
1
2
3
4
9
8
7
6
5
10
11
13 12
20
18
19
16
17
14
15
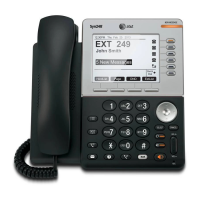
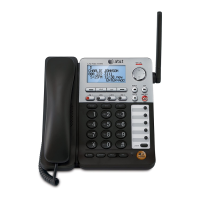
1 — NEW CALL indicator
On when there are new or missed calls.
2 — DIR
Press to view directory information.
3 — CID
Press to view caller ID information.
4 — /REPEATREPEAT
During message playback, press once to
repeat a message, or press twice to play the
previous message.
5 — /SKIP
During message playback, press to skip to
the next message.
6 — /MAILBOX
When in idle mode, press to enter the
general or an assigned mailbox menu.
7 — X/DELETE
Press to delete the message currently
playing.
Press to delete an entry while reviewing the
redial list, directory or call log.
Press to delete a digit or character while
entering numbers or names.
8 — Speed dial keys
Press to review or dial a stored speed dial
number when the deskset is not in use.
9 — LOWER
Press to enter the lower speed dial locations.
10 — SPEAKER
Press to turn on the speakerphone. Press
again to turn it off.
11 — VOL+/VOL-
During a call, press to adjust the
listening volume.
During message playback, press to adjust
the playback volume.
During any other time, press to adjust the
ringer volume.
12 — HEADSET
When a corded headset is connected to
the deskset, press to get a line, answer
a call or hang up. The red indicator is on
when the headset is in use.
13 — MUTE
During a call, press to mute the microphone.
During an incoming call, press to mute
the ringer.
14 — INT
When in idle mode, press to initiate an
intercom call.
15 — PTT
Press to initiate a PTT call.
Press and hold to broadcast your voice to
all extensions.
16 — FLASH
During a call, press to answer an incoming
call when you receive a call waiting alert.
17 — LINE 1-LINE 4 keys
Press to make or answer a call on the
desired line.
18 — Softkeys (2)
Press to select a menu item displayed
above the key.
19 — HOLD
Press to place an outside call on hold.
20 — EXIT
While in a menu, press to cancel an
operation and exit the menu display.
Quick reference guide
1
Navigation keys
While in menus, press DIR or CID to scroll
through the menus, highlight items or to change
settings.
While entering names or numbers, press or
to move the cursor to the left or right.
While playing back messages, press once to
repeat the message, or press twice to hear thetwice to hear the
previous message, or press to skip to the next
message.
Quick reference guide
Main menu
The > symbol highlights a menu item.
Main menu:
Directory
Call log
Ringer setting
Mailbox setup
Deskset setup
COVM
Speed dial setup
Customer support
•
•
•
•
•
•
•
•
>Directory
Call log
Ringer setting
Mailbox setup
Back
Select
L1
L2
L3
L4
1:Deskset 1
3 Missed calls
10:01AM 11/23
Redial
Menu
L1
L2
L3
L4
Using the menus:
Press the Menu softkey to show the first menu
item, Directory.
Press DIR or CID to scroll through
menu items.
Press the Select softkey to select or the Save
softkey to save changes to a highlighted
menu item.
Press the Back softkey to cancel an operation
or back up to the previous menu.
1.
2.
3.
4.
Add and register a deskset
The handset provided with the SynJ SB67118/
SB67138 is already registered as Handset 1.
Additional desksets are assigned numbers in the
order they are registered (Deskset 2 to
Deskset 10). You can register a maximum of 10
desksets/handsets, or 9 desksets/handsets and
one cordless headset.
Before using a new SynJ SB67148 expansion
deskset, you must register it with the SynJ
SB67118/SB67138. Start registration when the
deskset screen shows Press MENU on MAIN
base, select Registration & then Register HS.
Then press Start.
Register the deskset to your SynJ SB67118
telephone base
On the SynJ SB67118 telephone base, press
MENU/ENTER.
Scroll down to Registration and then press
MENU/ENTER.
Press MENU/ENTER again to select Register
HS. The main telephone base displays
Handset registering.
Press the Start softkey on the unregistered
deskset. The deskset shows
Register...Please wait. You hear a beep when
the registration process is successful. The main
telephone base shows Handset registered. The
deskset shows Registered and then
X:Deskset X (X represents the extension
number [1-0]; Deskset X represents the default
deskset name).
It takes up to 60 seconds to
complete the registration process.
Register the deskset to your SynJ SB67138
telephone base
On the SynJ SB67138 telephone base, press
MENU/ENTER.
Scroll down to Registration and then press
MENU/ENTER.
Press MENU/ENTER again to select
Register HS. The main telephone base screen
shows Registering new device...
Press the Start softkey on the unregistered
deskset. The deskset showsThe deskset shows
Registering...Please wait. You hear a beep
sound when the registration process is
successful. The main telephone base shows
Deskset registered. The deskset shows
Registered and then the deskset shows
X:Deskset X (X represents the extension
number [1-0]; Deskset X represents the
default deskset name). It takes up to 60
seconds to complete the registration process.
NOTE: If the registration fails, the screen shows Press
MENU on MAIN base, select Registration & then
Register HS. Then press Start. Try the registration
process again.
1.
2.
3.
4.
1.
2.
3.
4.
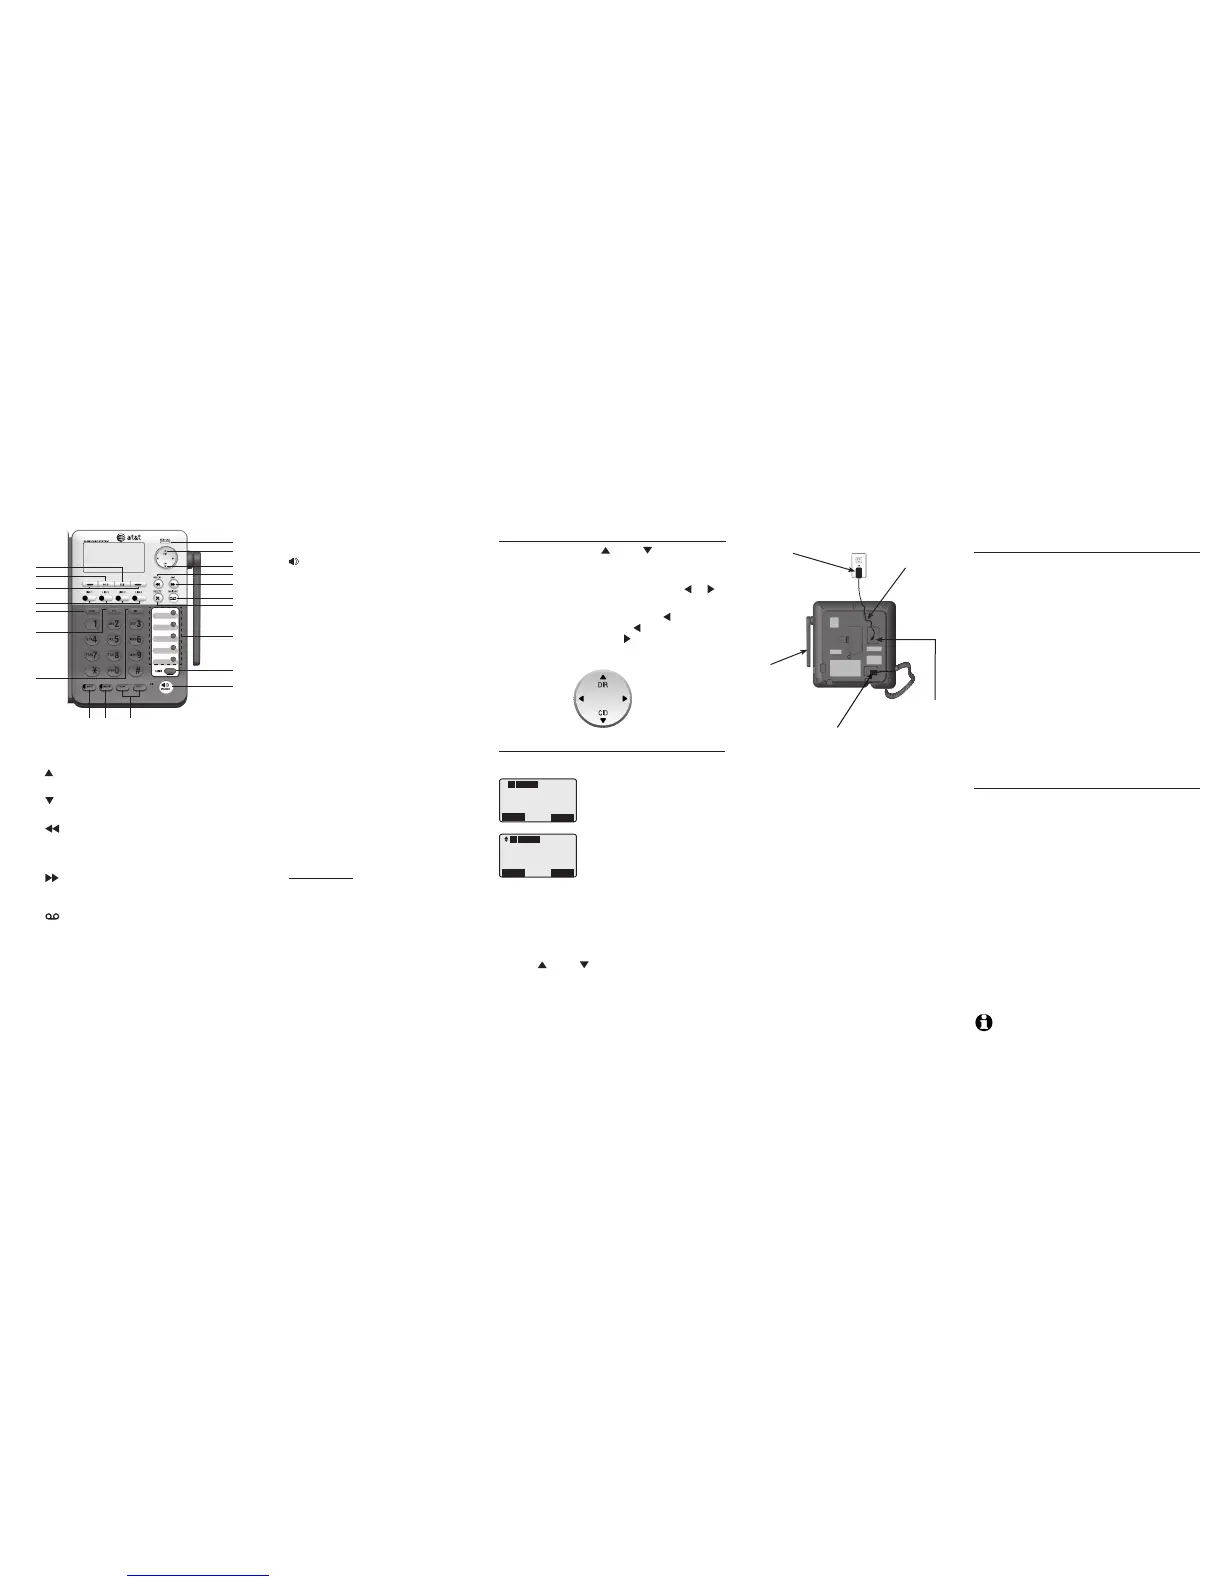
Add and register a deskset
Deskset installation
Install the deskset as shown below.
Plug the end of the
coiled handset cord into
the jack at the bottom
of the deskset.
Plug the small
end of the
power adapter
into the power
jack at the
bottom of the
deskset.
Plug the large
end of the power
adapter into a
power outlet not
controlled by a wall
switch.
Raise the antenna
for optimum
wireless range
and performance.
Route the
power adapter
cord through
the slot at the
bottom of the
deskset.
 Loading...