Tools
Required
• Drill
with
3/32
inch,
1/4
inch,
and
7/16
inch
drill
bits
•
1/4
inch plex bit
•
1/4
inch plex hole
saw
• Hole cutter 1-3/16 inch
• Phillips screwdriver
• Flat blade screwdriver
• Small flat blade screwdriver
• Socket
set
• Wire cutters
and
strippers
• Straight
edge
• Putty knife
•
Sandpaper
• Paint
• Squeegee
•
X-ACTOTM
knife
• Wood
patch
• Fast-ons (if installing a
new
JAMMA
harness)
Preparing
the
Existing
Game
for
Conversion
1.
Turn
off
power
to the game.
2.
Remove
the
old
PCB
and
game
harness
(if
not
JAMMA).
3.
Remove all control
panel
decals, labels,
and
con-
trols.
4.
Remove
any
side decals from
the
cabinet. If
your
cabinet
has
woodgrain
sides,
remove
the
old
graphics
and
adhesive (you
can
remove adhesive
with lacquer thinner).
5.
Remove the video display plexiglass, display bezel,
attraction shield,
and
marquee, if any.
6.
Paint the cabinet, if required.
7. Wipe
down
and
vacuum the cabinet as necessary.
Inspecting
the
Kit
Verify
each
component
with the kit parts list proVided
in Table 1-1. If any part
is
miSSing
or
damaged, please
contact
your
distributor
and
provide the following in-
formation:
1.
Tetris kit serial
number
2.
Part
number
and
description
of
any missing
or
dam-
aged
parts
3.
Date received
1-2
Tetris
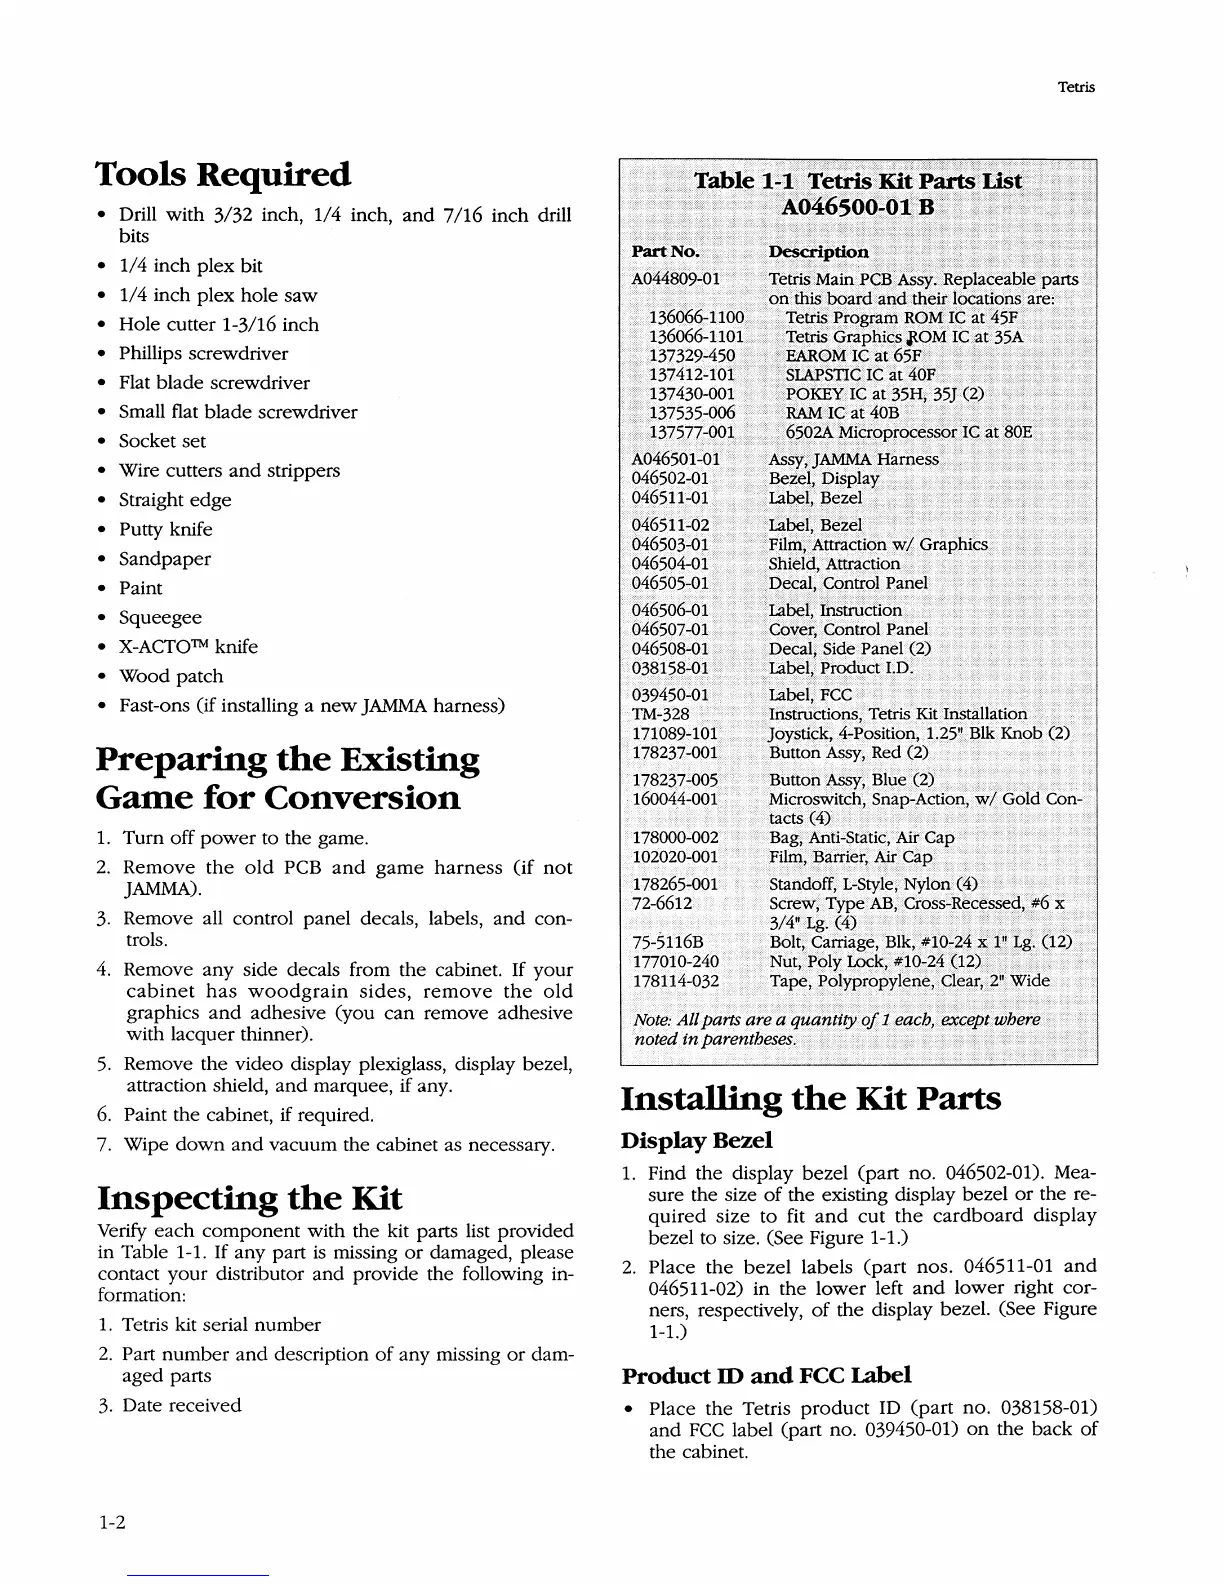
table
.·lH:r~~iG.tP~~t···
A.ij:i6500~OlilI/··
Pa.rtNo.
A044809;01
136C>66-1100
136066-1101
;137329-450
'··137412-101 .
137430-001
137535-0C>6
137577~00r
...
A046501...Q1
046502,.Q1
046511~01
()46511,.Q2
()46503,.Q
1
046504,.01
046505,.Q1
039450,.Q1
TM-328
171089-101
178237-001
178237-005
160044-001
178000~002
102020-001
178265-001
72-6612
75-5116B
177010-240
178114-032
:-,';'.::?::-:.;',::::::""
"::::C::':()'::
::::::~:
:=:-:,-:-<
..
J.JeScription
Te~~M~;~p¢~A;,~.·'ii~pl~ce~bl~pirts
ontliisibOardaridtheiI: l()cationsare:··
.•..•
TetfiSj>rograw
RQMI¢:ic45F
.....
·····TetrisGraphics~OM
leat
35A
...•
EARO.MIC·ar65F
...SLAPStICICit
4()F
.....
...
POKEY
IC;
at35H;35](2)
RAMICif40B
....
····95(j2AMi(:t(jpr9c~ss9qTC;<lr§6E····
Assy;JAMMAH<lrne~s
B~zt!lll)isplay
La»el, Bezel
U¥1;13
eZe1
.....
........
•.
...••............•
.
•.........
•••
Pilm{AUraction.w!.GraphiCs
Shield, AttraCtion
..
• .
l)e<:a,I,~()nt:(()l
~anel
.
G6ei;ibi;waion
COY(!f,
Control Panel
Decal, Side Panel
(2)
rabel;
pt
odl.l
ct
r
D
:
..
Label;
FCC
Instructioris,·TetdsKitIIlStallation •
Joysti~k;
...
+Position,.1.251.'13Ik.Knob
...
(2)
Button
Assy,lted
(2)
BU1:tohASsy,
Blue
(2)
Microswitch, Snap-Action, ",,I Gold
Con~
tacts(4)
Bag, Anti-Static, Air Cap
PilIl},
Barrier,
Air
cap
Standoff, LcStyle,Nylon (4)
Screw,.Type.AB,Cross~Recesse<i,#6
.·x
3/4"Lg. (4) . .
..................
.
Bolt,Cariiige,Blk;"i10~24X:l!i.~g
..
(12)
.
N\lt,PolyLock;tI'~0::24(12)
.
Tape,~olypropyleIle,qear,2"
Wide
Note:
Allparts are
aquantityollea.c!J,~ceptwbere
noted in parentheses.
Installing
the
Kit Parts
Display
Bezel
1.
Find the display bezel (part no. 046502-01). Mea-
sure the size
of
the existing display bezel
or
the re-
quired
size to fit
and
cut
the
cardboard
display
bezel to size. (See Figure 1-1.)
2.
Place
the
bezel
labels
(part
nos. 046511-01
and
046511-02) in
the
lower
left
and
lower
right cor-
ners, respectively,
of
the display bezel. (See Figure
1-1.)
Product ID
and
FCC
Label
• Place
the
Tetris
product
ID
(part
no. 038158-01)
and
FCC
label (part no. 039450-01)
on
the back
of
the cabinet.