3
CASEY PRO 3G PITCHING MACHINE
ASSEMBLY & USE
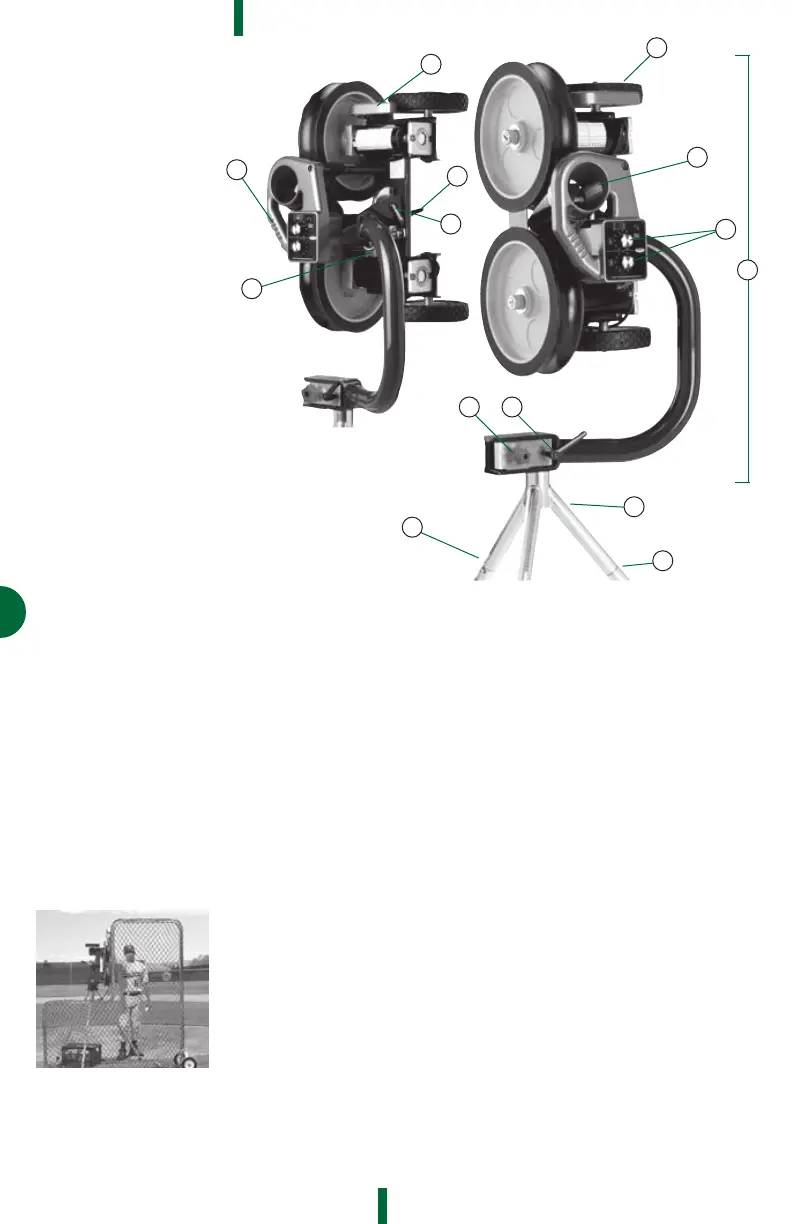
YourCaseyPro3Gpitchingmachinecomespre-assembledas3
components,theThrowingHeadAssembly(1),theTripod(2)and
thelegs(3).
Remove the Tripod and the three legs from the carton. Depressing
theSpringClip(4),insertalegintotheTripod.BesuretheSpring
CliplocksintothealignmentholeontheTripod.Repeatthiswiththe
other two legs.
LoosentheLeft/RightAdjustmentLockHandle(5)andmountthe
ThrowingHeadontotheTripod.BesurethattheLockisbackedout
farenoughtoallowtheThrowingHeadtoseatitselfallthewaydown
onto the Tripod.
ELECTRICAL
TheCaseyPro3Gmachineisdesignedtooperateona110VAC
powersource(220VforInternational).Thespeedcontrolisprotected
fromoverloaddamagebyabuilt-inACsurgeprotectoranda10amp
circuitbreaker.
Voltagetendstodropoverdistanceandrunninganyequipment
onlowvoltagecanshortenmotorlife.Therefore,itisimportantto
alwaysusetheproperextensioncordwithyourmachine.
Upto100feet,thesizecordtouseisa#16/3.From100to200feet,
usea#14/3cord.Over200feet,useatleasta#12/3extensioncord
or consult a local electrician.
OPERATING
INSTRUCTIONS
1. ThrowingHead
Assembly
2. Tripod
3. Leg(3ea.)
4. Spring Clip
5. Left/RightMacro
AdjustmentLock
6. Up/DownMacro
AdjustmentLock
7. PitchSelectionLock
8. Transport Wheels
9. BallFeedChute
10.SpeedControls
11.Handle
12.ControlPanelHandle
13.Left/RightMicro
AdjustmentKnob
14.Up/DownMicro
AdjustmentKnob
Caution:
Never lay your machine
on its throwing wheel and
never store or transport
your machine where
temperatures may
exceed 120°F.
AlwaysuseaProtectiveScreen
2
3
4
5
6
7
8
9
10
11
12
13
14
1
FPO