CS22D 2-Port USB DVI KVM Switch Quick Start Guide Conmutador KVM de 2 puertos para USB con DVI CS22D - Guía rápida
Guide de démarrage rapide du commutateur KVM DVI USB à 2 ports CS22D Switch KVM USB DVI CS22D a 2 porte – Guida rapida
CS22D2-Port-KVM-SwitchmitUSBfürDVI-GrakKurzanleitung Краткоеруководствопользователя2-портовогоKVM-переключателяUSBDVICS22D
www.aten.com www.aten.com
www.aten.com www.aten.com
www.aten.com www.aten.com
Package Contents
1 CS22D 2-Port USB DVI KVM Switch
1 User Instructions
© Copyright 2018 ATEN
®
International Co., Ltd.
ATEN and the ATEN logo are trademarks of ATEN International Co., Ltd. All rights reserved. All
other trademarks are the property of their respective owners.
This product is RoHS compliant.
Part No. PAPE-1223-A60G Printing Date: 11/2018
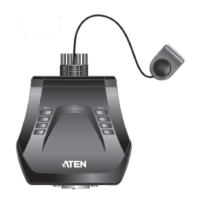
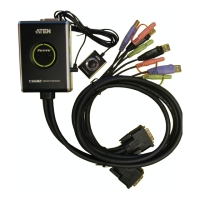
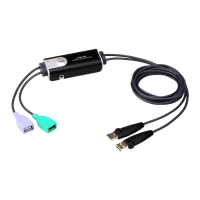
Hardware Review
A
1. Port LEDs
2. KVMCables
3. ConsolePorts
4. USB Power In
5. RemotePortSelector
6. USB Keyboard and Mouse Connectors
7. DVI Connectors
Hardware Installation
B
1.PlugyourUSBkeyboard,USBmouse,andmonitorintotheirrespective
ports on the CS22D.
Note :TheUSBport(s)canbeusedforUSBperipheralsharing.Todoso,
plugtheperipheralsandyourkeyboardormouseintoaUSBhub,
thenplugthehubintothekeyboardormouseport.
Presentación del hardware
A
1. IndicadoresLEDdelospuertos
2. CablesKVM
3. Puertosdeconsola
4. EntradadealimentaciónUSB
5. Selectordepuertosindependiente
6. ConectoresUSBparatecladoymouse
7. Conectores DVI
Instalar el hardware
B
1.ConectesutecladoUSB,mouseUSBymonitoralospuertos
correspondientesdelCS22D.
Nota : El/lospuerto(s)USBsepuede(n)utilizarparacompartir
dispositivosUSB.Paraello,conectelosperiféricosysutecladoo
mouseaunconcentradorUSByluegoconecteelconcentradoral
puertoparatecladoomouse.
Description de l’appareil
A
1. Voyants des ports
2. CâblesKVM
3. Portsdeconsole
4. Entréed’alimentationUSB
5. Sélecteurdeportdistant
6. ConnecteursclavieretsourisUSB
7. Connecteurs DVI
Installation du matériel
B
1.BranchezvotreclavierUSB,votresourisUSBetvotremoniteursurles
ports correspondants du CS22D.
Remarque : Vouspouvezutiliserleoulesport(s)USBpourpartager
plusieurspériphériquesUSB.Pourcefaire,brancher
lespériphériquesetvotreclavierouvotresourisàun
Hardware
A
1. LEDdelleporte
2. CaviKVM
3. Portedicollegamentoallaconsole
4. IngressoalimentazioneUSB
5. Selettoreremotodellaporta
6. Connettori USB di tastiera e mouse
7. Connettori DVI
Installazione dell’hardware
B
1.CollegarelatastieraUSB,ilmouseUSBeilmonitorallerispettiveporte
sulCS22D.
Nota : La/eporta/eUSBpuò/possonoessereutilizzata/eperla
condivisionediperifericheUSB.Atalne,collegareleperiferichee
latastieraoilmouseaunhubUSBepoiinserirel’hubnellaporta
dellatastieraodelmouse.
Hardwareübersicht
A
1. Port-LEDs
2. KVM-Kabel
3. Konsolports
4. BuchsefürStromversorgungüberUSB-Bus
5. UnabhängigerPort-Auswahlschalter
6. USB-Tastatur-undMausanschlüsse
7. AnschlüssefürDVI
Hardware installieren
B
1.SchließenSieIhreUSB-Tastatur,USB-MausunddenMonitorandie
entsprechenden Buchsen des CS22D an.
Hinweis: Derbzw.dieUSB-Port(s)kannbzw.könnenauchfür
freigegebeneUSB-Peripheriegeräteverwendetwerden.Dazu
schließenSiediePeripheriegeräteundIhreTastaturbzw.Maus
Обзор оборудования
A
1. Индикаторыпортов
2. KVM-кабели
3. Портыконсоли
4. ВходпитанияUSB
5. Удаленныйпереключательпорта
6. РазъемыклавиатурыимышиUSB
7. РазъемыDVI
Установка оборудования
B
1.ПодключитеклавиатуруUSB,мышьUSBимониторк
соответствующимпортамCS22D.
Примечание.USB-порт(ы)можетиспользоватьсядляобщего
доступакпериферийнымUSB-устройствам.Дляэтого
подключитепериферийныеустройстваиклавиатуру
илимышькUSB-концентратору,азатемподключите
2.PlugtheUSBandDVIconnectorsoftheattachedKVMcablesintotheir
respectiveportsonthecomputersyouareinstalling.
Note: IfthereisonlyoneUSBportonthecomputer,youcanconnecta
USBhubtothecomputer,thenplugtheKeyboard/Mousecable
into the USB hub.
3.(Optional)IfthepowersupplytoyourattachedUSBperipheral(s)isnot
sufcient,pluginUSBcabletotheMiniUSBpowerjacktogetpowerfrom
anotherUSBpowersource.(i.e.,PC,USBhub,5VUSBpoweradapter)
Note :TheUSBtominiUSBcableisnotincludedinthispackage.
Contactyourproductdealerformoredetails.
2.ConectelosconectoresUSByDVIdeloscablesKVMincluidosalos
puertoscorrespondientesdecadaunadelascomputadorasquequiera
instalar.
Nota : sisucomputadorasolotieneunpuertoUSB,podráconectarun
concentradorUSBalacomputadorayconectarloscablespara
tecladoymousealconcentradorUSB.
3.(Opcional)SielsuministroeléctricodelosperiféricosUSBconectados
noessuciente,enchufeuncableUSBalatomaMiniUSBparaobtener
energíaeléctricadeunafuentedeenergíaUSBexterna.(Porejemploun
PC,concentradorUSB,adaptadordealimentaciónUSBde5V)
Nota : ElcableUSBaMiniUSBnoestáincluidoenelpaquete.Póngase
encontactoconsurevendedorparamásinformación.
concentrateurUSBetcederniersurleportdeclavierou
souris.
2.ReliezlesconnecteursDVIetUSBdescâblesKVMfournisauxports
correspondantsdesordinateursàinstaller.
Remarque : S’iln’yaqu’unseulportUSBsurl’ordinateur,vouspouvez
connecterunconcentrateurUSBàl’ordinateuretbrancher
ensuitelecâbledeclavier/sourissurleconcentrateurUSB.
3.(Enoption)Sil’alimentationduoudespériphériquesUSBraccordésn’est
passufsante,raccordezuncâbleUSBauconnecteurd’alimentationmini
USBpourobtenirdel’alimentationdepuisuneautresourced’alimentation
USB(PC,concentrateurUSB,adaptateursecteurUSB5V,etc.).
Remarque :LecâbleUSBversminiUSBn’estpasinclusdansla
livraison.Contactezvotrerevendeurpourplusdedétails.
2.InserireiconnettoriUSBeDVIdeicaviKVMindotazionenellerispettive
portesuicomputerchesistannoinstallando.
Nota : SeilcomputerèdotatodiunasolaportaUSB,èpossibile
collegarciunhubUSBepoiinserireilcavodellatastiera/mouse
nell’hubUSB.
3.(Opzionale)Sel’alimentazionedelleperifericheUSBcollegateè
insufciente,collegareilcavoUSBallapresadialimentazioneMiniUSB
perriceverealimentazionedaun'altrasorgented'alimentazioneUSB.
(p.es.PC,hubUSB,alimentatoreUSBda5V)
Nota :ilcavodaUSBaminiUSBnonèinclusonellaconfezione.
Rivolgersialpropriorivenditorepermaggioridettagli.
aneinUSB-HubunddenHubandenTastatur-bzw.Mausport
an.
2.VerbindenSiedieUSB-undDVIdesmitgeliefertenKVM-Kabelsmitden
entsprechendenPortsderzuinstallierendenComputer.
Hinweis: BesitztIhrComputernureinenUSB-Port,könnenSieeinen
USB-HubmitdemComputerunddieTastatur-undMauskabel
mitdemUSB-Hubverbinden.
3.(Optional)FallsdieStromversorgungderangeschlossenenUSB-Geräte
nichtausreicht,verbindenSiedasUSB-KabelmitderMini-USB-Buchse
fürdieStromversorgung,ummehrStromvoneineranderenUSB-
Stromquellezuerhalten.(ZumBeispielPC,USB-Hub,5-V-USB-Netzteil)
Hinweis: DasUSB-auf-Mini-USB-KabelistnichtimLieferumfang
enthalten.WendenSiesichfürweitereDetailsanIhren
Fachhändler.
концентраторкпортуклавиатурыилимыши.
2.ПодключитеразъемыUSBиDVIкомплектныхKVM-кабелейк
соответствующимпортамустанавливаемыхкомпьютеров.
Примечание.ЕслинакомпьютереимеетсятолькоодинUSB-порт,
можноподключитьккомпьютеруUSB-концентратор,
азатемподключитькUSB-концентраторукабель
клавиатуры/мыши.
3.(Дополнительно)ЕслинаподключенноепериферийноеUSB-
оборудованиеподаетсянедостаточнопитания,подключитеUSB-
кабельвгнездопитаниямини-USB,чтобыполучатьпитаниеиз
другогоисточникапитанияUSB.(т.е.,ПК,концентраторUSB,5В
адаптерпитанияUSB)
Примечание.КабельUSBнамини-USBневходитвкомплект
поставки.Дляполучениядополнительныхсведений
обращайтеськвашемупоставщикупродуктов.
A
Hardware Review
B
Hardware Installation
1
5
6
7
3
4
2
2
1
3
2
2-Port USB DVI KVM Switch
Quick Start Guide
CS22D
Support and Documentation Notice
All information, documentation, fi rmware, software utilities, and
specifi cations contained in this package are subject to change without
prior notifi cation bythe manufacturer.
To reduce the environmental impact of our products, ATEN
documentation and software can be found online at
http://www.aten.com/download/
Technical Support
www.aten.com/support
이 기기는 업무용(A급) 전자파적합기기로서 판매자 또는 사용자는 이 점을 주의하시기 바라며,
가정외의 지역에서 사용하는 것을 목적으로 합니다.
EMC Information
FEDERAL COMMUNICATIONS COMMISSION INTERFERENCE
STATEMENT:
This equipment has been tested and found to comply with the
limits for a Class A digital device, pursuant to Part 15 of the
FCC Rules. These limits are designed to provide reasonable
protection against harmful interference when the equipment
is operated in a commercial environment. This equipment
generates, uses, and can radiate radio frequency energy and, if not installed and used in accordance
with the instruction manual, may cause harmful interference to radio communications. Operation of
this equipment in a residential area is likely to cause harmful interference in which case the user will be
required to correct the interference at his own expense.
FCC Caution: Any changes or modifi cations not expressly approved by the party responsible for
compliance could void the user's authority to operate this equipment.
Warning: Operation of this equipment in a residential environment could cause radio interference.
This device complies with Part 15 of the FCC Rules. Operation is subject to the following two
conditions: (1) this device may not cause harmful interference, and (2) this device must accept any
interference received, including interference that may cause undesired operation.
Scan for
more information