Do you have a question about the aTTo Digital TileRec and is the answer not in the manual?
Steps to initiate voice recording on the TileRec device.
Steps to stop voice recording and save the audio file.
Instructions for setting the device's time and date via a text file.
How to configure voice-activated or continuous recording modes.
Configure the LED indicator behavior during recording.
Set the desired length for automatically created audio files.
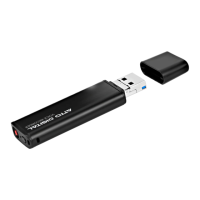
Steps to connect the recorder to a PC using a standard USB port.
Steps to connect the recorder to a PC using a USB-C port.
Instructions for connecting the recorder to an Android smartphone.
How to play audio recordings from the device on a computer.
How to play audio recordings from the device on an Android phone.
Steps to play audio recordings directly using headphones.
Solves issues when the computer doesn't recognize the device.
Addresses problems related to the device not charging properly.
Explains what to do when storage is full and recording fails.
Steps to resolve when the device becomes unresponsive.
Recommendations for storing the device to maintain its condition.
Importance and method of backing up recorded audio files.
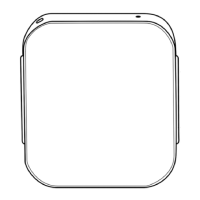
The TileRec is a voice-activated recorder designed for discreet and convenient audio capture. This compact device is ideal for recording conversations, lectures, or personal notes, offering a range of features to enhance its usability and ensure reliable performance. Its small size and simple interface make it easy to carry and operate in various settings.
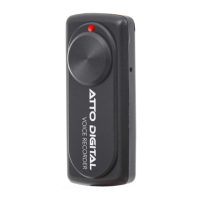
To begin recording, locate the REC button on the device. Slide this button to the ON position. The light indicator will change from red to blue, confirming that the device is actively recording. The LED will flash 10 times to signal the microphone's initiation. After these initial flashes, the LED can either remain lit or switch off, depending on your chosen settings. To stop recording, simply slide the REC button to the OFF position. The audio file will be automatically saved, ensuring that your recordings are preserved without additional steps.
The TileRec offers flexible recording modes. You can choose between voice-activated recording and continuous recording. In voice-activated mode, the device will automatically pause recording during periods of silence and reinitiate when sounds above 45dB are detected within the microphone's range. This feature helps conserve storage space and battery life by only capturing relevant audio. Continuous recording, on the other hand, records uninterruptedly until stopped. These modes can be configured by connecting the device to a computer and editing the RECSET file.
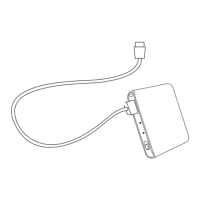
Setting the time stamp on your recordings is a straightforward process. Connect the TileRec to a PC using the provided USB-C cable. If your computer has a standard USB port, you can use the USB-C adapter included in the box. Once connected, open the "RECORD" folder on the device's partition, which will appear as a new drive on your computer. Inside this folder, you'll find a text file named RECSET. Open this file and adjust the first line to reflect the current date and time in the format yyyymmddhhmmss. For example, if the date is October 1, 2023, at 11:30 PM, you would enter 20231001233000. Ensure there are no spaces before or after the string of digits.
The LED behavior during recording can also be customized. In the third line of the RECSET file, you can specify whether the LED should flash during recording (by entering '1') or remain off (by entering '0'). Regardless of this setting, the LED will always flash 10 times when the device is turned on to indicate microphone initiation.
For better organization and easier navigation of your audio files, the TileRec supports timed sectioning. In the fourth line of the RECSET file, you can input a value representing your preferred length for each audio file in minutes. For instance, entering '30' will cause the device to create new audio files every 30 minutes. This feature is particularly useful for managing long recordings.
Connecting the TileRec to a computer for file access is simple. First, ensure the device is turned off by sliding the REC button to the "OFF" position to properly save any ongoing recordings. Connect the USB-C end of the cable to the TileRec and the USB-A end to an available USB port on your PC. If your PC only has USB-C ports, use the provided USB-C adapter. Once connected, the TileRec will appear as a new drive under "My PC" (Windows) or "Devices" (macOS). Double-click to open it and navigate to the "RECORD" folder, where all your audio files are stored.
The TileRec can also be connected to an Android phone. Ensure your Android phone is unlocked and on the home screen. Insert the USB-C connector into your phone's charging port. Plug the USB port of the cable that came with your TileRec device USB-C adapter. Attach the other end of the USB cable into the USB port on your TileRec Mini Voice Recorder. After a few moments, your Android phone should recognize the device, and a notification indicating a USB device connection will appear. In your phone's file manager, the TileRec will be listed as 'USB Storage' or similar. Tap to open it and locate the 'RECORD' folder to access your files.
Playback of recorded audio can be done in several ways. On a computer, connect the TileRec as described above, navigate to the "RECORD" folder, and double-click the desired MP3 file to play it using your computer's default audio player. On an Android phone, connect the device, grant permission if prompted, open your file manager, and tap the audio file in the "RECORD" folder. For direct playback, you can use the custom-designed earphones included with the TileRec. Insert the USB-C connector of the earphones into the USB-C port on the recorder. Slide the power button to the ON position to enable playback. The earphones feature controls for volume adjustment ("-" and "+"), fast-forwarding (long-press "+"), rewinding (long-press "-"), and muting the microphone (long-press microphone icon).
The LED signals provide important information about the device's status. A blue LED indicates that the device is currently recording. A green LED that flashes rapidly for 10 seconds signifies that the device's storage is full. In this situation, the device will automatically shut off, but the current audio file will be saved. You will need to free up storage space by deleting old files or transferring them to your computer. A continuously flashing red LED indicates a low battery, signaling that it's time to recharge. The current audio file will be automatically saved before the device powers off due to low battery. When charging, the red light indicator will flash continuously. Once fully charged, the red light will stop flashing and remain steadily lit. A full charge typically takes about 1.5 hours and provides up to 30 hours of battery life.
For optimal performance and longevity, proper maintenance and care are essential. Avoid storing the recorder in areas with high temperatures, damp conditions, or excessive dust. Regularly back up your recorded files to another storage device, such as your computer, to prevent data loss. Do not attempt to disassemble or repair the device yourself, as this could void the warranty and lead to further damage. If the device requires repair, back up your data beforehand. When disposing of the battery, adhere to local laws and guidelines. Store the battery at room temperature and aim to keep it charged at least to 30%. Avoid using high-power chargers, such as smartphone fast-chargers, as they may reduce the battery's lifespan. Even if you don't use the device regularly, it's recommended to charge the battery at least once every 6 months to prevent over-discharge.
Troubleshooting tips are available for common issues. If the device is not detected by your computer, ensure it is turned off before connecting and that you are using a USB cable that supports data transfer. For charging issues, try an alternative USB cable and ensure your computer is active and its USB port is configured for charging. If the green indicator light flashes rapidly, the storage is full; delete unnecessary files or format the device in NTFS. If the device becomes unresponsive, use a pin or needle to press the reset button for 10 seconds to restore normal functionality. Always use the "Safely Remove Hardware" (Windows) or "Eject" (macOS) option when disconnecting the recorder from your computer to preserve its integrity.
| power supply | Polymer Battery 3.7V 240mAh |
|---|---|
| battery life | 24 hours |
| recording format | MP3, 128Kbps |
|---|---|
| recording time for 4GB | 72 hours |
| recording time for 8GB | 145 hours |
| recording time for 16GB | 290 hours |
| recording time for 32GB | 575 hours |
| size | mm x mm x mm |
|---|---|
| weight | g |