PROGRAMMING STARTS IN
MAIN MENU
PRESS PROGRAM BUTTON ONE (1) AT A TIME IN THE MAIN MENU MODE.
1 NORMAL/DIAL BRIGHTNESS:
On power up, the meter usually starts operation in NORMAL/DIAL BRIGHTNESS. Gauge reads the
sensor value as temperature, pressure, etc. The “Down” and “Up” buttons will control the
brightness of the dial lighting. Press the center “Mode” button to save the setting and advance you
to PEAK PLAYBACK
2 PEAK PLAYBACK:
Reads the highest value displayed on the gauge since the last time the “PEAK” value was displayed.
“PEAK” value will be held in memory until erased by pressing the RIGHT or LEFT button while in the
“PEAK” level. Press the center “Mode” button to advance to HIGH RED-LINE SETTING
3 HIGH RED-LINE SETTING:
Sets the point at which “HIGH” warning threshold is reached for that specific gauge. The “Down and
“Up” buttons will move the dial pointer to select HIGH RED-LINE SETTING. During normal
operation the gauge constantly monitors the sensor value and compares it to the “HIGH” threshold.
If the threshold is exceeded, the red “HI” indicator is turned on. Press the center “Mode” button to
save the setting and advance to LOW THRESHOLD SETTING
4 LOW THRESHOLD SETTING:
Set the Minimum Threshold: Sets the point at which “LOW” warning threshold is reached for that
specific gauge. The “Down” and “Up” buttons will move the dial pointer to select the LOW
THRESHOLD SETTING. During normal operation the gauge constantly monitors the sensor value
and compares it to the “LOW” threshold. If the sensor value drops below the threshold, the yellow
“LOW” indicator is turned on. Press the center “Mode” button save the setting and advance to
5 COLOR SCHEME
5 COLOR SCHEME:
Set Faceplate Color Scheme: Operator can select the color of the gauge dial illumination. Each
time you press the “Down” control button you scroll through dial color selection until the dial
light goes off. Then press the “Up” button to reverse the scroll. Select your dial color illumina-
tion by pressing the center “Mode” button to save the setting and advance to DIAL BRIGHT-
NESS
6 DIAL BRIGHTNESS:
Adjust dial brightness for day or evening driving conditions. The RIGHT or LEFT command but-
tons will dim or brighten faceplate illumination. Press the Center mode button to save the setting
and return to NORMAL OPERATION.
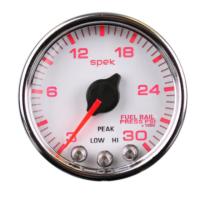
Programming Instructions for : Pressure
2 1/16” Spek Pro Fuel Rail Pressure Gauge
2
 Loading...