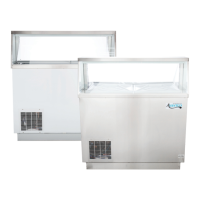
This document serves as a comprehensive user manual for Avantco Commercial Refrigerator and Freezer units, specifically covering Refrigerated Pizza Prep Units (178PICL1HC, 178PICL2HC, 178PICL3HC) and Refrigerated Sandwich Prep Units (178SSPT27HC, 178SSPT36HC, 178SSPT48HC, 178SSPT60HC, 178SSPT71HC, 178SSPT27MHC, 178SSPT36MHC, 178SSPT48MHC, 178SSPT60MHC, 178SSPT71MHC). The manual emphasizes the importance of reading it thoroughly before equipment setup, operation, and maintenance to ensure proper functioning and longevity of the units.
The manual begins with critical safety warnings, highlighting the use of flammable refrigerants. It explicitly states that repairs should only be performed by trained service personnel and warns against puncturing refrigerant tubing due to the risk of fire or explosion. These warnings are provided in English, Spanish, and French to ensure broad understanding and compliance with safety protocols. Users are advised to consult the repair manual/owner's guide before attempting any service and to follow all safety precautions. The document also cautions against fire or explosion risks if refrigerant tubing is punctured, stressing the need to handle the units carefully and in compliance with local government regulations.
Installation guidelines are provided to ensure optimal performance and prevent damage. If a unit has been transported on its side, it must stand still for a minimum of 24 hours before being plugged in. Before loading products, users should ensure the unit reaches the desired temperature. Proper ventilation is crucial, with a recommended clearance of 4 inches on the back of the unit for best performance. All accessories, such as shelves, shelf clips, and casters, must be installed before plugging in the unit.
Cabinet location guidelines specify that units should be installed on strong, level surfaces to prevent noise and malfunction. Installation in an indoor, well-ventilated area is recommended for efficient operation, with outdoor use potentially leading to decreased efficiency and damage. High humidity and dusty areas should be avoided, as humidity can cause rust and decrease efficiency, while dust on the condenser coil can lead to malfunction and void the warranty. The manual also advises against installing units near heat and moisture-generating equipment, as high ambient temperatures can overwork the compressor, leading to higher energy bills and gradual breakdown. For units with open lids, operation in areas over 80 degrees Fahrenheit is not recommended, and areas over 90 degrees Fahrenheit should be entirely avoided to prevent malfunction and warranty voidance.
Electrical requirements are clearly outlined. Users must ensure that the required voltage is consistently supplied, as low or high voltage can negatively impact the refrigeration unit. All units must be plugged into a grounded and properly-sized electrical outlet with appropriate overcurrent protection, referring to the nameplate for specific electrical requirements. Each unit should have its own dedicated outlet, and extension cords must not be used.
The manual details temperature controls and functions. The digital control units are factory-set for optimum food safety, with refrigerators cycling between 33 and 40 degrees Fahrenheit and freezers between -5 and 2 degrees Fahrenheit. To adjust the minimum temperature, users need to hold the "SET" button for 1 second, use arrow buttons to change the temperature, and press "SET" again to save. It's important to account for the differential, as cabinet temperature can fluctuate up to +7 degrees above the set minimum. Setting the temperature too high can result in unsafe maximum temperatures and potential health code violations. The manual illustrates the control panels for both freezer and refrigerator units, showing indicators for refrigerant (compressor on), fan (fan on), and defrost (defrost cycle running).
Loading product instructions emphasize ensuring all shelf clips are securely fastened and shelves are level before stocking. To maintain proper airflow, two to four inches of space should be left between the back wall and stored product, as blocking evaporator fans can lead to warmer cabinet temperatures and compressor failure.
The manual explains the defrost systems. Units are pre-programmed for automatic defrost cycles. For manual defrost, refrigerators require pressing the snowflake symbol and down arrow button for approximately 3 seconds to start and repeating to stop. Refrigerator coils are kept below 32°F, and during compressor downtime, the evaporator fan circulates air to melt frost, with run-off water draining into an evaporator pan. Freezer coils are defrosted electrically, with automatic defrost timers initiating at pre-set intervals.
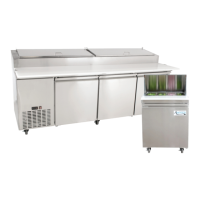
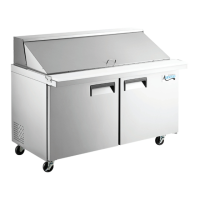
For pizza and sandwich prep units, the manual advises that they are designed to function with all pans in place, even if some are empty. To maintain food freshness, pans should only be filled with amounts that can be used within a specific usage period. During non-use, the insulated lid cover should be closed.
Safety and warning notices are reiterated, urging users to pay close attention to prevent serious injury or damage. These include warnings against overloading outlets, using extension cords, putting hands under the unit while moving, and plugging/unplugging with wet hands. Unplugging the unit for long periods of non-use is recommended, and a 10-minute wait after unplugging before plugging back in is crucial to prevent compressor damage. Proper grounding is required to minimize shock and fire hazards. Users are warned not to remove or repair components unless factory-instructed, ensure the unit is not resting on the electrical cord, avoid hanging on doors, and not store flammable/explosive gases or liquids inside. Altering or tampering with the electrical cord is strictly prohibited.
Food pan layouts are provided for various SSPT and PICL models, illustrating the configuration and sizes of pans (1/6, 1/9, 1/3) that can be accommodated. Specific diagrams show the arrangement for models like 178SSPT27, 178SSPT36, 178SSPT48, 178SSPT60, 178SSPT71, and their "M" variants, as well as 178PICL1, 178PICL2, and 178PICL3. Detailed tables list the item numbers, sizes, and quantities of food pan divider bars required for each model, ensuring users can correctly configure their prep units.
Regular maintenance instructions are provided, with a critical warning to disconnect the power cord before cleaning any parts of the unit. Cleaning the condenser coil is essential for efficient operation, recommended at least once a month. This involves using a commercial condenser coil cleaner and brushing fins from top to bottom. Bent fins should be straightened with a fin comb after cleaning. Fan blades and motor should be cleaned with a soft cloth, covering the motor to prevent moisture damage if washing the blades.
Cleaning the interior of the unit involves using warm water and mild soap, avoiding steel wool, caustic soap, abrasive cleaners, or bleach that could damage stainless steel surfaces. Door gaskets should be washed regularly, preferably weekly, by removing them, soaking in warm water and soap, drying, and replacing. Gaskets should be checked for a proper seal after replacement. Shelves and pilasters should be periodically removed and cleaned with mild soap and warm water. Pilasters are removed by first taking out shelves and shelf brackets, then lifting the pilaster up and out.
A troubleshooting section helps users diagnose and resolve common issues. For a compressor not running, solutions include replacing a blown fuse/resetting a circuit breaker, plugging in the power cord, setting the thermostat to a lower temperature, or waiting for the defrost cycle to finish. If condensing units run for long periods, users should allow adequate time for warm product to cool, ensure doors are closed, check and clean/replace door gaskets, and clean the condenser coil. For a cabinet temperature that is too warm, solutions include setting the thermostat lower, rearranging product for proper airflow (maintaining 4 inches clearance from the evaporator), allowing warm product to cool, replacing a fuse/resetting a breaker, cleaning the condenser coil, and ensuring doors are closed and gaskets are sealing properly if the evaporator coil is iced over.
Finally, the manual provides warranty information. Units are backed by a 1-year parts and labor warranty and a 5-year warranty on the compressor. For warranty inquiries or service, users need to locate the model number, cabinet serial number (on the front or inside the door jamb), and the bold number on the service plate (on the front of the unit). A contact number (1-800-678-5517) is provided for service technicians. The warranty does not apply to products sold or used outside the United States. For residential users, Avantco disclaims liability for parts or labor coverage for component failure or other damages resulting from installation in non-commercial or residential applications.