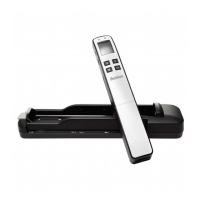
Scanner overview
#
Button name
Description
1
Scanner
indicator light
Indicates the operating/warning status of the scanner.
2
LCD display Displays preview pictures and settings menus.
3
Up arrow z Enters Menu screen from [Scan Ready] screen.
z Navigate “backward” through images and menu options.
4
Power/Scan
button
z Press to turn on the scanner./Press to start and end a scan.
z Accept option choice in Menu and Preview options.
z Press and hold for 3 seconds to turn off the scanner.
5
Down arrow z Enters Display mode from [Scan Ready] screen.
z Navigate “forward” through images and menu options.
6
Back arrow Return to previous screens or exists from Display mode or
Menu option.
Remove the scanner from the *feeder dock
Press and hold the latch. Lift the left end of the scanner first and then detach the right end of the
scanner from the feeder dock. * Do not lift the scanner too high and avoid using force to detach
the scanner from the feeder dock in case the connector may be damaged.
* Only MiWand 2L PRO or MiWand 2 PRO comes with a feeder dock!
Install the *battery
1. Push and remove the battery cover on the scanner.
2. Load the battery into the battery container. (*MiWand 2: 2xAA batteries, MiWand 2L:
Li-Ion battery)
3. Close the battery cover.
z Charge Li-Ion battery (for MiWand 2L): For first time use, charge the Li-Ion battery by
connecting the scanner to your computer with a supplied USB cable until the green
LED light goes off.
z Charge 2xAA batteries (for MiWand 2): The AA rechargeable battery can only be
charged through a rechargeable charger!
Install micro SD card
You must install a micro SD card to the SD slot of the scanner to store your images. Gently press in until the
SD card is latched.
Turn on the scanner
Press to turn on the scanner. The [Scan Ready] screen will be displayed as illustrated.
Press
again for about 3 seconds to turn off the scanner.
Choose your desired scan settings
1. On the [Scanner Ready] screen, press to enter the Menu mode.
2. A list of menu options is displayed. The options include Resolution, Color Mode, Save Format, LCD Off, and so on.
3. Repeatedly press until your desired option appears, such as “Language”, and then press to select it.
4. Repeatedly press until your desired item appears, such as “Français”, and then press to select it.
5. Press to exit.
* To increase ease of use, please first go to “Menu” and then choose “Language” to select your desired language on the screen.
* Default settings: Resolution: 300 dpi, Color Mode: Color, File Format: JPEG, LCD Off: 45 sec
Start wand scanning (hand-held)
1. Place your document on a flat surface.
2. Press
to start a scan.
3. Hold the scanner and glide the scanner gently over the surface of the page as
illustrated.
4. Press
to stop the scan.
* By default, the Preview mode is on allowing you to view the scanned images for 2
seconds immediately after scanning (available for JPEG file format only).
MiWand 2 Series Intelligent Handheld Scanner Quick Start Guide
2 3 4
1
5 6
or
Charge Li-Ion battery (for MiWand 2L)
P/N 251-0924-0 v100