EasyManua.ls Logo

AXA Remote 2.0 User Manual

AXA Remote 2.0
6 pages
To Next Page IconTo Next Page
Page #1 background imageLoading...
Page #1 background image
1
AXA Remote 2.0
Remote-controlled window opener
Information
You have just acquired a high quality AXA product.
The instructions below must be followed closely in order to
effectively assemble and operate this product.
Application:
Hopper window, opening inwards
Installation tools (recommended):
Tape measure, (cordless) drill, screwdriver, Ø 2 mm drill bit,
pencil or bradawl, allen key
Installation location:
Minimum installation space required
Minimum window height: 30 cm.
Maximum range remote control: distance 10 m.
Opener
Hinge side
50
88
26
26
310
38
min. 38 cm, max. 100 cm
min. 30 cm,
max. 100 cm
Klep/uitzetraam
Package contents
1. (1x) Closing unit
2. (1x) Cover
3. (1x) Hopper window bracket
4. (3x) Window washer plate
(1,5 mm)
5. (2x) AAA Batteries
6. (4x) AA Batteries
7. 1x) Window plate
8. (1x) Window casing plate
9. (6x) Casing washer plate
(1,5 mm)
10. (3x) Spacer block/drilling
template
11. (1x) Remote control
12. (4x) Screws 4,0 x 40 mm
13. (4x) Screws 4,0 x 70 mm
(for rebate)
14. (3x) Bolts M4 x10 mm
(black)
15. (2x) Bolts M4 x12 mm
16. (1x) Allen key
17. (4x) Screws 4,0 x 45 mm
18. (4x) Finishing caps
Valraambeugel
1x
8
3
5x
Raamonderlegplaat
13
2
nieuw
30 mm
37 mm
Window casing
330 mm
Window
Hopper window
9
10x
Kozijnonderlegplaat
12
Schroef 4.0x60
4x
9
10
1x
Boormal/Opvulblok
16
5
6
7
8
30 mm
37 mm
330 mm
Window
40
306
69
2,5
309
Window casing
1
37-224.2 (6-18)
3x
Verzonkenkop M4x10 (zwart)
14
14
2x
Verzonkenkop M4x12
15
15
16
13
12
17
4
3
11
EMC 2004/108/EC
EN
18

Other manuals for AXA Remote 2.0

Question and Answer IconNeed help?

Do you have a question about the AXA Remote 2.0 and is the answer not in the manual?

AXA Remote 2.0 Specifications

General IconGeneral
BrandAXA
ModelRemote 2.0
CategoryHome Automation
LanguageEnglish

Summary

Product Information

Installation Tools

Recommended tools for installing the AXA Remote 2.0 window opener.

Installation Location

Guidance on where to install the AXA Remote 2.0 window opener.

Minimum Installation Space

Required space for installing the AXA Remote 2.0 window opener.

Package Contents

List of all items included in the AXA Remote 2.0 package.

User Manual

Remote Control Operation

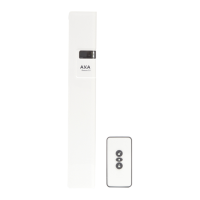
Explanation of the buttons and operation of the AXA Remote 2.0 remote control.

Configuring Remote Control

Step-by-step guide to pair the remote control with the closing unit.

Ventilation Capacity

Information on the ventilation capacity of the AXA Remote 2.0.

Installation Guide

Flush Window Preparation

Steps to prepare for installing the opener on a flush window.

Rebate Window Preparation

Steps to prepare for installing the opener on a rebate window.

Installation Steps

Flush Window Installation

Detailed steps for installing the AXA Remote 2.0 on a flush window.

Rebate Window Installation

Detailed steps for installing the AXA Remote 2.0 on a rebate window.

Final Assembly and Options

Closing Unit Assembly

Instructions for final assembly of the closing unit.

Assembly Cover

Steps for attaching the assembly cover and finishing caps.

Assembly Adapter Version

Instructions for installing the AXA Remote 2.0 with an adapter.

Troubleshooting and Maintenance

Troubleshooting Window Closure

Solutions for issues where the window does not close properly.

Unit Not Reacting

Steps to resolve issues when the unit does not react or reacts insufficiently.

Low Battery Indicator

Information on low battery indication and replacement.

Configure Multiple Units

Guidance on configuring multiple window units with one remote.