11
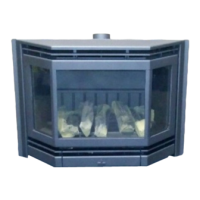
PANOLUX 65PANOLUX 52
3.3.2. Fitting in an existing chimney breast
Ÿ Remove the existing • re basket or stoking stones and remove the shut-off
• ap. The chimney must be intact and must not be damaged during • tting. The
chimney breast opening must be big enough for a gap of 1 - 3 cm to be left all
round the appliance. Clad the chimney breast opening from the inside with a
ceramic wool • reblanket or similar (see section 3.3).
Ÿ Extend the existing chimney so that it ends at the appliance’s smoke outlet. To
do this, use a • exible, double-walled stainless steel chimney, for example.
Ÿ Slide the appliance into the chimney breast opening. Seal the smoke outlet
where it joins the chimney so that no soot can accumulate above the appliance
under any circumstances.
Ÿ Level off the appliance so that the front of the ash drawer does not catch on the
base (if • tted).
Ÿ Fill any gaps around the appliance with a ceramic wool • reblanket or similar
and • t the supplied edging (frame). To insulate, use ceramic wool.
3.3.3. Fitting in a newly-built chimney breast
Ÿ Clad the appliance on the top, sides and rear up to the front edge with
an approx. 10 cm thick ceramic wool • reblanket or similar. Leave a few
centimetres clearance between the front of the chimney breast and the
appliance.
Ÿ Level off the appliance. Check that the slides do not catch on the base (if
• tted).
Ÿ Make a good seal between the smoke outlet from the appliance to the chimney.
Close up the front (the appliance has its own inlets for convection air).
Ÿ If the • re is to be placed against a bearing wall or against a wall containing
• ammable material, an air gap of at least 20 mm should • rst be built. Behind it
a false wall, 100 mm thick, must be built of masonry or aerated concrete.
Ÿ If the • re is not placed against a bearing wall or a wall containing • ammable
material, no false wall is necessary. Layers of insulation of at least 100-mm
thickness will then be suf• cient (class A, DIN 4102-compliant). See also section
3.3.
 Loading...