EasyManua.ls Logo

Barreto 1324 - User Manual

Default Icon
64 pages
Print Icon
To Next Page IconTo Next Page
Loading...
1324/1624/1824 owners manual.doc 6/4/08 Page 1 of 64
THE
MODELS 1324 & 1624 & 1824
HYDRAULIC TRENCHERS
CONGRATULATIONS!
You are now the proud owner of a BARRETO trencher. Please take a moment of your time to
look over the following information. Familiarize yourself with the trencher, its characteristics,
and method of operation. Pay particular attention to the safety and operating instructions.
If you have any questions or need any replacement parts in the future, please contact us at your
convenience. Our toll-free phone number, fax and email are listed below.
THANK YOU for your patronage and confidence in BARRETO equipment.
Barreto Manufacturing, Inc.
Innovative Equipment Engineered to Last
66498 Hwy 203, La Grande, OR 97850
(800) 525-7348 (541) 963-7348
FAX (541) 963-6755
E-Mail: info@barretomfg.com
Web Site: http://www.barretomfg.com
Question and Answer IconNeed help?

Do you have a question about the Barreto 1324 and is the answer not in the manual?

Overview

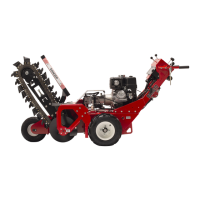
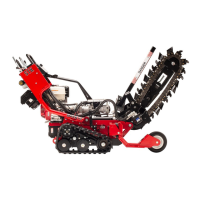
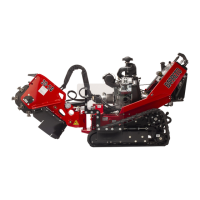
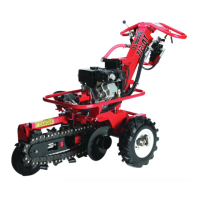
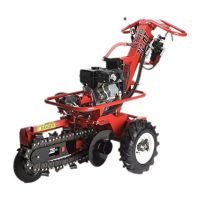
The Barreto Hydraulic Trencher, encompassing models 1324, 1624, and 1824, is a robust piece of equipment designed for digging trenches. Its primary function is to efficiently excavate soil using a hydraulic digging chain system. The manual emphasizes the importance of understanding the trencher's characteristics, operation, and safety instructions before use.

Important Technical Specifications:

  • Hydraulic Oil Capacity: The hydraulic reservoir holds approximately 15 gallons of hydraulic oil. The recommended oil is Shell DONAX TD FLUID or a comparable tractor transmission hydraulic oil.
  • Boom Wear Strip: The boom is equipped with a 7/8" wide wear strip on its bottom side.
  • Chain Slack: The digging chain should have approximately 2 inches of slack between the middle of the boom and the chain when the boom and chain are in a straight, horizontal position.
  • Wheel Drive Valve Cable Adjustment: The lower lever for the wheel drive valve should have a movement of 7/16" to 1/2" when the upper lever is pulled all the way up to the hand grip.
  • Axle Lock Movement: The lower axle lock lever should move 9/16" to 5/8" from the LOCK position to the UNLOCK position.
  • Engine Options (for 1624 & 1824 models): The 1624 model uses a 16 HP Briggs engine, while the 1824 model uses an 18 HP Honda engine.
  • Motor (for 1324 model): The 1324 model uses a 9.6 cubic inch motor. For 1624 and 1824 models, an 11.9 cubic inch motor is used.
  • Cushion Boom Lengths: Cushion booms are available in 24", 30", or 36" lengths.
  • Tire Options: Various tire and rim options are available, including 13 x 6.50 -6 Turfsavfer tires (with or without foam filling) and corresponding rims.
  • 4WD Damper: The 4WD damper system includes a damper, clevis pin, whiz locks, damper mount, nylock nuts, rod eye, SAE washers, and circle cotters.
  • 4WD Lift Linkage: This system includes a clevis pin, link, lock link, cotter, raise lever, spring, snap ring, thrust washer, bushing, and raise lever mount.
  • 4WD Snap Loc: Components include HH cap screws, hardened washers, upper and lower spring pivots, external snap rings, bushing, spring cap, die spring, stop tube, and nylock nuts.
  • 4WD Swing Arm: This assembly features HH cap screws, snap rings, whiz locks, SAE washers, nylock nuts, shaft mount plate, bearing flange set, bearings with collar, master link, roller chain, sprockets, swing arm, jack shaft, keys, thrust washer, C-clips, chain adjuster, rear chain guard, stop washer, and nut bars.
  • Crumbler Assembly: This includes a crumbler mount, arm, link, hardened washers, BH shoulder screws, spring, gripco nuts, HH cap screws, nylock nuts, clevis pin, and cotter pin. Optional 6" scraper is available.
  • Trailer (Barreto E4X6TBT Tilt Bed Trailer):
    • Receivers: Three receivers for attaching options like wheel locks or tiller bumper purchases.
    • Towing Ball: Requires a 2" ball on the towing vehicle.
    • Speed Limit: Do not exceed 45 miles per hour when towing.
    • Wiring: Four-pin connectors for tail, turn, brake, and ground. Standard color coding is Red = Right Turn, Yellow = Left Turn, Brown = Tail Lights, Green = Ground.
    • Wheel Lock (for 912 trencher): Uses a spring-loaded pin to secure the front wheel.
    • Wheel Lock (for 1318, 1324, 1624, 1824 trenchers): Uses a wheel lock pin behind the front wheel, with the handle behind the lip on the side plate and under the lock pin keeper.
    • Tiller Bumper Purchase (for 916, 918, 1320, 1620 tillers): Uses two bumper lock pins with hair spring cotters, and two bolts to prevent side-to-side shifting.
    • Spare Tire Mount: Includes a spare tire mount, bent arm pin, hair spring cotter, and lug nuts.
    • Swivel Jack & Mounting Bracket: For 4x6TBT or any 3x3 trailer tongue.
    • Tie-Down Kit: Includes chain mount, shackles, tie-down chains (5/16" x 42" and 5/16" x 86"), quick link, and ratchet load binder.

Usage Features:

  • Controls:
    • Ignition: "ON" to start, "OFF" to stop.
    • Engine (Throttle): Controls engine speed; operate at full throttle.
    • Clutch Lever: (Left handle grip) Activates ground speed and digging chain controls when pulled up. Releases to stop all motion. Must be held "ON" with digging chain control to start chain.
    • Axle: "UNLOCK" (down) for maneuvering (left wheel freewheels, right wheel drives). "LOCK" (up) for digging.
    • Digging Boom: Raises and lowers the digging boom.
    • Digging Chain: Starts chain in forward rotation after clutch lever is engaged.
    • Chain (Manual Control): Allows manual forward or reverse chain rotation to dislodge objects or dig difficult terrain. Can be used with clutch lever released.
    • Ground Speed: Controls wheel speed (forward or reverse) after clutch lever is engaged.
  • Starting Operation: Start and warm up the engine. Drive the trencher to the starting location with the axle in "UNLOCK." Lock the axle. Hold the digging chain control in "ON," pull up the clutch lever, and slowly lower the digging boom to the desired depth. Slowly move the ground speed control in REVERSE until the desired speed is reached, adjusting for soil conditions to avoid wheel spin or engine overload.
  • Hard to Dig Areas/Obstacles: Release the clutch lever to lock the wheels. Manually reverse the chain with the CHAIN control to dislodge objects. Manually run the chain forward with the CHAIN control to dig through roots or rocky areas. Intermittently activate the clutch lever to move the trencher back a few inches and repeat until the hard area is passed.
  • Trailer Usage:
    • Always secure the hitch to the ball and thread the safety chain through the hitch nut handle.
    • Attach the safety chain to the towing vehicle to prevent accidental detachment.
    • Check the hitch-to-ball connection after driving a few blocks.
    • Use appropriate wheel locks or tiller bumper purchases to secure equipment.
    • Strap Barreto equipment to the trailer D-rings for highway, long distance, or rough road towing.
    • Exercise extreme caution and allow extra clearance when towing.

Maintenance Features:

  • Hydraulic Oil Level Check: Routinely check the reservoir level using the sight glass on the left side of the tank. Add Shell DONAX TD FLUID or comparable oil if needed. Recheck oil level after the trencher has been run. Do not overfill.
  • Hydraulic Oil Filter Change: Change after the first 50 hours of use, then every 200 hours thereafter.
  • Hydraulic Oil Addition (with filter change): Add 1 quart of hydraulic oil to the reservoir with each filter change.
  • Hydraulic Fitting Check: Check all hydraulic fittings for leaks and tighten if necessary.
  • Greasing: Grease daily unless noted. Specific points include:
    • Boom Pivot (under rubber flap)
    • Outboard Bearings
    • 4WD Torque Tube (both ends) - Weekly
    • Wheel Hubs (1 zerk for each hub) - Monthly
    • Cylinder Pins (2)
    • Cylinder Rod End (through hole in motor cover)
    • Sprocket Hub Bearing
    • Front Wheel Axle - Weekly
    • Chain Roller
  • Engine Service: The engine is normally serviced prior to shipping, but users should check levels and add oil and fuel as required before starting, according to the engine manual.
  • Chain Installation: Slide the digging chain under the sprocket with teeth in the correct cutting direction (forward on top, rearward on bottom). Lower the boom onto the chain, wrap the chain around the boom and sprocket, and install the master link/pin. Tighten the chain using the boom adjuster screw to achieve the specified slack (2 inches). Tighten the adjuster screw locknut and boom mounting bolts.
  • Control Adjustments: Instructions are provided for adjusting the wheel drive clutch cable, digging chain valve lever, axle lock, speed cable, speed linkage, and speed control linkage dig speed. These adjustments ensure smooth operation and proper alignment of components.
  • Axle Chain Adjustment: Loosen bearing flange bolts and adjuster locknuts. Turn the left adjuster screw until vertical chain movement is 1/4" to 1/2". Turn the right adjuster screw the same amount. Tighten bearing flange bolts and locknuts.
  • Drive Chain Adjustment: Loosen access cover bolts and raise the cover. Loosen clamping bolts from inside the shaft mounts. Loosen the right locknut and turn the adjuster to get 3/8" to 1-1/4" vertical chain movement. Turn the left adjuster in the same amount to align the shaft. Tighten clamping bolts and locknuts and replace the cover.
  • Cleaning: Always thoroughly clean and service the trencher after each use.

Safety Instructions:

  • Read all safety and operating instructions before use.
  • Do not leave the trencher unattended with the engine running.
  • No parking brake; always park on a level surface.
  • The safety clutch lever is for operator protection; do not bypass or tape it down.
  • Wear safety goggles and a hard hat as objects may become airborne.
  • Stay clear of digging chain, auger, and other moving parts.
  • Contact local agencies to locate buried cables or gas lines.
  • Operate outdoors and avoid breathing exhaust and fuel fumes.
  • Do not smoke or operate near flames or sparks due to fuel fumes.
  • Hydraulic oil is under extreme pressure and can cause serious injury; check for leaks with cardboard.
  • Muffler and engine can cause burns; do not touch until cool.
  • Check the hydraulic reservoir level before starting the machine to prevent pump damage.

Warranty:

Barreto Manufacturing, Inc. warrants all BARRETO equipment against defects in material and workmanship for one year from delivery to the original user. This warranty covers replacement of defective parts (at dealer cost plus shipping for dealers) and excludes time for pick-up/delivery or service calls. It does not cover damage from abuse, neglect, or normal maintenance. Engines, engine accessories, and tires are warranted by their original manufacturers.

Barreto 1324 Specifications

General IconGeneral
BrandBarreto
Model1324
CategoryConstruction Equipment
LanguageEnglish

Related product manuals