OPERATION INSTRUCTIONS
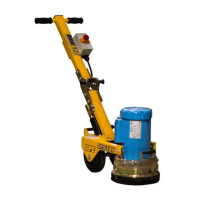
SETTING UP YOUR FLOOR GRINDER
Your Floor Grinder comes fully assembled with handle and motor fully installed. The
handle is folded to allow for easier transportation. The handle can be moved into operating
position by releasing the two locking pins on either side of the handle, the handle can then be
moved into 1 of 3 positions. With the handle in the desired position the locking pins can be
reengaged. Tooling can now be installed, and your Floor Grinder is ready for use.
PRIOR TO OPERATION
• Make sure that all dust, debris etc., are thoroughly removed from the unit prior to
operation. Special effort should be given to the bottom of the machine where the tooling
plate is located.
• Check all bolts and screws for tightness and make sure all bolts and screws are securely
tightened. Loose bolts and screws may cause damage to the unit. Make sure tooling is
properly installed.
• Connect the vacuum hose to the dust extraction port if a dust control vacuum is being
used.
• Ensure the power supply is correct for the machine before making the connection.
CHANGING OR INSTALLING TOOLING
• Tilt the machine onto the back wheels and rest it on the handlebar.
• All tooling is fixed in grooves and held in place by magnets.
• Check the grinding tool for wear and replace if needed.
• Remove tooling by sliding tooling to the centre of the disk.
• Fix new tools by sliding the tool in the groove starting from the centre of the machine
ATTENTION: Before working on the grinder bring the motor to a total stand still and
disconnect from the power supply.
CAUTION: Tools can be hot after use.