Do you have a question about the Bauer 20142E-B and is the answer not in the manual?
Indicates a hazardous situation which, if not avoided, will result in death or serious injury.
Indicates a hazardous situation which, if not avoided, could result in death or serious injury.
Indicates a hazardous situation which, if not avoided, could result in minor or moderate injury.
Addresses practices not related to personal injury.
Read all instructions before use and follow safety precautions.
Take precautions during setup, including work area and water supply.
Covers safe handling, electrical safety, and emergency procedures.
Details on water, accessories, GFCI, and intended use.
Focuses on injection hazards and surface damage.
Consult doctor for regular users; avoid smoking and use gloves.
Use low-vibration tools and schedule breaks.
Maintain tool and stop use if abnormal vibration occurs.
GFCI provides shock protection; use identical replacement parts if needed.
Use outdoor-rated, 3-wire cords with correct rating; avoid damage.
Explains VAC, Amperes, On/Off positions.
Explains eye injury, manual reading, electric shock, and injection hazards.
Lists electrical rating, pressure, flow rate, and temperature.
Provides length of high-pressure hose and power cord.
Read all safety information before setup or use.
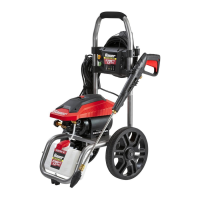
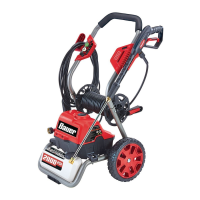
Identifies key components of the pressure washer.
Instructions for attaching the handle securely.
Steps to connect the high-pressure hose to the unit and gun.
Designate work area, check water supply, and plan job.
Use dedicated circuits and route cords safely.
Ensure inlet strainer is clear and insert wand into spray gun.
Connect water supply hose to the inlet and flush debris.
Choose appropriate nozzle and use high-impact spray with caution.
Properly uncoil hose, engage safety lock, and test spray.
Plug into dedicated outlet, press reset, and turn on power.
Fill tank, attach black nozzle, spray, then switch nozzles for rinsing.
Use low-impact spray on windows; avoid if caulking is damaged.
Do not clean hot wood; use low-impact spray and work with grain.
Use low-impact spray on brick; soak surface before applying detergent.
Secure spray gun, turn off unit, disconnect hoses, and clean nozzles.
Inspect tool for loose hardware, damage, or loose wiring before each use.
Drain water, flush tank, clean body, and remove mineral deposits.
Periodically remove mineral buildup from water inlet.
Store in a dry, frost-free room; flush with antifreeze for long-term storage.
Check cord, power outlet, GFCI reset, or contact technician.
Press GFCI reset button or have unit repaired by technician.
Check water supply, filter, nozzle attachment, or contact technician.
Check detergent type, clean dispenser, and replace if needed.
Clean unit with de-mineralizing solution for mineral deposits.
| Brand | Bauer |
|---|---|
| Model | 20142E-B |
| Category | Pressure Washer |
| Language | English |