EasyManua.ls Logo

Bauer 21183C-B - User Manual

Bauer 21183C-B
15 pages
Print Icon
To Next Page IconTo Next Page
Loading...
Visit our website at: http://www.harborfreight.com
Email our technical support at: productsupport@harborfreight.com
For Best Results,
Use 3.0 Amp Hour Battery
(Sold Separately)
Owners Manual & Safety Instructions
Save This Manual Keep this manual for the safety warnings and precautions, assembly,
operating, inspection, maintenance and cleaning procedures. Write the product’s serial number in the back
of the manual (or month and year of purchase if product has no number). Keep this manual and the receipt
in a safe and dry place for future reference. 21l
When unpacking, make sure that the product is intact
and undamaged. If any parts are missing or broken,
please call 1-888-866-5797 as soon as possible.
Copyright
©
2021 by Harbor Freight Tools
®
. All rights reserved.
No portion of this manual or any artwork contained herein may be reproduced in
any shape or form without the express written consent of Harbor Freight Tools.
Diagrams within this manual may not be drawn proportionally. Due to continuing
improvements, actual product may differ slightly from the product described herein.
To ol s re q ui red f o r a ss em b ly an d s er v ic e m ay no t b e i n cl ud e d.
Read this material before using this product.
Failure to do so can result in serious injury.
SAVE THIS MANUAL.
Question and Answer IconNeed help?

Do you have a question about the Bauer 21183C-B and is the answer not in the manual?

Overview

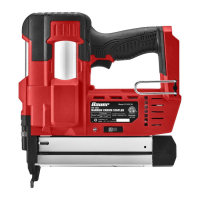
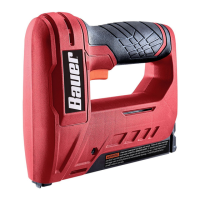
The device described in the manual is a Bauer 20V 18G Narrow Crown Stapler, identified by model number 21183C-B and item number 59098. It is a battery-operated (cordless) power tool designed for driving narrow crown staples.

Function Description

The Bauer 20V 18G Narrow Crown Stapler is used for fastening applications, driving 18 gauge narrow crown staples ranging from 5/8" to 1-1/2" in length. It operates using a 20V Li-Ion battery pack (sold separately) and is charged with a Bauer 20V Li-Ion charger (sold separately). The stapler features an actuation system that supports both Single Sequential and Contact actuation modes, allowing for precise or rapid fastener placement depending on the user's needs.

The tool includes a Workpiece Contact mechanism, which helps prevent accidental firing by ensuring the tool is pressed firmly against an object before driving a fastener. An LED Indicator provides visual feedback on the tool's status, including battery level, overheating, jams, and an empty magazine. A Depth Knob allows the user to adjust the driving depth of the fasteners.

Important Technical Specifications

  • Battery Pack: Bauer 20V Li-Ion (sold separately)
  • Charger: Bauer 20V Li-Ion (sold separately)
  • Actuation System: Single Sequential and Contact
  • Staple Size: 18 Gauge, Narrow Crown 5/8" – 1-1/2"

Usage Features

General Operation: Before use, the battery pack must be fully charged and properly connected to the tool. The tool should always be tested on a piece of scrap wood to ensure proper function and to prevent accidental discharge. Users must wear ANSI-approved safety goggles with side shields and hearing protection during operation.

Loading the Tool: To load staples, the Latch is depressed, and the Magazine Cover is slid back. Staples are placed upside down in the magazine with the crown closest to the body of the tool. The Magazine Cover is then gently slid back into place, ensuring it re-engages with the Latch. It is crucial to empty the magazine before loading staples of a different length to prevent jams.

Actuation Modes: The stapler offers two actuation modes, selected via the Actuation Mode Switch:

  • Single Sequential Actuation: This mode is for precise placement of fasteners. The tool will only actuate if the Workpiece Contact is pressed against the workpiece before the Trigger is pulled. It will only actuate again if the Trigger is released and squeezed again. This mode prevents accidental firing if the Workpiece Contact is not pressed against an object.
  • Contact Actuation: This mode allows for rapid placement of fasteners. The tool will actuate if the Workpiece Contact is pressed against the workpiece and the Trigger is pulled. It will actuate again if the Trigger is released and pulled or if the Workpiece Contact is lifted and pressed against the workpiece again. This mode is recommended only for skilled operators aware of the hazards and proper safe work practices due to its rapid firing capability.

Depth Adjustment: The driving depth of fasteners can be adjusted using the Depth Knob. Turning the knob clockwise reduces nail depth, while turning it counterclockwise increases nail depth. The battery pack should be disconnected, and the Workpiece Contact pointed away when adjusting depth.

LED Indicator: The LED Indicator provides critical status updates:

  • Flashing Red: Indicates a jam in the Magazine.
  • Solid Red: Indicates low battery.
  • Flashing Green: Indicates the tool is overheating.
  • Solid Green: Indicates no fasteners are in the Magazine.
  • Not Illuminated: Indicates the battery is fully charged, and fasteners are correctly installed.

Safety Precautions during Use:

  • Always keep fingers away from the Trigger when not driving fasteners.
  • Do not point the tool toward oneself or anyone nearby.
  • Only actuate the tool when placed firmly against the workpiece.
  • Do not drive fasteners on top of other fasteners or at too steep an angle, as this can cause ricocheting.
  • Avoid driving fasteners too close to the edge of a workpiece to prevent splitting or flying debris.
  • Keep clear of the workpiece near the fastening area, as fasteners may bend sideways and exit unexpectedly.
  • Do not use the tacker for fastening electrical cables.

Maintenance Features

Regular Inspection: Before each use, a general inspection of the tool is required. This includes checking the Workpiece Contact operation, free movement of the Workpiece Contact and Trigger, the condition of the Battery Pack (no leaking, swelling, or cracks), loose hardware, misalignment or binding of moving parts, and any cracked or broken parts.

Post-Use Procedures: After each use, the Battery Pack should be disconnected, and the Magazine emptied. The tool should be discharged into a piece of scrap wood to confirm it is disconnected and incapable of driving fasteners. The Drive Guide and Magazine should be cleaned to remove dirt and debris, and the Drive Guide should be lightly oiled. External surfaces should be cleaned with a dry cloth. The tool should be stored indoors, out of children's reach.

Clearing Jams: If the LED Indicator flashes red, a jam is present. To clear a jam:

  1. Remove the Battery Pack.
  2. If a fastener is jammed in the discharge area, remove it with pliers.
  3. If a fastener is jammed in the Magazine, open the Magazine by pressing the release Latch and sliding it open.
  4. Pull out the jammed fastener and any remaining strip. Dispose of damaged fasteners.
  5. Place a new strip of staples into the magazine and slide the cover shut. If the LED continues to flash after clearing the jam, the tool requires service by a trained technician.

Battery Care:

  • Keep the Battery Pack dry.
  • Do not open, drop, short-circuit, puncture, incinerate, or expose the Battery Pack to temperatures greater than 265°F.
  • Charge the Battery Pack only according to its Charger's instructions.
  • Inspect the Battery Pack before every use; do not use or charge if damaged.
  • When not in use, keep the Battery Pack away from metal objects that could short-circuit the terminals.
  • Li-Ion batteries must be recycled or disposed of properly.
  • Store the Battery Pack, Charger, and tool in a dry, indoor area away from metal objects to prevent shorting.

Troubleshooting: The manual provides a troubleshooting guide for common issues such as insufficient or excessive fastener depth, the tool cycling without driving fasteners, frequent jamming, the tool not starting, slow operation, decreased performance, excessive noise, and overheating. Solutions range from adjusting settings and cleaning to replacing parts or seeking professional service. For example, if the tool will not start, it could be due to an improperly connected or uncharged battery pack, or a burnt-out battery pack.

Service: Tool service and repairs must be performed only by qualified repair personnel using identical replacement parts. Any procedures not specifically explained in the manual should be performed by a qualified technician. The tool should not be modified.

Bauer 21183C-B Specifications

General IconGeneral
BrandBauer
Model21183C-B
CategoryPower Tool
LanguageEnglish

Related product manuals