EasyManua.ls Logo

Bauer 21221E-B - User Manual

Bauer 21221E-B
16 pages
To Next Page IconTo Next Page
Loading...
Visit our website at: http://www.harborfreight.com
Email our technical support at: productsupport@harborfreight.com
Owners Manual & Safety Instructions
Save This Manual Keep this manual for the safety warnings and precautions, assembly,
operating, inspection, maintenance and cleaning procedures. Write the product’s serial number in the
back of the manual (or month and year of purchase if product has no number). Keep this manual and the
receipt in a safe and dry place for future reference. 22h
When unpacking, make sure that the product is intact
and undamaged. If any parts are missing or broken,
please call 1-888-866-5797 as soon as possible.
Copyright
©
2022 by Harbor Freight Tools
®
. All rights reserved.
No portion of this manual or any artwork contained herein may be reproduced in
any shape or form without the express written consent of Harbor Freight Tools.
Diagrams within this manual may not be drawn proportionally. Due to continuing
improvements, actual product may differ slightly from the product described herein.
Tools required for assembly and service may not be included.
Read this material before using this product.
Failure to do so can result in serious injury.
SAVE THIS MANUAL.
Question and Answer IconNeed help?

Do you have a question about the Bauer 21221E-B and is the answer not in the manual?

Bauer 21221E-B Specifications

General IconGeneral
TypeImpact Wrench
Voltage20V
Anvil TypeDetent Pin
Power SourceCordless
Spindle LockNo
Drive size1/2 inch
Maximum Torque450 ft-lbs
Switch TypeVariable Speed

Summary

IMPORTANT SAFETY INFORMATION

Warning Symbols and Definitions

Defines hazard symbols and their meanings to alert users to potential injury risks.

General Tool Safety Warnings

Provides essential safety precautions for operating power tools to prevent injury.

Grounding Instructions

110-120 VAC Grounded Tools: Tools with Three Prong Plugs

Details safety procedures for grounding 110-120 VAC tools to prevent electric shock.

Drill Press Safety Warnings

Vibration Safety

Specifications

Setup - Before Use

Mounting

Instructions for securing the tool to a stable supporting structure before operation.

Assembly: Column to Base

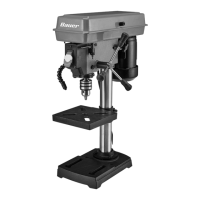
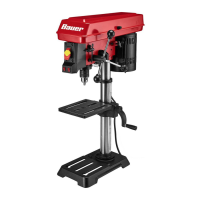
Step-by-step guide for attaching the column base to the main base.

Assembly: Table to Column

Procedure for attaching the table support bracket to the column.

Headstock and Feed Handles

Details on installing the headstock and attaching the feed handles.

Installing;Removing the Chuck

Guide on how to securely install and remove the drill chuck.

Operating Instructions

Tool Set Up

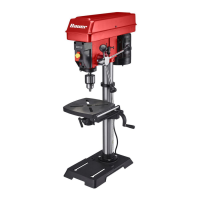
Initial setup procedures for the drill press before operation.

Table Adjustment

Instructions for adjusting the drill press table's height, pivot, and tilt.

Setting a Drilling Depth

Guide on how to set the precise drilling depth using adjustment nuts.

Changing Drill Speed

Drill Bit Installation

Step-by-step instructions for correctly installing drill bits into the chuck.

Workpiece and Work Area Set Up

General Operating Instructions

Maintenance and Servicing

Cleaning, Maintenance, and Lubrication

Procedures for cleaning, routine maintenance, and lubrication of the tool.

Belt Inspection and Tensioning

Guidance on inspecting belts for damage and proper tensioning.

Troubleshooting

Parts List and Diagram

Parts List

A comprehensive list of all parts with their descriptions and quantities.

Assembly Diagram

An exploded view diagram showing the assembly of all parts.
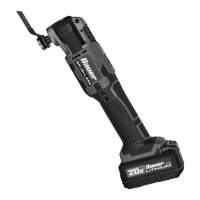
Limited 90 Day Warranty

Related product manuals