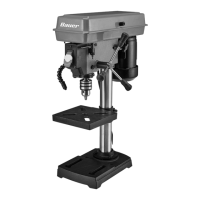
Page 7For technical questions, please call 1-888-866-5797.Item 58780
SAFETYOPERATIONMAINTENANCE SETUP
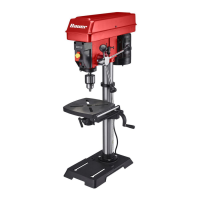
Table to Column
1. Thread the Table Lock Handle (7) into the
opening in the Table Support Bracket (5).
2. Lower Table Support Bracket (5) down over
the Column with the top of the table face up,
and tighten Table Lock Handle to secure.
Table Lock
Handle (7)
Table
Support
Bracket (5)
Work Table (6)
Headstock and Feed Handles
1. Loosen the Set Screw (39) on each
side of the Headstock (71) so they
will stay clear while installing it.
2. With the help of an assistant, lift the Headstock
above the Column, and gently slide it
down the Column as far as it will go.
3. Align Headstock with Base, and tighten the two
Set Screws to secure the Headstock in place.
4. Thread the Feed Bars into the threaded openings
on the Feed Bar Seat (23) and tighten them.
Feed Bar
Seat (23)
Set
Screw
(39)
Headstock (71)
Feed
Bars (56)
Chuck
(60)
Installing/Removing the Chuck
1. Loosen the Table Lock Handle (7) and slide the
Table Support Bracket up the Column to within 6″ of
the Spindle (14). Tighten the Table Lock Handle.
2. Open the jaws of the Chuck (60) to their
maximum, using the supplied Chuck Key.
3. Put a piece of scrap wood on the
table to protect the Chuck nose.
4. Ensuring all parts are thoroughly clean, dry and
burr free, place the Chuck with its open jaws on
the scrap wood, directly under the Spindle.
5. Use the Feed Handle to gently lower the Spindle so
it is just entering the opening in the top of the Chuck.
6. Examine the Chuck from all sides to be sure
that it is properly aligned with the Spindle.
7. Using the Feed Handles, insert the Spindle all
the way into the Chuck, pressing the Chuck
nose hard against the piece of scrap wood on
the Table to secure the Chuck into place.
8. To remove the Chuck, use Feed Handles
to lower Chuck to lowest position.
9. Place a drift key (not included), above the chuck and
tap it with a rubber mallet (not included) to release
the Chuck from the Spindle. Make sure to hold
Chuck with one hand to prevent it from falling.
10. Alternative Method: Place the Chuck Key into
the opening on the side of the Chuck. Open the
Headstock Cover and hold the Spindle Pulley
stationary. Using the Chuck Key for leverage, rotate
the entire Chuck clockwise, while gently pulling
downwards. Remove the Chuck from the Spindle.