This document outlines the installation and user instructions for a Baxi Programmer & Room Sensor, available in three models: a 7-day wired digital programmer and room sensor (Part No. 720644701), a 7-day wireless digital programmer and room sensor (Part No. 720644801), and a 24-hour wireless digital programmer and room sensor (Part No. 720644901). These instructions are crucial for proper setup, operation, and maintenance of the device, and should be kept in a safe place, to be handed over to the next occupier if you move house.
Function Description
The Baxi Programmer & Room Sensor is a sophisticated control unit designed to manage central heating and domestic hot water systems. It functions as a thermostat and programmer, allowing users to set specific temperature modes and time schedules for optimal comfort and energy efficiency. The device continuously monitors the room temperature and operates in various modes: 'Hi' (or 'COMFORT'), 'Lo' (or 'REDUCED'), 'Frost Protection', or 'Automatic' (AUTO), which follows programmed schedules.
In 'Automatic' mode, the boiler will heat the property to the 'Hi' COMFORT temperature during programmed heating periods and maintain a 'Lo' REDUCED temperature for overnight periods or when the property is unoccupied. The 'Frost Protection' function ensures the boiler fires if the temperature drops below 4°C, even when the unit is in Standby mode.
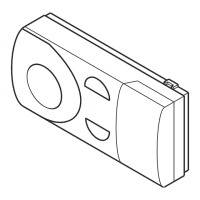
The wired version (720644701) connects directly to the boiler unit, taking full control of its functions, except for Chimney, Commissioning, and Combustion Adjustment, which are managed via the boiler's instruction manual. The wireless versions (720644801 & 720644901) communicate with a Radio Frequency Receiver fitted near the boiler via radio frequency transmission.
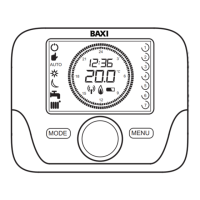
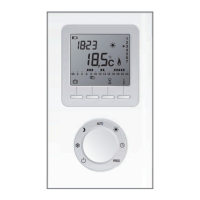
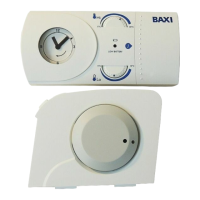
The device features a digital display that shows the current time, day, measured temperature, battery life (for wireless versions), and various symbols indicating the operating mode, central heating and domestic hot water status, and signal strength (for wireless versions). A selector button and menu button facilitate navigation and setting adjustments.
Usage Features
The programmer offers a range of user-friendly features for controlling heating and hot water:
- Standby & Operating Modes: The controller can be set to either Standby Mode, where both central heating and domestic hot water are switched OFF (though frost protection remains active), or Operating Mode, where the boiler responds to preset demands. Switching between these modes is done via the Mode button and selector button, with visual confirmation on the display.
- Central Heating Activation: Users can set central heating to 'AUTO', 'REDUCED', 'COMFORT', or 'OFF'. This involves pressing the Mode button, rotating the selector button to the flashing central heating symbol, confirming, and then scrolling through the options.
- Domestic Hot Water Activation: For combi boilers, it is recommended to keep domestic hot water in the 'ON' position. However, users can alter this setting via the menu, similar to central heating activation.
- Temperature Settings:
- Room Temperature (Comfort): The 'COMFORT' set point can be adjusted by pressing the MENU button, navigating to 'SC ON', and using the selector button to increase or decrease the temperature.
- REDUCED Temperature: The 'REDUCED' set point can be adjusted similarly by navigating to 'Sr Ed' in the menu.
- Domestic Hot Water Temperature: The domestic hot water temperature can be set by navigating to 'Sd HU' in the menu.
- Manual Override: During a heating period, the room temperature can be temporarily increased or decreased by rotating the selector button. The set temperature will revert to the programmed 'COMFORT' mode value at the next heating demand period.
- Setting Time & Day: The current time and day can be set through the MENU. For the 7-day versions, the day can be set individually for each day of the week, for 5 weekdays and 2 weekend days, or for all 7 days identically. The 24-hour version does not have a 'Day' function.
- Programmed Schedules: The device allows for setting multiple timed 'On' and 'Off' periods for central heating and domestic hot water, enabling users to create customized heating schedules. Preset programmes (Pr1, Pr2, Pr3) are available for quick selection.
- Outdoor Sensor Curve (otC): For systems with an external weather sensor (Part No. 720103001), the temperature compensation value can be adjusted to optimize heating based on outdoor conditions. This function is accessible through the parameter menu.
- Parameter Codes: Advanced settings and functions are accessible through a parameter menu, including assigning the programmer to a heating circuit, setting it as a master, enabling user adjustments for reduced room temperature and DHW programming, and configuring DHW modes (24h, CHP, DhP). Other parameters include room sensor offset, temperature unit, software version display, room anti-freeze function, room sensor enable/disable, and room temperature modulation.
- Error Codes: The device displays error codes (e.g., E83, E85) to indicate communication problems or other issues. Some errors can be reset by following a specific procedure involving the selector button. A 'Service Due' code ('Sd') indicates that the boiler may require servicing.
Maintenance Features
The manual provides guidance on several maintenance aspects, particularly for the wireless versions:
- Battery Replacement: The wireless units require 2 AA type alkaline batteries. A flashing battery symbol on the digital display indicates that the batteries need replacing. Instructions for battery installation are provided. It's recommended to change batteries approximately every 2 years as a precaution. If batteries go flat, settings are retained for a maximum of one week, and the boiler defaults to ON.
- Clock Function Check: The clock function needs to be checked every time the batteries are replaced.
- Wireless Communication & Synchronization: The wireless units are pre-synced, but if communication issues arise (indicated by Error 83 or 85), a manual synchronization process is detailed. This involves holding the selector button, navigating to 'SnC OFF', and then interacting with the receiver unit to establish a connection. The manual also includes a signal strength test to help determine the optimal location for the programmer and room sensor, aiming for a signal strength of 3 or 4 for reliable operation.
- Troubleshooting: The manual outlines steps for troubleshooting communication errors, including checking wiring between the receiver and boiler, ensuring units are within range, and performing manual synchronization.
- Service Warning: If the 'Sd' symbol appears, users are advised to contact 'heateam' for boiler servicing. Resetting this function without completing the service will invalidate the warranty.
- Transferring Control: If necessary, control can be transferred back to the boiler by removing the unit from its cradle, unplugging the receiver, or cycling the boiler's power.