EasyManua.ls Logo

BCP SKY5871 - User Manual

BCP SKY5871
8 pages
Print Icon
To Next Page IconTo Next Page
Loading...
SKY1831 + SKY5871 + SKY5872 + SKY5873 + SKY6579 + SKY6580
SKY6668
Ver. 9
INSTRUCTION
MANUAL
Hanging Chaise Lounge Chair
Question and Answer IconNeed help?

Do you have a question about the BCP SKY5871 and is the answer not in the manual?

Summary

Tools and Hardware

Tools Required

Lists the necessary tools for assembly, including Allen wrench and wrench.

Hardware

Details the specific hardware components required for assembly, with itemized lists.

Parts Identification

Part A: Top Curved Pipe

Identifies the top curved pipe component.

Part B: Curved Back Leg

Identifies the curved back leg component.

Part C: Middle Curved Pipe

Identifies the middle curved pipe component.

Part D: Seat Frame Curved Pipe (L;R)

Identifies the left and right seat frame curved pipes.

Part E: Front Leg

Identifies the front leg component.

Part F: Seat Frame Small Crossbar

Identifies the small crossbar for the seat frame.

Part G: Seat Frame Pipe

Identifies the seat frame pipe component.

Part H: Seat Frame U-shape Pipe

Identifies the U-shape pipe for the seat frame.

Part I: Seat

Identifies the main seat component.

Part J: Canopy Frame

Identifies the canopy frame component.

Part K: Armrest

Identifies the armrest components.

Part L: Nut Cap

Identifies the nut cap components.

Part M: Canopy

Identifies the canopy component.

Part N: Cushion

Identifies the cushion component.

Part O: Knob

Identifies the knob components.

Part P: Leg Cap

Identifies the leg cap components.

Part Q: 60 mm Tube Cap

Identifies the 60mm tube cap components.

Part R: 42 mm Tube Cap

Identifies the 42mm tube cap components.

Product Assembly Instructions

Step 1: Attach Eye Bolt to Top Curved Bar

Securely attach the eye bolt to the top curved bar using a wrench and lock nut.

Step 2: Attach Canopy Frame

Connect the canopy frame to the top curved bar using the attached knob.

Step 3: Assemble Outer Frame

Assemble the outer frame by attaching legs, end caps, and leg caps.

Step 4: Connect Seat Frame Pipes

Join seat frame pipes with hardware, hook carabiner, and add end caps.

Step 5: Assemble Seat Frame

Assemble the seat frame using various pipes, armrests, and nuts.

Step 6: Attach Seat

Lay the seat and secure it to the frame using the provided rope.

Step 7: Secure Canopy and Cushion

Attach the canopy to the frame and tie the cushion to the seat frame.

Product Warranty and Support

Help Center Information

Provides contact information and resources for product support and inquiries.

Product Warranty Details

Outlines the terms and conditions for product returns and refunds.

General Liability Warning

Disclaims liability for injuries or damages due to improper use or assembly.

Overview

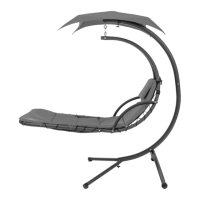
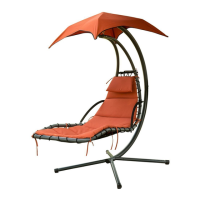
This document is an instruction manual for a Hanging Chaise Lounge Chair, identified by several model numbers including SKY1831, SKY5871, SKY5872, SKY5873, SKY6579, SKY6580, and SKY6668. The manual provides detailed instructions for assembling and using the product, along with important safety warnings, hardware lists, and product warranty information.

Function Description:

The Hanging Chaise Lounge Chair is designed to provide a comfortable and relaxing seating experience. It features a unique suspended design, allowing the user to gently sway or recline. The chair includes a canopy for shade, a cushioned seat for comfort, and a sturdy frame for support. It is intended for residential use and offers a leisurely way to enjoy outdoor or indoor spaces. The design emphasizes comfort and relaxation, with a focus on a suspended, ergonomic lounging position.

Important Technical Specifications:

  • Capacity: The chair has a weight capacity of 265 lbs.
  • Assembly Time: It requires approximately 1 person and up to 60 minutes for assembly.
  • Hardware: The assembly requires various bolts (M10 x 100mm, M10 x 80mm, M8 x 70mm, M8 x 75mm, M8 x 50mm, M8 x 20mm), a carabiner hook, an S-hook, rope, and an eye bolt.
  • Tools: The manual specifies the use of an Allen wrench and a regular wrench, both provided with the product.
  • Components: Key components include a top curved pipe, curved back leg, middle curved pipe, seat frame curved pipes (L/R), front legs, seat frame small crossbar, seat frame pipe, seat frame U-shape pipe, seat, canopy frame, armrests, nut caps (M10 and M8), canopy, cushion, knobs, leg caps, 60mm tube caps, and 42mm tube caps.

Usage Features:

  • Suspended Design: The chair hangs from a curved frame, allowing for gentle swinging and a unique lounging experience.
  • Canopy: A canopy (Part M) is included to provide shade, enhancing comfort during outdoor use. It attaches to the canopy frame (Part J).
  • Cushioned Seat: The chair comes with a cushion (Part N) for added comfort, which is tied to the seat frame.
  • Ergonomic Lounging: The design of the seat (Part I) and frame components (Parts D, F, G, H) suggests an ergonomic shape for comfortable reclining.
  • Side Entry: Users are specifically instructed to enter the chair from the side, not the front, to prevent potential injury.
  • Adjustable Components: The assembly process involves securing various pipes and frames, which once assembled, form a fixed structure. The canopy's position is secured with a knob, allowing for proper tensioning.

Maintenance Features:

  • Regular Bolt Checks: Users are advised to reconfirm that all bolts, screws, and knobs are secure every 90 days. This is a critical maintenance step to ensure the product's safety and stability over time.
  • Hardware Replacement: In case of missing, broken, damaged, or worn parts, users should stop using the product until repairs are made and/or factory replacement parts are installed. This highlights the importance of using only approved components for maintenance.
  • Storage Guidelines: The product should not be used or stored in the proximity of open flame or flammable/combustible chemicals, indicating a need for careful storage to prevent damage or hazards.
  • Cleaning: While not explicitly detailed, the nature of a lounge chair suggests regular cleaning of the cushion and frame to maintain its appearance and hygiene, especially if used outdoors.
  • Warranty Information: The product comes with a 60-day return policy for a full refund, provided the item is returned in its original packaging with all accessories. Returns require an RA (Return Authorization) number. This provides a framework for addressing product issues and potential replacements. The warranty also clarifies that the manufacturer disclaims liability for personal injury or property damage resulting from incorrect attachment, improper use, inadequate maintenance, unapproved modification, or neglect. This underscores the user's responsibility in maintaining the product according to instructions.

BCP SKY5871 Specifications

General IconGeneral
BrandBCP
ModelSKY5871
CategoryIndoor Furnishing
LanguageEnglish

Related product manuals