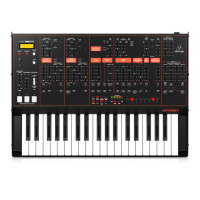
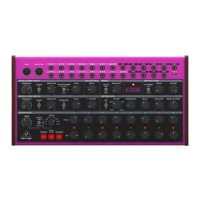
(1) FREQUENCY (VCO 1) – control the frequency ± 5 octave
(10 octave range).
(2) SHAPE – select Square or Triangle waveform.
(3) ENVELOPE – this bipolar control increases pitch
modulation when turned to the CW (Clock-wise). Turning
left applies negative Envelope Modulation giving a slide
pitch eect.
(4) SEQ PITCH MOD – this 3 way switch selects if the Pitch
Sequencer is sent to OSC 1&2, to OSC 2 only or o.
(5) LEVEL – this sets the volume for VCO 1.
(6) EG (VCO 1&2) DECAY – this control modulates the pitch
of both Oscillator’s. Turning CW increases the amount of
modulation added.
(7) FREQUENCY (VCO 2) – control the frequency ± 5 octave
(10 octave range).
(8) SHAPE – select Square or Triangle waveform.
(9) ENVELOPE – this bipolar control increases pitch
modulation when turned to the CW (Clock-wise). Turning
left applies negative Envelop Modulation giving a slide
pitch eect.
(10) HARD SYNC – switch On to force OSC 2 to match the phase
of OSC 1. Can be used for complex metallic sounds or
anged sounds.
(11) LEVEL – this sets the volume for VCO 2.
(12) 1-2 FM AMT – modulate the pitch of OSC 2 with OSC 1, turn
CW to increase the eect.
(13) NOISE COLOR – select Pink or White noise. White noise is
bright while pink noise is darker sounding.
(14) NOISE/EXT – set the amount of NOISE or the level of EXT
AUDIO added into the signal.
(15) POWER LED – indicates the unit is on. Turns red if poly
mode is activated.
(16) VCA MODE – Fast sets the VCA EG to around 1 ms. Slow
sets the attack time of the VCA EG to 100ms.
(17) DECAY – sets the decay time of the VCA envelope.
(18) VOLUME – controls the main overall volume.
(19) VCF SELECT – choose either High Pass HP or Low Pass LP
lter modes.
(20) CUTOFF – adjust the lter cuto point depending which
mode is selected (20 Hz to 20 kHz).
(21) RESONANCE - adjusts the resonance of the lter. This
emphasizes the frequencies around the cuto point.
(22) DECAY (FILTER) – determines how quickly the change in
timbre returns to its original value over time.
(23) ENVELOPE (FILTER) – turning CW from 12 o’clock
increases lter envelope modulation. Turning counter
clockwise (CCW) applies negative envelope modulation to
the lter cuto frequency.
(24) NOISE/VCF MOD – turning the NOISE/VCF MOD CW
governs how much the Filters Cuto Frequency is being
modulated by the Noise source. By patching into the VCF
MOD input on the patch bay, any control signal can modify
the Filter’s Cuto Frequency.
(25) TEMPO – Tempo can be set from 10 to 10,000 when set to
internal (INT). Via MIDI and USB the range is 10- 300 BPM.
(26) CLOCK – Clock can be set to MIDI, USB or INT/EXT. Use the
ADV/CLOCK patch point to clock externally.
(27) SCALE – this sets the timing of the sequencer against the
incoming MIDI or USB CLOCK. Choose from 1/4, 1/8, 1/16,
1/32 straight rhythm or 1/4T, 1/8T, 1/16T and 1/32T
triplet feel.
(28) TRIGGER - With the Sequencer stopped, pressing the
TRIGGER button will play the current Sequencer Step
(shown by the LED) without advancing to the next step.
This makes it easy to ne-tune settings for a specic step
by playing it as many times while changes are made.
(29) PLAY/STOP – this button stops and starts the sequencer at
the current step.
(30) ADVANCE – move step by step through the 8 steps of
the sequencer.
(31) PITCH – These 8 controls adjust pitch values. CW of centre
adds to the VCO Frequency control. Moving CCW from
the 12 o’clock position lowers the pitch for that step. The
controls have around a 10-octave range.
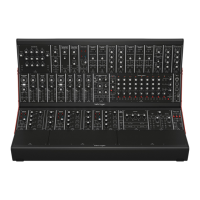
(EN) Step 2: Controls
EDGE Controls
(32) VEL – these 8 controls adjust the velocity of each. They
control the amplitude of the VCO Envelope, Filter Envelope/
Decay and the VCA Decay. Turn CW to raise the value from
0 V to 5 V.
(33) MIDI IN – this MIDI DIN input can be used to play sounds
via an external MIDI device and also allow MIDI clock to
be used.
(34) OUT/THRU – MIDI DIN can be used as an output or a thru.
(35) OSC 1 CV – oscillator 1 pitch CV, at 1 V/octave.
(36) OSC 2 CV – oscillator 2 pitch CV, at 1 V/octave.
(37) OSC DECAY – input determines the Decay Time of the OSC
Decay and is useful for adding pitched dynamics to tuned
percussion sounds.
(38) ADV/CLOCK – When the input of a clock’s rising edge is
detected, the Sequencer pattern is shifted by one step. In
this mode, the Tempo control has no use.
(39) TRIGGER – This input will Trigger all three Envelope
Generators at the currently selected Sequencer Step
Velocity level without advancing to the next step. This is
useful when connecting to external sequencers.
(40) VELOCITY – controls the maximum amplitude of the
Envelope Generators and is one of the keys to a highly
dynamic and expressive sound.
(41) NOISE LEVEL – input modulates the value of the NOISE /
EXT LEVEL control regardless of whether it is controlling
the Noise level, or the level of an External Audio Signal
connected via the EXT AUDIO input jack.
(42) 1-2 FM AMT – This input modulates the value of the 1-2
FM AMT control to determine the amount of modulation
applied to Oscillator 2 by Oscillator 1.
(43) EXT AUDIO – Inserting an External Audio source into this
jack removes Noise from the signal path and replaces it
with the External Audio Signal. The volume of this input is
then controlled by the NOISE / EXT LEVEL control.
(44) TEMPO – This input provides 1V/Octave control of the
Sequencer Clock VCO speed.
(45) PLAY/STOP – allows an external voltage to start and stop
the Sequencer.
(46) VCF MOD – inserting a control voltage replaces the Noise
Generator as a hardwired modulation source for the Filter.
The maximum amount of modulation applied to the Filter
will still be controlled by the NOISE / VCF MOD control.
(47) VCF DECAY – This input controls the Decay Time of the VCF
EG and is useful for creating large variations in sound.
(48) VCA CV – This input allows a control voltage to be applied
to the output VCA oering another way of modulating the
overall volume.
(49) VCA DECAY – This input regulates the Decay Time of the
VCA EG and is useful for adding variations to non-pitched
percussion patterns.
(50) OSC 1 – direct out of Oscillator 1. Can be used as a
modulation or audio output.
(51) OSC 2 – direct out of Oscillator 2. Can be used as a
modulation or audio output.
(52) OSG EG – this output duplicates the control voltage used
to modulate both Oscillator’s internally.
(53) TRIGGER – provides a pulse from the Sequencer Clock that
can be used as a clock source for synchronizing to external
instruments, or as a Trigger signal.
(54) VELOCITY – provides a voltage that varies based on the
Velocity setting of the current Sequencer step.
(55) PHONES – 3.5 mm headphone output controlled by the
volume control (18).
(56) PITCH – provides a voltage that changes based on the
Pitch setting of the current Sequencer step.
(57) VCF EG - This output is a duplicate of the control voltage
used to modulate the Filter internally.
(58) VCA – This is the main audio output, set by the
Volume control.
(59) VCA EG - This output provides a copy of the control voltage
used to modulate the VCA internally.
Rear Panel
(60) MIDI CHANNEL SELECT – a MIDI channel from 1 to 16 is
selectable using the dip switches.
(61) USB – connect to a computer using standard A to B
USB cable.
(62) ON/OFF – power switch.
(63) DC INPUT – attach supplied PSU only, 12 V 1000 mA.
20 21Quick Start GuideEDGE
 Loading...