12 13Quick Start Guide
JT-4000M MICRO
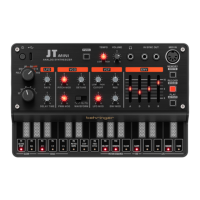
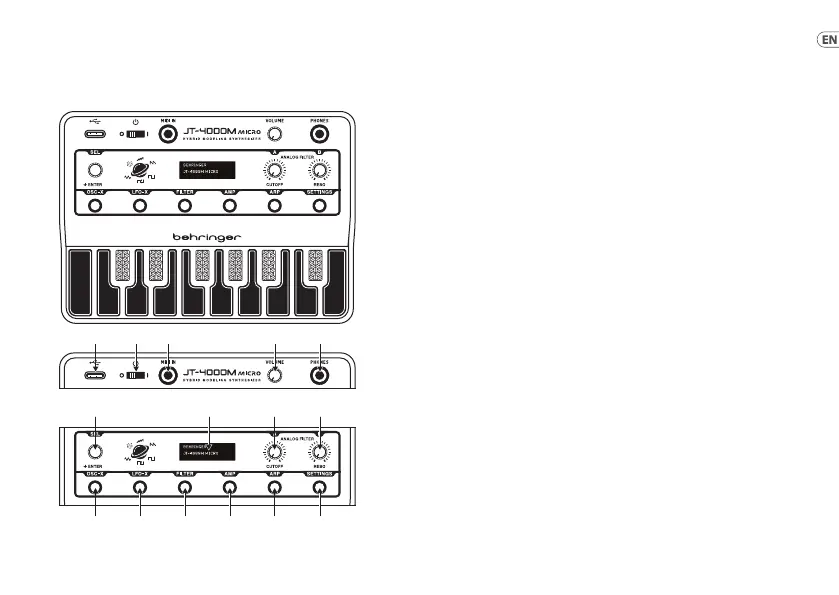
JT-4000M MICRO Controls
(EN) Step 2: Controls
• Two VCOs based on 1990s JP8K
• Two operator FM option
• 12 dB/octave VCF with
comprehensive modulation options
• Separate ADSR envelope generators
for VCA and VCF
• Two LFOs
• Extensive parameter control via
MIDI CCs
• 32 editable preset sounds, all of
which can be archived using SysEx
1. USB SOCKET – use this USB‑C
socket to power the JT‑4000M
MICRO from a suitable power
source (laptop, USB charger), to
access MIDI over USB functions
and to update the rmware.
2. POWER SWITCH – use this
switch to turn the JT‑4000M
MICRO on or o.
3. MIDI IN – use this 3.5 mm TS
jack to control the JT‑4000M
MICRO over MIDI. An adaptor for
5‑pin DIN is supplied.
4. VOLUME – use this control to
set the output volume to the
headphone socket (5).
5. HEADPHONE SOCKET – use
this 3.5 mm TRS jack socket to
connect a suitable pair of stereo
headphones.
Not suitable for balanced audio
connections.
6. SELECT – use this control to scroll
through the menu options for the
various sections of the JT‑4000M
MICRO (selected with buttons
10‑15), and to scroll through
the stored presets. Pressing the
control acts as ENTER.
When the * is displayed then
pressing SELECT will save the
edited preset.
7. DISPLAY – the display shows
the current preset and an
oscilloscope trace of its
waveform, unless one of the
buttons 10‑15 is in use, where it
will show the available options
and settings. When a preset has
been edited the symbol * will
show next to the name until the
edits have been saved. Pressing
Enter will save the edited preset
and the * will stop showing.
(EN) Step 2: Controls
(1) (2) (3) (4) (5)
(6)
(7) (8) (9)
(11)(10) (12) (13) (14) (15)