(EN) Step 2: Controls
X-TOUCH ONE Controls
1)
(6)
(7)
(8)
(10)
(11)
(12) (13) (14) (15) (16)
2)
3)
4)
5)
(9)
Operation Modes
The X-TOUCH ONE supports Mackie Control,
HUI, and MIDI communication protocols
for seamless integration with every
compatible music production software.
The procedure for changing modes and
adjusting the display brightness and
contrast is shown in the Getting Started
section of this guide.
The exact function of the buttons of the
X-TOUCH ONE will vary widely from one
Digital Audio Workstation (DAW) to the
next. We recommend that you read your
DAW’s documentation regarding how it
operates with external control surfaces.
Overlay Templates
The X-TOUCH ONE shipping box contains
various overlays for the most popular
DAWs. These t over the X-TOUCH ONE top
panel, and are marked with text labels
that indicate the typical button functions
for each DAW.
If you are using a di erent DAW, you can
use the “MC User” Template and mark it
with your own assignments for what each
button does in your DAW.
Typical Operation
The X-TOUCH ONE comes from the factory
in standard Mackie Control mode, and
the top panel printing is for this mode.
The following details show some of the
typical uses of the X-TOUCH ONE controls
in DAW applications in standard Mackie
Control mode:
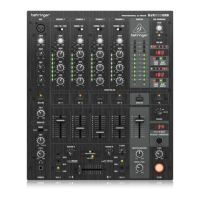
(1) Push encoder knob – this
endless encoder has a detent and
push function (not illuminated),
and a 13-segment amber LED ring.
This is typically used in DAW
applications for ne control of
the channel left/ right Pan.
(2) LCD Display – this display
indicates various parameters
and labels as shown in your DAW.
(The DAW completely controls
which items are displayed.)
The display will also show the
mode during the procedure for
changing the operation mode.
(3) BPM/Time – Press this to toggle
the display between BPM display
or Time display.
(4) Fader – this touch-sensitive
motorized 100 mm fader is
typically used for ne Level control
of the currently selected channel
in DAW applications. If the MASTER
button is engaged, then the fader
will adjust the Master level in
your DAW.
(5) Channel meter – this 8-LED
meter shows the signal level of
the channel, and indicates when
a signal is present (SIG LED),
and when it is clipping (CLIP LED).
The meter reading is completely
controlled by your DAW.
(6) Display – the display can show
SMPTE timecode of hours,
minutes, seconds and frames,
or BBT bars, beats, and ticks.
The BPM/Time button is used
to switch between these two
display modes.
12 13Quick Start GuideX-TOUCH ONE