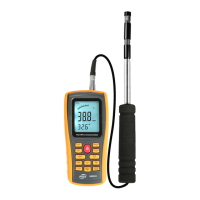
The BENETECH GM8903 is a hot wire anemometer designed for measuring wind velocity, temperature, and flow. This instruction manual provides a comprehensive guide to its operation, features, and maintenance.
Function Description
The GM8903 hot wire anemometer is a versatile instrument capable of measuring various parameters related to air movement. Its primary functions include:
- Wind Velocity Measurement: It can accurately measure the speed of wind in different units such as m/s, km/h, ft/min, knots, and mph.
- Temperature Measurement: The device also measures the ambient air temperature, with selectable units of Celsius (°C) and Fahrenheit (°F).
- Wind Flow Measurement: Beyond just velocity, it can calculate and display wind flow in units like CMM (cubic meters per minute) and CFM (cubic feet per minute), which is crucial for applications involving duct systems.
- Maximum and Minimum Value Measurement: The anemometer can record and display the highest and lowest wind velocity values during a measurement session.
- 2/3 Vmax and Average Wind Flow Measurement: It offers specialized functions for measuring 2/3 of the maximum wind velocity and calculating the average wind flow, which are important for specific industrial and HVAC applications.
- Data Holding: Users can freeze the current readings on the display for easier recording or observation.
- Data Storage and Deletion: The device has an internal memory to store up to 350 records, which can be retrieved and deleted as needed.
- PC Connectivity: It can connect to a computer via a USB cable, allowing for real-time data monitoring, data download, and further analysis using dedicated software.
- Backlight: The LCD display features a backlight for improved visibility in low-light conditions.
- Low Battery Indication: A clear icon on the display alerts the user when the battery level is low.
- Automatic Power-Off: To conserve battery life, the device automatically turns off after 10 minutes of inactivity, unless powered by a USB source.
Usage Features
The GM8903 is designed for user-friendly operation with a clear LCD display and intuitive button layout.
Getting Started:
- Unpacking and Check: Upon receiving the device, users should carefully unpack and verify that all included items (anemometer unit, probe, yellow sticker pocket, software disc, USB cable, AAA batteries, English instruction manual, and cloth pouch) are present and undamaged.
- Battery Installation: Open the battery door at the rear of the unit and insert four AAA 1.5V alkaline batteries, ensuring correct polarity.
- Power On/Off: Long press the "ن" key for 1 second to power on the device. All symbols will briefly appear on the screen before entering the default wind velocity and temperature measuring mode.
Measurement Modes:
- Wind Velocity and Temperature:
- Place the probe in the airflow, ensuring the arrows on the probe align with the air direction. Avoid extruding the sensor tip to maintain accuracy.
- Wait 2 seconds for the unit to be ready.
- Press the "UNIT" key to cycle through wind velocity units (m/s, km/h, ft/min, knots, mph).
- Press the "°C/°F" key to switch between Celsius and Fahrenheit for temperature display.
- Press the "LIGHT" key to toggle the backlight on or off. The backlight will turn off automatically after 7 seconds of no key operation.
- Wind Flow Measurement:
- Press the "VEL/FLOW" key to enter "FLOW" mode.
- Unit Selection: Press the "UNIT" key to switch between CMM and CFM for wind flow, and M² and FT² for duct area. The area unit will automatically adjust based on the selected wind flow unit (M² for CMM, FT² for CFM).
- Duct Area Input: Press the "AREA" key. The 4-digit display will disappear, allowing numeric keys to be used to input the duct area (e.g., 1.6). Press "ENTER" to confirm.
- Place the probe in the duct area to measure the current wind flow.
- Note: Failing to enter the duct area will prevent wind flow measurement. If the wind flow exceeds 9999, "x10" or "x100" will appear, indicating the measured value is multiplied by 10 or 100.
- 2/3 Vmax Wind Flow:
- Enter "FLOW" mode and select desired units and input duct area as described above.
- Press the "OPTION" key repeatedly until "2/3V MAX" appears on the LCD.
- Aim the probe at the duct area to measure 2/3 Vmax wind flow.
- Press "OPTION" again to exit this mode.
- Average Wind Flow:
- Enter "FLOW" mode and select desired units and input duct area as described above.
- Press the "OPTION" key repeatedly until "AVG" appears on the LCD.
- Aim the probe at a specific point in the duct area and press the "NEXT" key. The LCD will show a serial number (e.g., "1") and the first group of wind flow values.
- To measure subsequent groups (up to 12), move the probe to another test point and press "NEXT" again.
- Press "OPTION" again to exit this mode.
- Max and Min Measurement:
- During wind flow or velocity measurement, press the "MAX/MIN" key to display the maximum value ("MAX" icon) or minimum value ("MIN" icon).
- Press "MAX/MIN" again to exit.
Data Management:
- Data Holding: Press the "HOLD" key to freeze the current readings. Press again to return to normal operation.
- Data Storage:
- Instantaneous (One-Shot): In "VEL" state, set the sampling rate to "0" using the "SAMPLE" key and "ENTER". Each time "REC" is pressed, the current reading is stored.
- Automatic: In "VEL" state, press the "SAMPLE" key and input a sampling rate (1-99 seconds) using numeric keys, then "ENTER". Press "REC" to start automatic storage at the set interval. The "REC" icon will appear. Press "REC" again to stop.
- Reading Stored Data:
- Sequentially: Press the "READ" key to view stored data sequentially. The LCD will first show the serial number, then the data. Press "RST" to return to normal operation.
- Randomly: In "READ" status, press the "SAMPLE" key, enter the desired record number, and press "ENTER". The data will be displayed. Press "RESET" to exit.
- Clearing Stored Data: Press and hold the "CLEAR" key for 5 seconds. "CLR" will appear on the LCD, indicating all stored data has been cleared.
- Note: The maximum number of readings that can be stored is 500. If the reading number exceeds the total stored data, the LCD will show the last stored value.
PC Connection:
- Requirements: Ensure the computer meets the minimum specifications (Pentium 600MHz+, free USB port, 800x600+ screen resolution, 8MB+ RAM, 50MB+ disk space, Windows 98/ME/2000/XP/7).
- Software Installation: Insert the provided software disc, open the disc drive, and double-click "Anemometer setup.exe". Follow the installation wizard, clicking "NEXT" and selecting "Create a desktop icon". Select "Run Anemometer" upon completion.
- Connecting Device: Insert one end of the USB cable into the anemometer's USB interface and the other into the computer's USB port. The "USB" symbol will appear on the LCD.
- Real-Time Measurement: In the software, click "File/Real Time Measure" or the corresponding button on the toolbar ("Start to Measure") to begin real-time data display and recording.
- Data Download: Click "Import Data" in the "File" menu or on the toolbar. In the download interface, click "Start to Import" to transfer stored data from the anemometer to the computer.
- Saving Data: Click "Save" to save downloaded data to a file (LAB format).
- Software Functions: The software allows for viewing real-time graphs, zooming, printing, system setup, and viewing system information.
Maintenance Features
Proper maintenance ensures the longevity and accuracy of the GM8903 anemometer.
Battery Replacement and Product Care:
- Long-Term Storage: If the unit will not be used for extended periods, remove the batteries to prevent leakage and potential damage to the battery compartment and electrodes.
- Low Battery Indication: When the battery icon appears on the LCD, replace the batteries immediately to avoid inaccurate readings and potential leakage.
- Replacement Procedure: The battery compartment is located on the bottom rear of the unit. Open the door, replace the old batteries with new ones (observing polarity), and close the door securely.
Cleaning the Casing:
- Cleaning Agents: Never use alcohol or thinner to clean the unit casing, as these can erode the LCD surface.
- Recommended Method: Lightly clean the unit with a small amount of clean water as needed.
Storage and Usage Conditions:
- Environmental Avoidance: Do not store or use the unit in locations subject to:
- Splashes of water or high levels of dust.
- Air with high salt or sulfur content.
- Air with other corrosive gases or chemical materials.
- High temperatures or humidity (above 50°C, 90% RH) or direct sunlight.
- Physical Impact: Avoid impacting the unit.
- Humidity: Do not use the device in high humidity conditions.
Troubleshooting:
- Blank Screen: Check if batteries are inserted correctly and if polarity matches the markings inside the compartment.
- PC Connection Issues: Verify the USB cable is functional. If not, replace it.
- Inaccurate Wind Flow Readings: Check if the probe is blocked or damaged.
- Inaccurate Wind Temperature Readings: Check if the heat resistor is detached or damaged.
- Data Reading Issues: Ensure the device is operated within the specified temperature and humidity ranges.
Warranty:
- Refer to the provided warranty card for details on warranty coverage.
- The manufacturer disclaims liability for damages due to transportation, incorrect use, manipulation, alterations, or repairs without a valid warranty card or invoice.
Specific Declarations:
- The company is not responsible for any direct or indirect evidence resulting from the use of this product's output.
- Product design and manual updates are reserved for authorized technicians. Do not attempt any unauthorized alterations or repairs.
- Dispose of batteries according to local laws and regulations.