Do you have a question about the BenQ CM00G3 and is the answer not in the manual?
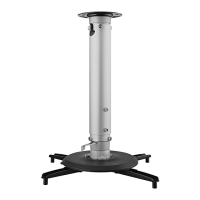
Details material (Steel/Aluminum alloy) and weight (1.76kg).
Covers adjustable length (127.7mm-577.7mm), rotation (360°), and tilt (+/-25°).
Specifies maximum load (25kg) and compatible screw types (M3-M6).
Shortest length is 127.7mm, longest is 577.7mm, adjustable in 25mm increments.
Suitable for projectors with mounting hole diameter within 380mm.
Angles can be adjusted by +/- 25 degrees.
Nuts control projector angle tightness; adjustments by service professionals.
Lists all components like ceiling bracket, modules, bolts, pipes, and fasteners.
Lists necessary tools: drill, bit, hammer, spanner, screwdriver, and pencil.
Secure bracket to ceiling, marking and drilling holes based on wall type.
Attach the arm bracket to the projector securely using provided bolts and washers.
Mount hinge module, cover, and connect them using bolts and nuts.
Adjust mounting length using internal pipe, route power cord, and secure.
Secure internal/external pipes and ceiling bracket using hex bolts; adjust length for 127.7mm.
Route power cord through external pipe and attach to ceiling mount bracket.
Loosen knob to adjust hinge module angle, then push back and tighten the knob.
| Brightness | 3000 ANSI Lumens |
|---|---|
| Contrast Ratio | 10, 000:1 |
| Lamp Life | 3, 500/5, 000/6, 000 hours (Normal/Eco/SmartEco) |
| Throw Ratio | 1.15-1.50 (100" @ 2.5m) |
| Display Technology | DLP |
| Resolution | 1080p (1920x1080) |
| Zoom Ratio | 1.3x |
| Native Resolution | 1080p (1920x1080) |
| Input Connectors | HDMI, VGA, USB, RS-232, Audio In/Out |