This document describes the Podo-Q, a professional podiatry device designed for foot care, featuring a micro motor handpiece with integrated dust suction. The device is primarily used for grinding, polishing, and other treatments requiring precise rotational tools.
Function Description
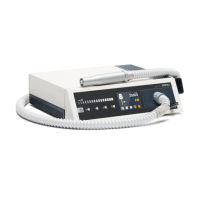
The Podo-Q is a control unit that powers and manages a micro motor handpiece. Its core function is to provide adjustable burr/mandrel rotation speed and integrated dust suction, ensuring a clean and efficient working environment. The device allows users to set rotational speed, direction, and suction level via a touchpad and display. It also includes memory functions to save preferred settings for quick recall. The integrated dust bag compartment collects debris generated during treatments, maintaining hygiene and protecting the user from dust inhalation.
Important Technical Specifications
- Dimensions (W x H x D): 290 x 80 x 250mm
- Weight: 2300g
- Voltage: 95-265V, 50/60Hz
- Equipment: Control unit, micro motor handpiece, dust bag, power cord, instruction manual.
- Warranty: 24 months for the control unit, 12 months for the handpiece.
- Burr/Mandrel Shaft Diameter: Must be 2.35 mm.
- Maximum Rotational Speed: Up to 25,000 RPM (Rotations per Minute), adjustable via the slider.
Usage Features
The Podo-Q offers intuitive operation through its touchpad and display.
Control Unit Operation:
- Start/Stop Button: Activates/deactivates the handpiece and suction.
- Suction Stop and Standby Button: A short press stops suction; pressing for 4 seconds puts the device into standby mode. The device automatically enters standby if not operated for more than 2 hours.
- Burr Speed Indicator: Displays the current rotational speed in RPM.
- Suction Strength Indicator: Shows the current suction level (low, medium, high).
- Optional External Light ON/OFF: Controls an external light if connected.
- Suction Level Button: Allows selection of low, medium, or high suction.
- Rotational Direction Button: Changes the burr/mandrel rotation direction (left/right).
- Slider to Adjust Burr Speed: A touch-sensitive strip for precise adjustment of the rotational speed.
- Burr Default and Rotation Direction Indicator: Visualizes the selected burr size (small, medium, large) and rotation direction.
- Memory Buttons: Three dedicated buttons (M1, M2, M3) allow users to save and recall their favorite settings (burr speed, rotational direction, and suction strength). To save, press and hold the Start/Stop button, then press the desired Memory button.
Handpiece Operation:
- Burrs/mandrels are inserted into the handpiece as far as possible. The burr/mandrel is automatically powered when the motor starts and can only be removed once the handpiece has come to a complete stop.
- Safety Precaution: Never remove a burr/mandrel while the device is running to avoid injury. Only use burrs/mandrels with undamaged or unbent shafts. Always adhere to the permissible maximum speeds for the specific attachment.
Settings Menu:
- Version Info Menu: Accessible by pressing the "Suction stop" button during device startup (while the logo is displayed). This menu displays software versions (Main PCB, Turbine, Touch) and component runtimes (Handpiece, Turbine, Lamp).
- User Setup Menu: Accessible from the version info menu. Allows adjustment of display brightness and the maximum RPM of the handpiece. Settings can be changed using arrow keys and confirmed with the "SET" button. To exit, restart the device.
Maintenance Features
Regular maintenance is crucial for the longevity and proper functioning of the Podo-Q.
Dust Bag Management:
- Changing the Dust Bag: The dust bag compartment is easily accessible. To change the bag, pull the handpiece connector from its socket, separate the bag from the suction cover, remove the old bag, and replace it with a new one. Reassemble by following the steps in reverse order. The device indicates when the dust bag is full.
Handpiece Maintenance and Cleaning:
- Regular Cleaning: Ensures a secure fit of the burr/mandrel.
- Disassembly for Cleaning:
- Remove the burr/mandrel from the handpiece.
- Unscrew the handle sleeve.
- Unscrew the bearing bushing and pull it forward.
- Press the polygon sleeve with the burr out of the bearing bushing.
- Insert a burr into the collet chuck to pull the collet chuck and clamping rollers out of the polygon sleeve.
- Clean the collet chuck, clamping rollers, and polygon sleeve.
- Reassemble by following these steps in reverse order.
- Important: Do not use oils or fats for lubrication.
- Disinfection: Disinfect the surface of the handpiece with a surface disinfectant, ensuring no liquid enters the handpiece.
Micro Motor Disassembly (for advanced maintenance/repair):
- Loosen the knurled nut by turning left (caution: do not turn the plastic lid).
- Pull the motor with the handpiece cover out of the motor sleeve.
- The motor can then be pulled from the handpiece cover.
- Caution: Incorrect opening may damage connector pins on the micro motor. Always mind the micro motor's connection pins during disassembly and reassembly.
Troubleshooting:
The manual provides a fault diagnosis section for both the control unit and the motor handpiece, offering solutions for common issues such as a full dust bag, faulty handpiece, problems with dust suction, hardware errors, burrs not clamping properly, or burrs not running smoothly. Solutions often involve checking connections, replacing components (like the dust bag or handpiece motor), cleaning parts, or restarting the device. If problems persist, contacting a service partner is recommended.
Safety Instructions:
- Maintain at least 30mm clearance on all sides of the device to prevent overheating.
- Do not block the venting slots.
- Protect the device from moisture and do not use it to draw liquids.
- Only authorized experts should open the device; unauthorized opening voids the warranty.
- Clean the plastic housing with a slightly moistened towel; do not use petrol or chemical detergents.