ENGLISH
INSTALLATION MANUAL
1) GENERAL OUTLINE
The SUB hydraulic controller provides the ideal solution for underground hinge-
pivot installations, as it brilliantly solves aesthetic automation problems. The SUB
actuator consists of a perfectly sealed single block, containing a hydraulic control
unit and a jack, which provides a hidden underground installation without any
hydraulic connections. The gate is kept closed by an electric lock, or by a hydraulic
lock on the SUB versions supplied with it. The versions with slow-down functions
avoid unpleasant slamming noise when the gate is brought to the nal opening
and closing stages. The pushing force can be adjusted with extreme precision by
means of two by-pass valves which provide antisquash safety. The end-of-stroke
operation is electronically set by a timer on the control panel. The emergency
release, activated by the proper key supplied, can be easily reached after remov-
ing the appropriate cap found on the cover.
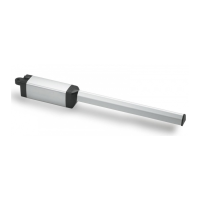
3) MAIN AUTOMATION PARTS
Single-block hydraulic actuator (g.1) consisting of:
M) 2-pole single-phase motor protected by thermal circuit-breaker.
P) Hydraulic lobe pump.
D) Distributor with adjustment valves.
PC) Rack - pinion jack.
Components supplied as standard: by-pass release and adjustment key, capacitor,
grooved bush and instruction manual.
WARNING: An actuator can be mounted on the left or right-hand side, as identi-
ed by looking at the gate from the inside (opening direction). An actuator can
be recognised as left or right-handed by observing the position of release pivot
“PST”. Fig.1 shows an actuator to be mounted on the left.
4) ACCESSORIES
- CPS Bearing foundation case (provided for automation).
- CID Non-bearing foundation case.
- BSC Slide arm (for mounting to one side of the hinge-pivot).
5) TECHNICAL SPECIFICATIONS
Single-phase power supply ............................................................ 220-230V 50/60Hz(*)
Motor revolutions ...................................................................................................2800 min
-1
Output shaft revolutions .....................................................................................See Table 1
Absorbed power ...............................................................................................................250 W
Capacitor ..............................................................................................................................6.3 µF
Absorbed current ...............................................................................................................1.4 A
Max torque .....................................................................................................................400 Nm
Pressure .......................................................................................................3MPa (30 bar) max
Pump capacity .........................................................................................................See Table 1
Impact reaction ............................................................................................ Hydraulic clutch
Manual manoeuvre ..............................................................................................Release key
Max no. manoeuvres .......................................................................................500 / 24hours
Thermal protection .........................................................................................................160 °C
Environmental conditions ..........................................................................-10 °C to +60 C°
Degree of protection .......................................................................................................IP 67
Controller weight .......................................SUB 220N (~22 kg) - SUB G 240N (~24 kg)
Oil ......................................................................................................................................IDROLUX
Dimensions ....................................................................................................................See g.2
Sound pressure ......................................................................................................LpA<70dbA
(*) Special voltages available on request.
6) ACTUATOR INSTALLATION
6.1) Preliminary checks
Check that:
- The leaf structure is sturdy and rigid.
- The upper hinge is in working order and possibly adjustable.
- A hole can be dug to lay the case under the hinge-pivot, or to one side of the
hinge-pivot for slide arm installation.
- The leaf ground stop plates are tted.
- Repair or replace all faulty or worn components.
Fig.3 illustrates an exploded view of the installation. Automation reliability and
safety are directly aected by the condition of the gate structure.
6.2) Electrical installation setup
Set up the electrical installation as shown in g.4, making reference to the cur-
rent standards for electrical installations. Keep the mains supply connections
denitely separate from the service connections (photocells, electric edges,
control devices, etc.).
WARNING! For connection to the mains power supply, use a multicore cable
with a cross-sectional area of at least 3x1.5mm
2
of the kind provided for by
the regulations in force.
To connect the motors, use a cable with a cross-sectional area of at least
1.5mm
2
of the kind provided for by the regulations in force.
The cable must be type H05RN-F at least.
Connect the control and safety devices in compliance with the previously men-
tioned installation standards. Fig.4 shows the number of connections and the
cross section for power supply cables about 100-m long; for greater lengths,
calculate the cross section needed for the true automation load.
6.3) Main automation parts (Fig.4):
I) Type-approved adequately rated omnipolar circuit-breaker with at least
3,5 mm contact opening, provided with protection against overloads and
short circuits, suitable for cutting out automation from the mains. If not
already installed, place a type-approved omnipolar circuit-breaker with
a 0.03A threshold just before the automation system.
Qr) Control panel and incorporated receiver.
SPL) Preheating board for operation with temperature lower than 5°C (optional).
S) Key selector.
AL) Blinker with tuned antenna.
M) Controller.
E) Electric lock.
Fte) External photocells (emitting section).
Fre) External photocells (receiving section).
Fti) Internal photocells with CF posts (emitting section).
Fri) nternal photocells with CF posts (receiving section).
T) 1-2-4 channel transmitter.
RG58) Cable for antenna.
D) Connector block.
The connector block (fig. 6) must always be positioned higher
than the motor. In fact, as the controller is perfectly sealed, the tank is
made to breathe through the actuator supply cable.
6.4) Cementation of the foundation case (under the hinge-pivot)
The case must be cemented under the hinge-pivot, keeping in mind that the
actuator bearing shaft must be perfectly aligned to the leaf rotation axis. If the
gate is provided with xed hinges, disassemble it and remove the lower hinge.
If the leaf is high enough from the ground and cannot be removed, proceed to
supporting it by means of a shim placed between the ground and the leaf during
installation. If the gate is provided with adjustable hinges, remove the lower
hinge, loosen the upper one and move the leaf to the side. If the gate has been
newly manufactured, t an upper hinge which can be adjusted.
- Dig a foundation hole having the dimensions shown in g.5.
- Provide a drainage pipe (g.6) for rainwater in order to prevent stagnation
inside the foundation case. Lay a raceway for the power supply cable as far
as connector block “D”
- Lay a strong foundation on the bottom (g.5) where to bury the hooks of
foundation case “P”. The dimensions for positioning plate “P” are dened in
g.5. Let the cement harden for the time needed.
- Rest the actuator on base “P”, with its shaft perfectly aligned to the leaf axis
(g.7), and weld four angle bars “A” in correspondence with the four corners
of the actuator centring base. The minimum dimension between the pillar
and rotation shaft axis is shown in g.6.
- Assemble the foundation case by xing its two half sections together by means
of the screws supplied (g.8), and xing small plate “PI” to the back. Position
the box around the actuator, so that small plate “PI” (g. 8) ts around the
shaft, and the edge of the box protrudes above the ground by about 10mm
(g.6). Position cover “CE” (g.3) on the box and x its corners with 2 screws.
- Fill the rest of the hole with concrete.
6.5) Cementation of the foundation case (to one side of the hinge-pivot)
Installation with slide arm (to one side of the hinge pivot). This is advisable when
you want to avoid disassembling the existing gate leaf. Area “A” highlighted in g.9
corresponds to a right-angled triangle having a side of approximately 200mm,
where the actuator axis can be laid in order to allow the leaf to open by at least 90°.
- The drive arm provides a distance between centres between grooved bush
“B” and sliding roller “R” of up to 380mm.
- Bush “B” must be welded to the drive arm with the leaf completely closed, the
roller must be inserted into slide “S” taking into account the safety degrees
shown on small card “CA” (g.11). For slowed-down versions, also take into
account the slow-down degrees (g.13).
- Slide “S” (g.9) can be welded or xed with screws both underneath and to the
side of the leaf. The position of the slide is to be identied by marking on the
leaf the spots reached by sliding roller “R” both during closing and opening,
Having identied the mid-point between the two markings made previously,
align the mid-point of slide “S” and x it tightly. If slide “S” is shorter than the
distance between the two markings on the leaf, this type of installation is not
possible. Keep in mind that, the nearer slide “S” is to the leaf rotation pivot,
the greater will the leaf speed be. Having identied the actuator position,
proceed to cementing the foundation case as described in paragraph 6.4.
7) BEARING FOUNDATION CASE
Two bearing foundation case models - CPS for SUB and CPS G for SUB G (g.10)
- are available. Having installed the bearing case, the gate becomes operational
SUB - 25
 Loading...