Powering On the Sequenal Circulator
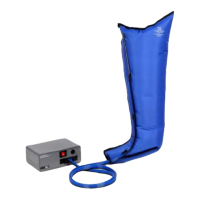
11. Paent shall be seated in a reclined posion, legs elevated within easy reach of the
Sequenal Circulator.
12. Press the “Power On/O” buon to turn the pump on.
13. Within several seconds, the pump shall begin producing air pressure. The air pressure
may be set in the same posion as the previous treatment. Factory default pressure is
50 mmHg in the chamber #1, decreasing incrementally as it moves distally to proximally
between zones.
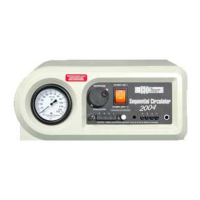
Seng the Air Pressure on the Sequenal Circulator
14. Turn Pressure Knob to the prescribed seng.
15. The Pressure Knob determines the pressure in the distal chamber. Once set, the
Sequenal Circulator shall automacally set the subsequent pressure zones within the
garment, by incrementally decreasing each zone as the air pressure moves distally to
proximally.
16. Treatment me shall be determined by physician. Adhere to physician’s instrucon on
me alloed for each treatment.
Powering O the Sequenal Circulator
17. Upon compleon of treatment, press the “Power On/O” buon to turn o the pump.
The pump shall stop running at this me. Please note you must wait unl the light goes
out before removing your garment.
18. Prior to removing the garment, squeeze the sides of the Latch Connector Bars and
detach from pump by pulling outward away from pump. This will fully detach the
garment from the pump.
19. Depress the garment to help evacuate any remaining air. Once the garment becomes
loose enough to remove, unzip the garment and remove.
20. Repeat removal procedure for any addional garments being used.