The Bionik NeoGlow Controller is a high-quality, innovative gaming accessory designed to enhance your gaming experience. This user guide provides comprehensive instructions for its use, maintenance, and technical specifications.
Function Description
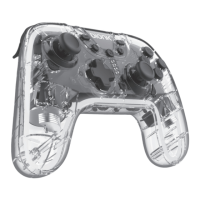
The NeoGlow Controller is a versatile gaming controller compatible with Nintendo Switch, PC (via Bluetooth), and Android devices. It features a transparent design with internal LED lighting, offering various color modes and adjustable brightness. The controller includes mappable buttons (M1 and M2) for customized gameplay, a Turbo mode for rapid input, and adjustable vibration intensity for immersive feedback.
Important Technical Specifications
- Connectivity: Wireless (Bluetooth) for PC and Android, wired (USB-C) for Nintendo Switch and PC.
- Charging: USB-A to USB-C cable included.
- Battery: Internal rechargeable battery. Player indicator LEDs flash when the battery is low and during charging. LEDs turn off when fully charged.
- Operating Temperature: 32°F – 113°F (0°C – 45°C).
- FCC Compliance: Class B digital device, Part 15 of FCC Rules.
Usage Features
-
Nintendo Switch Connectivity:
- From the Nintendo Switch HOME screen, select "Controllers" then "Change Grip/Order."
- Press and hold the controller's Sync button for five seconds. The player indicator LEDs will cycle in sequence.
- Once connected, the controller will vibrate and appear on the Nintendo Switch screen. The player indicator LED will illuminate solid green, indicating the player number.
Note: Once connected, pressing the HOME button will wake up the Nintendo Switch console.
-
PC Connectivity (via Bluetooth):
- Press and hold the X button and Sync button simultaneously for five seconds. The first and second player indicator LEDs will flash, indicating pairing mode.
- The controller will appear as "NeoGlow Controller" in your PC's Bluetooth device list.
- Once selected, the first and second player indicator LEDs will turn solid green.
Note: The controller can also be connected via the included cable.
-
Android Device Connectivity:
- Press and hold the A button and Sync button simultaneously for five seconds. The first player indicator LED will flash, indicating pairing mode.
- The controller will appear as "NeoGlow Controller" in your Android device's Bluetooth list.
- Once selected, the first player indicator LED will turn solid green.
-
Color Modes:
- To cycle through color modes, double-press the Color Mode button.
- To select a specific color, single-press the Color Mode button.
- To resume cycling through colors, press the Color Mode button again.
-
Brightness Adjustment:
- While holding the Color Mode button, press up or down on the directional pad to adjust brightness (25%, 50%, 75%, or 100%).
Note: Brightness can only be adjusted when a specific color or color combination is locked.
-
Mappable Buttons (M1 & M2):
- M1 and M2 buttons on the back can be mapped to action buttons (A/B/X/Y/L/R/ZL/ZR) or directions (Up/Down/Left/Right/L3/R3).
- To map a button:
- Press and hold the Program button for five seconds. The second and third player indicator LEDs will flash.
- Press either M1 or M2. (M1 will cause the third player LED to flash; M2 will cause the second player LED to flash).
- Press the desired action button or direction.
- Press the Program button again to exit. The player indicator LED will show the original player status.
- Macro Function: Allows up to 32 function changes for a mapped button. Follow the same mapping steps, but press a sequence of buttons or directions in step 3.
- To clear mapped buttons:
- Press and hold the Program button for five seconds. The second and third player indicator LEDs will flash.
- Press either M1 or M2. (M1 will cause the third player LED to flash; M2 will cause the second player LED to flash).
- Press the Program button again. This will clear any attached button or direction.
Note: Both M1 and M2 can be cleared simultaneously by holding the Program button for eight seconds.
-
Turbo Mode:
- Available for A/B/X/Y/L/R/ZL/ZR buttons.
- Regular Turbo: Press and hold the Turbo button, then press the desired action button.
- Super Turbo: Press and hold the Turbo button, then press the same action button again.
- To turn off Turbo mode: Press and hold the Turbo button, then press the same action button again.
Notes:
- Super Turbo mode remains active until turned off.
- Hold the Turbo button for 10 seconds to clear all current turbo functions.
- Multiple buttons can be activated simultaneously.
-
Vibration Mode:
- Press the Vibration button to adjust intensity (Off, 30%, 70%, 100%).
Notes:
- For Nintendo Switch, ensure "Controller Vibration" is "On" in System Settings > Controllers and Sensors.
- Vibration only works in some games; check game settings.
- The Vibration button only functions when connected to a device.
Maintenance Features
-
Charging:
- Connect the USB-A end of the cable to a power source.
- Connect the USB-C end to the controller. Player indicator LEDs will flash during charging.
- LEDs turn off when fully charged.
Notes:
- Player indicator LEDs flash when the controller battery is low.
- The controller can be used while charging.
- Press the Sync button to turn off the controller.
-
Care and Storage:
- Keep away from fire, liquids, and high temperatures.
- Recycle electronic components appropriately.
- Do not throw or shake the product.
- Do not operate if damaged or dropped.
- Clean exterior surfaces with a soft cloth; avoid harsh chemicals or strong cleaning agents.
- Keep the controller free of dirt and dust.
- Handle the cable carefully to avoid tangles, knots, or damage from sharp edges. Discontinue use if the cable shows signs of wear.
- Do not attempt to disassemble the product. Tampering voids the warranty and can cause injury.
- Discontinue use if the device is damaged or suspected to be malfunctioning; contact customer support.
- Store and operate between 32°F – 113°F (0°C – 45°C).
- Recharge the battery every three months when not in use to maintain optimal battery condition.
- Recycle the internal battery properly; contact local waste management for disposal information.