3
Project Type
Instructions
Date: September 23 2020
Customer: Thermor Ltd
Job Number: TH0951
Item Number: 261BC
Designer: Alex Vranjesevic
PO: 24735-00
Revision: A
Artwork is not to be amended or scaled. If any changes
are required please send through Thermor oce with
instructions, and we will amend here and resend artwork
through. PLEASE RETURN WITH SIGNATURE
Contact: Graphic’s Department
graphics@thermor-ins.com
Colour Breakdown
Reason For Project:
New Item: X
New Branding:
Design Update:
N/A:
UPC (For Reference Only)
Indoor/Outdoor
Indoor/Outdoor
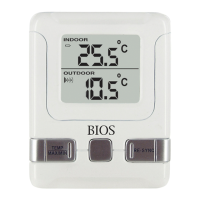
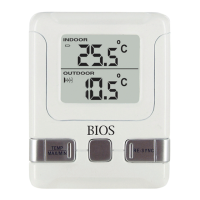
Wireless Thermometer
Instruction Manual
Monitor: Remote Sensor:
A. Battery Icon E. Transmission Indication LED
A. Battery Icon E. Transmission Indication LED
B. Indoor Temperature
C. Signal Detection Icon
D. Outdoor Temperature
1. MAX/MIN Button
2. Clear Button
3. ºC/ºF Button
4. Reset Button
5. Re-sync Button
Before You Begin
1.0 Setup procedure:
1. Insert batteries into the monitor rst.
2. Place the monitor as close as possible next to the remote sensor and insert the
batteries into the remote sensor.
3. Position the monitor and remote sensor within eective transmission range, which
in usual circumstances is 20 to 30 meters (65 to 100 feet). The range is aected
by the building materials and where the monitor and remote sensor are positioned;
try various locations for the best results.
Note: The remote sensor should be placed in a shaded area for accurate readings.
1.1 Getting Started
Once the remote sensor has been powered up (or the
RESET button has been
pressed), the transmission signal is immediately sent to the monitor. The monitor will
attempt to search for the signal for 3 minutes.
Once the signal is received, the dashes (--.-°F) on the monitor will change to the
current outdoor temperature. If after 3 minutes the screen does not change to show
the outdoor temperature, press the
RE-SYNC button on the monitor. The monitor will
now attempt to search for the signal for another 3 minutes.
2.0 Troubleshooting
Press the
RESET button at any time your display shows dashes (--.-°F) and/or ensure
that the remote sensor is in direct line to the monitor.
If the outdoor temperature cannot be received, check:
1. The distance between the monitor or remote sensor should be at least 0.9 to 1.2
meters (3 to 4 feet) away from any interfering sources such as computer
monitors or TV sets.
2. Avoid placing the monitor onto or in the immediate proximity of metal window
frames.
3. Using other electrical products such as headphones or speakers operating on
the same signal frequency (433MHz) may prevent correct signal transmission and
reception.
4. Neighbors using electrical devices operating on the 433MHz signal frequency can
also cause interference.
6. Reset Button
7. Test Button
(not functional)
 Loading...