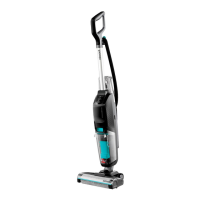
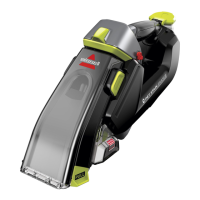
EasyManua.ls Logo

Bissell CROSSWAVE HARD FLOOR EXPERT 3831 Series User Manual

Bissell CROSSWAVE HARD FLOOR EXPERT 3831 Series
8 pages
To Next Page IconTo Next Page
Page #1 background imageLoading...
Page #1 background image
Product Overview
1. Handle
2. Power Button
3. Cleanout Cycle Button
4. Clean Water Tank
5. Dirty Water Tank Removal Button
6. Dirty Water Tank with Filter
7. Brush Roll Window Release Button
8. Brush Roll Window
Important Safety Instructions ................................2
What’s in the Box? ......................................................... 2
Assembly .............................................................................. 3
Changing the Brush Roll ............................................ 3
Filling the Clean Water Tank....................................4
Cleaning Your Floors ....................................................4
Emptying the Dirty Water Tank ............................5
Using the Clean-Out Cycle .......................................5
After-Cleaning Care ...................................................... 6
Storing Your Machine ...................................................6
Troubleshooting ............................................................... 7
Warranty ............................................................................... 7
Meet your new BISSELL® product!
Go to support.BISSELL.com for a comprehensive walkthrough
of your new purchase, including videos, tips, support, and more.
Want to get started right away? This guide has all the information
you need to set up your new product. Let’s take a look…
CROSSWAVE® HARD FLOOR EXPERT®
ALL-IN-ONE MULTI-SURFACE CLEANER
3831 SERIES
1
2
3
8
7
6
5
4

Questions and Answers:

Bissell CROSSWAVE HARD FLOOR EXPERT 3831 Series Specifications

General IconGeneral
BrandBissell
ModelCROSSWAVE HARD FLOOR EXPERT 3831 Series
CategoryUltrasonic Jewelry Cleaner
LanguageEnglish

Summary

Important Safety Instructions

General Safety Warnings

Key precautions to reduce risk of fire, electric shock, or injury during appliance use.

Save These Instructions

Instruction to retain the safety guidelines for future reference and household use.

Grounding Instructions

Details on proper grounding to prevent electrical shock hazards.

What's in the Box?

Carton Contents Identification

Guidance to identify standard accessories included with the product purchase via carton flap.

Assembly

Handle Attachment

Step to correctly attach the handle to the main unit until it clicks.

Clean Water Tank Installation

Step for inserting the clean water tank into the machine until it clicks.

Cord Management

Instructions for managing the power cord using the Quick Release Cord Wrap.

Changing the Brush Roll

Brush Window Removal

Step to detach the brush window for brush roll access.

Brush Roll Removal

Procedure to remove the brush roll from the machine by pulling its tab.

Brush Roll Reinstallation

Steps for correctly reinstalling the brush roll into the foot assembly.

Filling the Clean Water Tank

Formula Selection

Guidance on selecting compatible cleaning formulas for the machine.

Water Tank Removal

Steps to detach the clean water tank from the machine for filling.

Tank Cap Removal

Instruction to unscrew the cap from the water tank.

Filling with Water

Details on filling the tank with warm water to the specified line.

Adding Cleaning Formula

Guidance on adding the correct amount of cleaning formula to the tank.

Water Tank Reattachment

Steps to properly reattach the filled water tank to the machine.

Cleaning Your Floors

Machine Operation

Instructions on turning on the machine and reclining to start brush roll spinning.

Fluid Dispensing and Stroke Technique

Explanation of fluid dispensing and recommended steady forward/backward cleaning strokes.

Hard Floor Sanitize Formula Use

Specific instructions for using the Hard Floor Sanitize formula on nonporous floors.

Pre-Cleaning Soil Removal

Step to remove loose debris before cleaning passes.

Formula Dwell Time

Instructions for allowing the cleaning formula to remain on the floor for five minutes.

Formula Extraction and Drying

Steps for extracting the cleaning solution and allowing the floor to air dry.

Emptying the Dirty Water Tank

Tank Release and Removal

How to release and remove the dirty water tank from the machine.

Filter Removal from Tank

Method for removing the filter from the dirty water tank.

Water Disposal and Tank Rinsing

Procedure for disposing of dirty water and thoroughly rinsing the tank.

Using the Clean-Out Cycle

Clean Water Tank Fill Check

Pre-cycle step to ensure sufficient water in the clean water tank.

Machine Placement for Cycle

Setup for the clean-out cycle, including plugging in and placing in storage tray.

Initiating Clean-Out Cycle

Instruction to press the clean-out cycle button to begin the cycle.

After-Cleaning Care

Brush Roll Drying

Steps for removing and letting the brush roll dry completely.

Machine and Tray Wiping

Cleaning the main unit and storage tray, removing residual water or dirt.

Dirty Tank and Strainer Maintenance

Reiteration of dirty tank emptying and strainer cleaning procedure.

Filter Cleaning and Debris Removal

Steps to remove the filter from the lid and clear any debris.

Filter Washing and Replacement

Detailed instructions for washing, drying, and recommended replacement of the filter.

Tank Cover Rinsing

Cleaning the tank cover to remove any remaining wet debris.

Parts Air Drying

Ensuring all cleaned parts are fully dry before storage or next use.

Reassembly of Components

Reassembly instructions for brush roll, filter, strainer, and tank lid.

Dirty Water Tank Reattachment

Proper procedure for reattaching the dirty water tank to the machine.

Storing Your Machine

Cord Wrap and Storage Location

Guidance on cord management and suitable indoor dry storage locations.

Troubleshooting

Reduced or No Spray Issues

Common issue of insufficient spray and its potential causes and solutions.

Loss of Suction or Streaking

Troubleshooting for poor suction or streaking results and their causes.

Brush Roll Not Turning

Solutions for the brush roll failing to spin, including obstructions and installation.

Machine Not Turning On

Diagnosing why the machine won't power on, including brush stall and tank cap.

Machine Leaking

Addressing potential leaks from the machine, often related to the water tank.

Brush Roll Stops Unexpectedly

Troubleshooting brush roll stopping unexpectedly due to overheating or stall.

Warranty Information

Warranty Details and Contact

Information on the limited 2-year warranty and contact for complete details.

Related product manuals