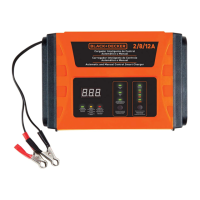
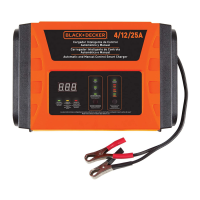
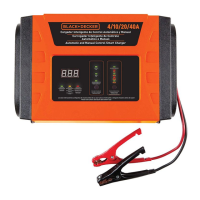
CCOONNTTRROOLL PPAANNEELL LLEEDD IINNDDIICCAATTOORRSS//BBUUTTTTOONN::
F
F
A
A
U
U
L
L
T
T
—
—
lights when any of several faults are detected — see F01 through F05 Codes as described in the previous
chart. (If the Fault LED lights, refer to “Troubleshooting” for details.)
R
R
e
e
v
v
.
.
P
P
o
o
l
l
a
a
r
r
i
i
t
t
y
y
—
—
lights when clamps are incorrectly connected to battery terminals.
B
B
a
a
t
t
t
t
e
e
r
r
y
y
V
V
o
o
l
l
t
t
a
a
g
g
e
e
—
—
lights when the Battery Voltage button is pressed.
A
A
l
l
t
t
e
e
r
r
n
n
a
a
t
t
o
o
r
r
G
G
o
o
o
o
d
d
—
—
Lights when load or no load checks show the alternator is keeping up with the electrical load.
OPERATING INSTRUCTIONS
Ensure that all installation and operating instructions and safety precautions are understood and carefully followed by
anyone installing or using the charger. Follow the steps outlined in the “Important Safety Instructions” section of this
manual.
CChhaarrggee RRaattee SSeelleeccttiioonn
After charger clamps are correctly connected, plug in the charger to a 120 or 220 volt AC outlet and the charger will
show “000” on the Digital Display, indicating power has been applied. Select the proper charge current rate based on
battery size.
WWAARRNNIINNGG::
If Digital Display shows “F02” and the Fault Indicator lights, the connection to the battery terminals is bad.
Follow the steps outlined in the “Important Safety Instructions” section of this manual.
If Rev. Polarity indicator also lights, the Red (Positive) and Black (Negative) clamps are incorrectly connected to battery
terminals. Follow the steps outlined in the“Important Safety Instructions” section of this manual.
CChhaarrggiinngg tthhee BBaatttteerryy
1. Press 2/6/10 AMP button to begin charging at the 2 amp rate; the unit sounds a beep and displays charging
current. The charger starts charging at 2 amp rate automatically if 2/6/10 AMP button is not pressed within 3 minutes
after applying AC power.
Charger occasionally sounds a beep and displays “0.0” during self-test or charging stage changes.
2. Pressing the 2/6/10 AMP button again advances charging rate to 6 amps and pressing once more advances
charging rate to 10 amps. (Pressing the button again will turn OFF the charger output and the Display will show
“000”.) This selection and actual battery charge rate are monitored by the microprocessor and the unit will stop
charging if the selected rate is too fast or too slow for battery size or condition.
As the battery nears full charge capacity, the unit’s output will automatically drop to a lower charge rate.
3. The battery charger displays the charge current. To view the battery voltage, press BATTERY VOLTAGE button. The
charger will sound a beep and display the the battery voltage. Press BATTERY VOLTAGE again to return to displaying
the charge current.
4. The display shows “FUL” when the battery is fully charged.
5. Disconnect the AC power cord first, then the negative clamp, and finally the POSITIVE clamp.
AAuuttoommaattiicc FFllooaatt CChhaarrggiinngg
Automatic Float Charging is ideal for maintaining a fully charged battery.
1. Keep the AC power and battery connected after battery is fully charged.
2. The charger monitors the battery and tops it off as needed.
3. The display shows “FLO” when topping off the battery and returns to “FUL” when completed.
4. To view battery voltage, press the Battery Voltage button.
NNoottee::
Charging can be terminated by pressing the 2/6/10 AMP button at any time when the unit is charging. After AC
power interruption, charging restarts at 2 amp rate automatically.
WWAARRNNIINNGG::
If battery size is not known, charge at the 2 amp rate. DO NOT overcharge batteries.
AC POWER INDICATOR -
When connected to an AC outlet, digital display shows circulating pattern to
i
ndicate power is on. Disconnect charger after use.
FAULT CODES
OPERATION CODES
F01
INTERNAL SHORTED CELL BATTERY - Cannot be charged. Have battery
c
hecked by certified auto service center.
E
XCESSIVE LOAD ON BATTERY WHILE CHARGING - Check load.
F02
B
AD BATTERY CONNECTION - Check battery connection.
BATTERY VOLTAGE TOO LOW TO ACCEPT CHARGE -
H
ave battery checked by certified auto service center.
F03
I
NTERNAL OPEN CELL/
Have battery checked by certified auto service center.
S
ULFATED CONDITION -
F04
OVERTIME CONDITION - Battery will not accept a charge after 18 hours of continuous charging.
B
attery may have internal damage. Have battery chacked by certified auto service center.
B
ATTERY CHARGE RATE IS SET TOO LOW - Set charger to higher charge rate. See manual.
F
05
O
VERHEATED CONDITION - Disconnect charger and allow to
c
ool for 30 min., check for ample ventilation.
A
LTERNATOR VOLTAGE CHECK
000
CHARGER STANDBY
F
UL
BATTERY FULLY CHARGED
FLO
BATTERY IN FLOAT MODE