Do you have a question about the Black & Decker Firestorm FS1300CSL and is the answer not in the manual?
| Brand | Black & Decker |
|---|---|
| Model | Firestorm FS1300CSL |
| Category | Saw |
| Language | English |
Lists the catalog numbers for the Firestorm circular saw models FS1300CSL and FS1500CSL.
Instructions to register the new product online at Firestormtools.com/productregistration.
Provides a customer service phone number (1-800-544-6986) for product issues and returns.
Advice to save the manual for future reference and notes Spanish content on the back cover.
Emphasizes reading and understanding all instructions to prevent electric shock, fire, and injury.
Instruction to keep the safety instructions for future reference.
Guidelines for maintaining a safe, well-lit work area to prevent accidents and distractions.
Precautions for double insulated tools, polarized plugs, and avoiding wet conditions.
Advice on staying alert, dressing properly, and keeping hair, clothing, and jewelry away from moving parts.
Guidance on securing the workpiece and using tools properly.
Use the correct tool for the application for better and safer performance.
Disconnect power before adjustments, accessory changes, or storage to prevent accidental starting.
Keep tools sharp and clean for better control and reduced risk of binding.
Use only manufacturer-recommended accessories for safety and performance.
Ensure tool service is performed only by qualified personnel to avoid injury.
Keep hands away from the cutting area and blade during operation.
Position body to the side of the blade, not in line, to prevent injury from kickback.
Do not reach under the workpiece as the guard cannot protect from the blade.
Ensure the lower guard operates correctly and closes instantly before each use.
Retract lower guard only for special cuts; it must operate automatically otherwise.
Ensure the lower guard covers the blade before setting the saw down.
Never hold the workpiece by hand or leg; support it properly to prevent loss of control.
Use a rip fence or straight edge guide for accurate ripping and reduced blade binding.
Use blades with correct arbor hole size and shape to prevent loss of control.
Never use damaged or incorrect blade washers or bolts for optimal safety.
Defines kickback as a sudden reaction from a pinched, bound, or misaligned saw blade.
Maintain a firm grip and proper body position to resist kickback forces.
Release trigger and hold saw motionless if blade binds until it stops completely.
Center the blade in the kerf when restarting to avoid binding and kickback.
Support large panels to minimize risk of blade pinching and kickback.
Avoid dull or damaged blades to prevent friction, binding, and kickback.
Ensure depth and bevel adjustment levers are tight before cutting to prevent binding.
Exercise extra caution during pocket cuts in blind areas to avoid unforeseen objects.
Warning about dust generation and the need for NIOSH/OSHA approved respiratory protection.
Caution to wear appropriate hearing protection due to potential noise exposure.
Avoid snagging the lower guard, which can reduce control and cause blade twist.
Use the retracting lever for manual operation of the lower guard.
Keep blades clean and sharp to minimize stalling and kickback.
Danger warning to keep hands away from the cutting area and blades.
Support large panels to prevent pinching and kickback during cuts.
Use only correct blades and assembly components for mounting.
Ensure depth and bevel adjustments are tight before making any cut.
Support and secure the workpiece properly on a stable surface.
Maintain alertness and control of the saw with both hands.
Release the switch immediately if the blade binds or the saw stalls.
Instructions on how to guard against kickback during operation.
Methods to reduce the risk of kickback, such as proper grip and support.
Avoid sawing overhead as material can sag and pinch the blade.
Use a fence or straight edge guide for ripping to prevent binding.
Do not force the tool; adjust speed for wood density, wetness, or knots.
Never remove the saw from the work while the blade is moving.
Allow the blade to reach full speed before contacting the material.
Never attempt to lift the saw while making a bevel cut to prevent binding.
Always secure work to prevent movement during cuts.
Stop and restart a new cut if the current cut goes off line, do not force it back.
Set blade depth so only one tooth projects below the workpiece.
Inspect lumber for and remove nails before cutting to prevent damage.
Danger of laser radiation causing serious eye injury; avoid direct exposure.
Do not use optical tools to view the laser beam to prevent eye damage.
Position the laser to avoid unintentional eye contact.
Do not operate the laser near children or allow them to operate it.
Do not disassemble the product; modification increases laser radiation risk.
Using controls or procedures not specified may cause hazardous laser exposure.
Do not operate the laser in explosive atmospheres.
Store the product out of reach of children and untrained persons.
Use only manufacturer-recommended accessories for laser tools.
Laser tool repairs must be done by qualified personnel.
Do not remove or deface warning labels on the laser tool.
The laser tool is intended for indoor use only.
The laser tool operates within a specific temperature range of 41°F to 104°F.
The laser is factory-set and cannot be adjusted.
Caution against using controls or procedures not specified in the manual.
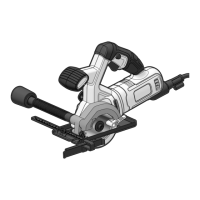
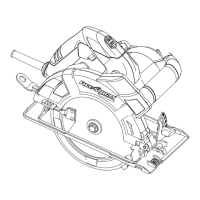
Identifies all the main parts and components of the circular saw, referencing Figure 6.
Explains symbols found on the tool's label, such as volts, watts, and laser class.
Ensures the power supply matches the tool's nameplate marking for AC operation.
Always unplug the saw from the power supply before performing any assembly or adjustment tasks.
Instructions for setting the cutting depth according to workpiece thickness, referencing Figures 7 & 8.
Move the saw shoe to the desired position and read the depth of cut scale.
Tighten the lever to secure the saw shoe in its adjusted position.
Set depth so one tooth projects below the workpiece for correct cutting.
Instructions for setting bevel angles between 0° and 45°, referencing Figure 9.
Loosen the locking knob to unlock the saw shoe for bevel angle adjustment.
Move saw shoe to desired position and read bevel angle from scale.
Tighten the locking knob to secure the saw shoe at the desired bevel angle.
Step-by-step guide for removing the saw blade from the FS1500CSL model, referencing Figures 10 & 11.
Step-by-step guide for attaching the saw blade to the FS1500CSL model.
Step-by-step guide for removing the saw blade from the FS1300CSL model, referencing Figures 12 & 13.
Step-by-step guide for attaching the saw blade to the FS1300CSL model.
Instructions on how to guard against kickback during operation.
Follow all assembly, adjustment, and setup instructions before use.
Ensure the lower guard operates correctly before starting.
Choose the correct blade for the material being cut for optimal performance.
Accurately measure and mark the workpiece before cutting.
Properly support and secure the work as per safety guidelines.
Always use appropriate and required safety equipment.
Keep the work area secure and maintained.
Verify the switch operates correctly with the plug inserted and guard closed.
Support work and hold saw firmly to prevent loss of control and injury.
Instructions for attaching the rip fence to the circular saw.
Instructions for removing the rip fence from the circular saw.
Use a straight edge guide if a proper fitting rip fence is not available.
How to operate the on/off trigger switch for the tool.
Adjusting the kerf plate for straight and miter cutting guides.
Procedure for adjusting the kerf plate to align with cutting lines.
Warning against aiming the laser at reflective surfaces to avoid beam redirection.
Danger of serious eye injury from direct laser beam exposure.
Warning against using tinted glasses to enhance laser light visibility.
How to activate the laser line using the laser on/off switch.
Step-by-step guide on how to use the laser line for accurate cutting.
General advice for sawing, including holding the tool with both hands.
Allow the blade to reach full speed before starting the cut.
Apply gentle pressure to the tool during the cutting process.
Keep the saw shoe pressed against the workpiece during cuts.
Tips for achieving optimal results and minimizing splintering.
Procedure for cutting holes in material without cutting from the side.
Instructions on how to store the blade wrench on the saw shoe.
Clean the tool using mild soap and a damp cloth.
Repairs and maintenance should be done by authorized service centers using identical parts.
Note that Black & Decker tools are factory-lubricated and ready for use.
Information on recommended accessories available from local retailers.
Warning against using non-recommended accessories; specifies blade size 7-1/4 in. (185mm).
Information on finding and contacting Black & Decker service centers for advice, repair, or parts.
Details of the two-year warranty for home use products against defects.
Explains the process and conditions for returning products to the retailer within their policy timeframe.
Details the process for returning products directly to a Black & Decker service center for repair/replacement.
Specifies that the warranty does not cover accessories.
Identifies common causes and solutions for the unit failing to start.
Provides solutions for common problems like unit not starting or circuit issues.
Details laser diode wavelength (633-670nm) and Class Illa.
Specifies the operating temperature range for the laser: 41°F (5°C) to 104°F (40°C).
States the accuracy specification for the laser line: +/- 1.8mm at every 300 mm.
Provides importer details for the product in the USA: Black & Decker (U.S.) Inc.