ENGLISH
8
2. For long storage, it is recommended to store a fully
charged battery in a cool dry place out of the charger for
optimal results.
NOTE: Batterys should not be stored completely depleted of
charge. The battery will need to be recharged before use.
Charging a Battery
The battery needs to be charged before its first use and
whenever it fails to produce sufficient power on jobs that
were easily done before. The battery may become warm while
charging; this is normal and does not indicate a problem.
WARNING: Do not charge the battery at ambient
temperatures below 40° F (4,5° C) or above 104° F (40° C).
Recommended charging temperature: between 65 °F and
75 °F (18 ° – 24 °C).
NOTE: The charger will not charge if the battery temperature
is (aproximately) below approximately 40° F (4,5° C) or above
104° F (40° C). The tool should stay connected to the charger.
Once the battery temperature returns to its normal range the
tool will begin to charge automatically.
• Plug the charger into any standard 100-240 Volts 50/60Hz
electrical outlet.
NOTE: Because this tool is equipped with a USB port, it can be
charged through USB ports. Ensure the cable (Micro USB) and
port are USB compliant.
• Insert the charger plug into the USB charging port as
shown in figure A. The charging indicator will illuminate,
indicating that the battery is being charged. When charging
is completed the light will turn off.
WARNING! Do not use tool while it is connected to
the charger.
WARNING! Fire hazard. When disconnecting the
charger from the tool, be sure to unplug the charger
from the outlet first, then disconnect the charger cord
from the tool.
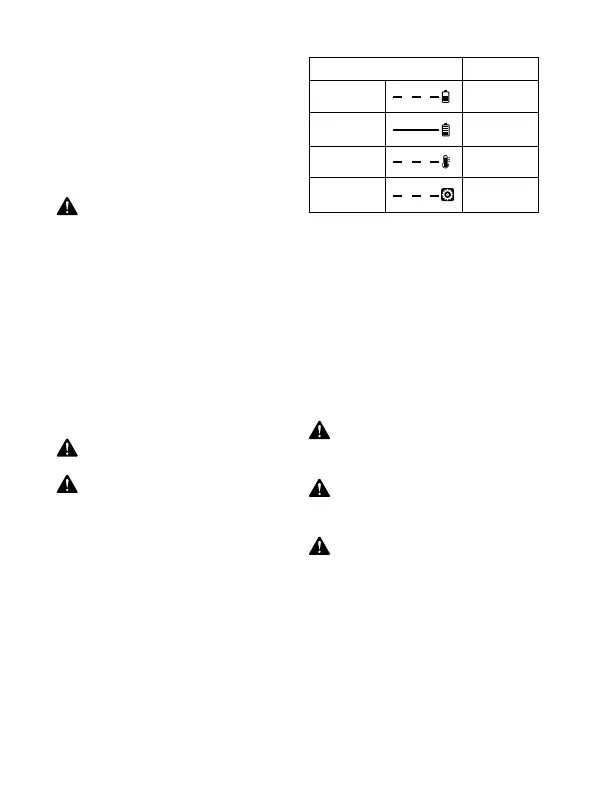
Battery Charge-Control Indicator
• When battery capacity is low, the two LED lights at the
head of the tool will blink
• When charging, the 5 torque setting lights act as charging
indicator lights. The 5 lights will turn on gradually when
charging. When all 5 lights are on, the battery is fully charged.
State of Charge 5 LED Light
Charging
1 to 5 LED Blink
Fully charged
All LED On
Hot battery
All LED Blink
Overcurrent
protection
All LED Blink
ADDITIONAL SPECIFIC SAFETY RULES
a. Always use eye protection. All users and bystanders
must wear eye protection that conforms to ANSI Z87.1.
b. Clean out your tool often, especially after heavy use.
Dust and grit containing metal particles often accumulate
on interior surfaces and could create an electric shock
hazard.
c. Do not operate this tool for long periods of time.
Vibration caused by the operating action of this tool may
cause permanent injury to fingers, hands and arms. Use
gloves to provide extra cushion, take frequent rest periods
and limit daily time of use.
d. Air vents often cover moving parts and should be
avoided. Loose clothes, jewelry or long hair can be
caught in moving parts.
WARNING: ALWAYS use safety glasses. Everyday
eyeglasses are NOT safety glasses. Also use face or dust if
cutting operation is dusty. ALWAYS WEAR CERTIFIED
SAFETY EQUIPMENT.
WARNING: Always wear proper personal hearing
protection that conforms to ANSI S12.6 (S3.19) during
use. Under some conditions and duration of use, noise
from this product may contribute to hearing loss.
WARNING: Use of this tool can generate and/or
disperse dust, which may cause serious and permanent
respiratory or other injury. Always use NIOSH/OSHA
approved respiratory protection appropriate for the dust
exposure.Direct particles away from face and body.
SAVE THESE INSTRUCTIONS FOR
FUTURE USE
ASSEMBLY
Fitting and Removing a Screwdriver Bit (Fig. B).
This tool uses screwdriver bits with a 1/4” (6,35 mm) hexagonal
shank.
1. To fit a bit, insert the bit shaft into the bit holder
7
until
it locks into place.

 Loading...