1514
English
English
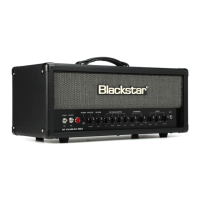
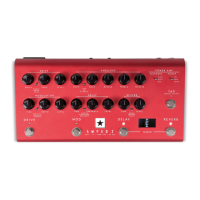
Rear Panel
20. Mains Input
The supplied detachable mains lead is connected here. Dept. 10 AMPED products
use a universal input power supply. This means that the mains input range is rated
at 100Vac to 240Vac and capable of operating at 50Hz and 60Hz.
Therefore, these products can be used anywhere in the world without needing to
adjust anything. Along with the size and weight benets, this makes them ideal for
a musician who travels internationally.
NOTE: The mains input can only be connected to a power outlet that is compatible
with the voltage, power and frequency requirements stated on the rear panel. If in
doubt, seek advice from a qualied technician.
21. Power Switch
This switch is used to turn the amplier on and o.
22. In
Plug your guitar into this input. Always use a good quality screened instrument
lead.
23. FX Loop Send
Connect to the (mono) input of external eects units here. The Eects Loop Send
is taken before the Presence (16) and Master (18) controls.
The default for the Eects Loop is for it to be placed before the onboard Reverb in
the signal chain. This setting can be changed using Blackstar’s Architect software
and saved to the amp.
24. FX Loop Return
Connect to the (mono) output of external eects units here.
As default, the Eects Loop is set to run in series. The Eects Loop can be set to
run in parallel using Blackstar’s Architect software and saved to the amp. When
running in parallel, Architect also provides control over the Eects Loop Return
Level.
TIP: The typical use of a parallel eects loop is to run the looped eects on full
‘wet’. This eliminates the dry signal from the eects loop and oers more control
over the wet/dry mix.
NOTE: If the Eects Loop is set to parallel, running eects in the loop that contain
a dry signal will result in a level boost when mixed back with the dry pass-through
at the Eects Loop Return.
25. FX Loop Send
The Level switch sets the Eects Loop to either +4dBu or -10dBV, which allows
the level to be optimal for use with either professional audio equipment (+4dBu) or
with guitar level eects such as eects pedals (-10dBV).
TIP: If you are unsure which setting to use, start with -10dBV.
26. Out
Connect your AMPED to the input of another amplier using the Out. The signal for
this output is taken after the Presence (16) and Master (18) controls, but the power
valve Response (17) is not applied to the tone.
27. Speaker Outputs
Connect a suitable guitar speaker cabinet to the matching impedance Speaker
Output:
The output marked ‘16 OHM’ is for the connection of a single 16 Ohm extension
speaker cabinet.
The output marked ‘8 OHM’ is for the connection of a single 8 Ohm extension
cabinet.
WARNING: Do not use both speaker outputs at the same time, doing so will
damage your amplier. Connect the speaker cable to your cabinet rst, then your
AMPED pedal.
NOTE: If the speaker lead is disconnected at the amplier end, then your AMPED
pedal will automatically switch to a safe, low power consumption mode. Therefore,
for example, if you wish to record using the output from either the XLR, stereo jack,
or USB, then you can set it on your desk without any need to be connected to a
speaker load.
IMPORTANT NOTE: The protection sensing is at the speaker output jacks on the
unit. Do not disconnect at the speaker end only. Disconnect at the amp!
28. Outputs
Use the two isolated 9V DC outputs to power your external pedals up to a
maximum combined current of 500mA. Both isolated outputs are centre negative.
WARNING: Do not exceed a combined total current of 500mA from the two
outputs. Do not connect pedals that require a centre positive power connection.
29. USB Audio - CabRig Output
Use the supplied USB-C cable to connect your AMPED 2 directly to your
computer. This is for USB digital audio output and for connecting to Blackstar’s
Architect software.
Standard audio drivers are used to connect the amplier to a PC, Mac or other
applicable recording device. No specic drivers are required. For a guide on low
latency USB recording visit: www.blackstaramps.com/usbrecording
NOTE: Always connect the amplier via a main USB port, often found on the
rear of the computer.
CabRig is a next-generation advanced speaker simulator that reproduces
the sound and feel of mic’d up guitar speaker cabs in incredible detail. The
sound is dependent on the position of the CabRig switch. The CabRig switch
has 3 positions to choose between three presets, these presets are completely
customisable in the CabRig section of the Architect software.
 Loading...