EasyManua.ls Logo

BlazeVideo A262 - User Manual

BlazeVideo A262
127 pages
Print Icon
To Next Page IconTo Next Page
Loading...
TRAIL CAMERA
MODEL: A262
INSTRUCTION MANUAL
EN DE FR IT ES
V1.0

Table of Contents

Question and Answer IconNeed help?

Do you have a question about the BlazeVideo A262 and is the answer not in the manual?

Overview

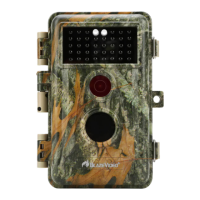
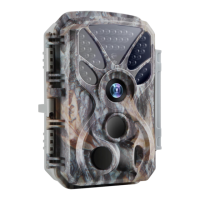
The A262 Trail Camera is a new generation of digital scouting camera designed to capture high-quality still photos and video clips of wildlife. It is triggered by movement detected by a highly sensitive Passive Infra-Red (PIR) motion sensor. The camera is capable of taking still photos up to 32MP and video clips at 1296P 20fps or 1080P 30fps (H.264 format).

Key Features and Technical Specifications:

  • Imaging Technology: The camera incorporates innovative imaging technology with all-new software, smart illumination, blur reduction, auto noise reduction, and dynamic exposure technology. This ensures high-resolution image quality even in low light or dark environments.
  • Sensor and Lens: Equipped with an advanced CMOS sensor and a premium f/1.6 large aperture lens, the camera utilizes an exclusive imaging optimization algorithm for clear photos and videos.
  • Night Vision: Features clear night vision with a flash range of up to 90ft (27m). It is equipped with 36 high-performance, no-glow 940nm infrared LEDs, which are invisible to human and animal eyes.
  • Trigger Speed and Recovery: Offers a fast trigger time of approximately 0.1-0.5 seconds (thanks to pre-activated technology with 3 PIR sensors) and a quick recovery time of less than 0.5 seconds. The trigger distance extends up to 90ft (27m).
  • PIR Sensing Angle: The total PIR sensing angle is 120° when side motion sensors are enabled. The central zone has a 60° angle, and each side sensor has a 30° angle.
  • Power Consumption and Battery Life: Consumes very little power (less than 0.1mA) in standby (surveillance) state, allowing for up to 8 months of standby operation time when powered by eight AA 1.5V batteries.
  • Display and Controls: Features a built-in 2.4-inch LCD color screen for reviewing pictures and videos and displaying menu settings. The keypad design facilitates easy programming and operation.
  • Working Modes: Supports three working modes: Motion Detection, Time Lapse, and Hybrid (combining both).
  • Memory: Requires a standard-size SDHC/SDXC memory card (maximum capacity 512GB, Class 10). SanDisk 32GB SDHC Class 10 memory cards are recommended for optimal cost-performance. Note: Memory card and batteries are not included.
  • Durability: Built for all climates with an IP66 waterproof rating, making it resistant to rain and snow. It operates in temperatures ranging from -4°F to 140°F (-20°C to 60°C).
  • Information Strip: Each capture includes an info strip displaying Date, Time, Temperature, and Moon Phase.
  • Additional Features: Includes Operation Hours, Loop Recording, Time Lapse, and Password Protection.

Usage Features:

  • Battery Installation: Requires eight (8) 1.5V AA Alkaline or Lithium batteries. Energizer AA Lithium batteries are recommended for maximum battery life. Do not mix old and new batteries or different battery types. Rechargeable NiMH AA batteries can be used but may have a shorter lifespan due to their lower voltage (1.2V). Batteries should be removed when the camera is not in use for extended periods.
  • SD Card Installation: Insert the SD card with the camera's power switch in the OFF position. Do not insert or remove the SD card when the power switch is in the ON or SET position. It is recommended to format the SD card in the camera's menu settings before first use, especially if it has been used in other devices.
  • Operating Modes:
    • OFF Mode: The "safe" mode for actions like replacing the SD card or batteries, or transporting the device. Consumes minimal power.
    • ON Mode (Surveillance): The camera automatically captures photos or videos based on current parameter settings. If set to "Motion Detection," it has a 30-second countdown before becoming ready to capture. If set to "Time Lapse," it immediately enters Time Lapse mode without a countdown. Manual controls are not active in this mode.
    • SET Mode: Allows users to check and change camera settings via the built-in LCD screen and menu. Settings include photo/video resolution, interval between captures, time imprint, etc. The camera will automatically enter ON mode if there's no operation for 5 minutes.
  • Shortcut Keys (in SET Mode):
    • UP key: Quickly sets the camera to shoot video clips.
    • DOWN key: Quickly sets the camera to take still photos.
    • RIGHT key: Manually triggers the shutter, useful for testing.
    • OK key: Initiates playback of captured photos/videos. Use UP/DOWN to navigate and OK again to exit.
  • Advanced Settings: Accessible via the MENU key in SET mode. Use UP/DOWN to navigate, LEFT/RIGHT to change settings, and OK to confirm and save changes.
    • Photo Quality: Selectable resolutions (32MP, 24MP, 16MP, 8MP, 4MP). Higher resolutions produce better quality but larger files, slowing shutter speed.
    • Video Quality: Selectable resolutions (1296P@20fps, 1080P@30fps, 720P@30fps). Higher resolutions produce better quality but larger files.
    • Video Length: Adjustable from 3 seconds to 5 minutes. Night video length is recommended to be less than 30 seconds to conserve battery power.
    • Video Format: MP4 (mainstream, compatible with most players) or MOV (for legacy digital camera software).
    • Detection Delay: Sets the waiting time before responding to subsequent PIR triggers (0s to 60m). Prevents redundant images. Invalid in "Time Lapse" mode.
    • PIR Sensitivity: High, Medium, Low settings. High is for warm ambient temperatures or distant objects; Medium/Low is for cold weather. Invalid in "Time Lapse" mode.
    • Side Motion Sensors: Can be turned On (faster trigger speeds, pre-activation) or Off (saves battery).
    • Time Lapse Interval: Sets the interval for periodic photo/video capture (3s to 24h). Effective only in "Time Lapse" or "Hybrid" mode. Invalid in "Motion Detection" mode.
    • Date/Time: Set current date and time. Date input format is adjustable.
    • Camera Name: Assign a 4-character name (A-Z, 0-9) to identify the camera's location in photos.
    • Info Strip: Turn On/Off to display date, time, temperature, and moon phase on captures.
    • Loop Recording: On (oldest files overwritten) or Off (stops capturing when SD card is full).
    • Operation Hours: Set specific daily time periods for camera operation.
    • Password: Set a 4-digit password for security.
    • Format SD Card: Deletes all files on the SD card. Backup important files first.
    • Factory Reset: Returns all settings to manufacturer defaults.
  • Mounting: Can be mounted using the provided adjustable strap or a tripod socket (standard UNC 1/4-20 thread screw, not included). Recommended mounting on a sturdy tree (approx. 6 in/15cm diameter), about 16-17ft (5m) from the monitored area, at a height of 2.5-3.5ft (0.75-1m). For best night results, the subject should be within 10-65ft (3-20m) of the camera.
  • Sensing Angle and Distance Test: Perform this test in SET mode by selecting "Motion Test" from the menu. Move in front of the camera at various positions and distances. A red LED flash indicates detection. The central PIR sensor has a 60° angle, while side sensors (30° each) pre-activate the camera. Avoid aiming at heat sources, nearby branches, or glass windows to prevent false triggers.
  • Reviewing Photos/Videos: Files are stored in the \DCIM\100MEDIA folder on the SD card (DSCF0001.JPG for photos, DSCF0001.MP4 for videos). Can be reviewed directly on the camera screen, downloaded to a computer via USB (in SET mode), or accessed via an SD card reader.

Maintenance Features:

  • Cleaning PIR Lens: If the black PIR lens becomes dirty or scratched, gently blow off or lightly pick out dirt. Do not wipe, as this may cause more scratches.
  • Troubleshooting:
    • Ensure the camera is powered on and in the correct mode.
    • Format or replace the SD card if experiencing issues, as SD cards can sometimes be unstable.
    • Replace batteries if night vision is not working as expected.
    • To improve night image quality, remove close-up obstacles (walls, tree trunks) or adjust the camera's position to avoid strong reflections.
    • If problems persist, contact customer support with your order number or check the website for the latest firmware.

BlazeVideo A262 Specifications

General IconGeneral
BrandBlazeVideo
ModelA262
CategoryScouting Camera
LanguageEnglish

Related product manuals