1 : 1
01 02
1
[33] x 12 (M6 x 38 mm)
[34] x 2 (M6 x 13 mm)
[36] x 4 (M4 x 10)
[37] x 4 (ST4.2 x10)
[35] x 2 (1/4”)
[38]
[39]
[28]
[28]
[27]
[24]
[38]
[29]
[24]
[23]
C
D
D
C
[38] [27] [25] [29][23]
[01] x 1 [02] x 1 [03] x 1 [04] x 1 [05] x 1 [06] x 1 [07] x 2 [08] x 1 [09] x 3 [10] x 1
[11] x 1 [12] x 1 [13] x 1 [14] x 1 [15] x 1 [16] x 1
[38] x 1
[18] x 1
[39] x 1 [40] x 1
[19] x 1 [20] x 1
[23] x 2 [24] x 2 [25] x 1 [26] x 6 [27] x 2 [28] x 2 [29] x 1 [30] x 1 [31] x 8 [32] x 2
[21] x 1(L) [22] x 1(R)[17] x 1
[02] x 1(L)
[03] x 1(R)
[04] x 1
[33] x 4
[31] x 4
[25] x 1
[27] x 2
[38] x 1
[39] x 1
[28] x 2
[29] x 1
[23] x 2
[24] x 2
G56201 Version 1 - 2013
You will need - Vous aurez besoin de - Potrzeba
- Вам потребуется - Necesitará - İhtiyacınız
olacak
Tools not provided - Éléments non fournis -
Narzędzia nie dołączone - Инструменты не
предоставляются - Herramientas no incluidas
- Aletler verilmez
Assembly - Assemblage - Montaż - Сборка -
Ensamblaje - Kurulum
Lighting the appliance
1. If the appliance has a lid/hood, open it.
2. Ensure all knobs are in the off position.
Open the gas control valve on the gas bottle or regulator.
3. Push and turn the control knob to the high position.
Press the ignition button rapidly several times until the burner is lit.
4. If burner fails to ignite, turn control knob to the off position and
turn gas off at the bottle or regulator. Wait five minutes, then repeat
the above steps.
5. If the appliance still fails to light, ple
a
se refer to the manual ignition instr
uctions
.
6. After successful lighting, light each burner as desired.
KHK-IMP PID 63932 C6
Barcode: 5052931266753 / 5052931254170
Code barre: 5052931249497 (Réf 641669)
Barcode: 2140002643640 (Ref 2000019847)
GB IE
FR
TR
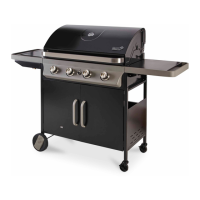
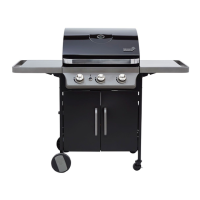
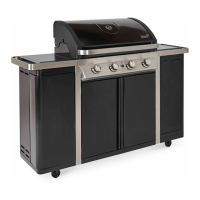
Barker 450
Bondi G450
GB IE
IMPORTANT - Whilst every care is taken in the manufacture of this product, care must be taken during assembly in case sharp
edges are present.
FR
IMPORTANT - malgré tout le soin apporté dans la fabrication de ce produit, il convient d’opérer avec précaution à cause de la
présence possible d’arêtes coupantes.
PL
Ważne - choć podczas produkcji urządzenia dołożono wszelkiej staranności, podczas montażu należy uważać na możliwe ostre
krawędzie.
RU
Важно - В то время как при изготовлении предпринимаются все меры безопасности, во время сборки также нужно быть
аккуратным, если есть острые углы.
ES
Importante - Si bien durante la fabricación de este producto se toman todas las medidas de cuidado necesarias, se debe tener
TR
Önemli - Bu ürünün üretimi sırasında her türlü önlem alınmış olmasına rağmen, montaj sırasında keskin kenarlara karşı dikkatli
olunmalıdır.
G56201-BBQ-Blooma-IM-A2-06.indd 1 11/5/13 10:38 AM
[02]
[03]
[04]
B
B
B
A
A
A
[33][31]