EasyManua.ls Logo

BONTEC CT130E - User Manual

Default Icon
8 pages
Print Icon
To Next Page IconTo Next Page
Loading...
English
Installation Instruction
UNPACKING INSTRUCTIONS
IMPORTANT SAFETY INFORMATION
!
Tools Required
CT130E
Carefully open the carton, remove contents and lay out on cardboard or other protective surface to avoid damage.
Check package contents against the Supplied Parts List in the next page to assure that all components were
received undamaged. Do not use damaged or defective parts.
Install and operate this device with care. Please read this instruction before beginning the installation, and carefully
follow all instructions contained herein. Use proper safety equipment during installation.
Carefully read all instructions before attempting installation.
Do not use this product for any purpose or in any configuration not explicitly specified in this instruction. We hereby
disclaim any and all liability for injury or damage arising from incorrect assembly, incorrect mounting, or incorrect use
of this product.
If you are uncertain about the nature of your wall, consult a qualified installation contractor.
Please call a qualified installation contractor for help if you:
If you don't understand these directions or have any doubts about the safety of the installation.
CAUTION!
WARNING
This TV mount must be securely attached to the vertical wall. If the
mount is not properly installed it may fall, resulting in possible injury
and/or damage.
4mm Drill Bit
Phillips Screwdriver
10mm Masonry Bit
Stud Finder
Wrench or Socket Set
Carpenter's Level
Note: The mounting components and hardware supplied in this package are not designed for installations to walls with steel studs or
to cinder block walls. If the hardware you need for your installation is not included, please consult your local hardware store for proper
mounting hardware for the application.
1
Question and Answer IconNeed help?

Do you have a question about the BONTEC CT130E and is the answer not in the manual?

Summary

Unpacking Instructions

Important Safety Information

Caution: Wall Mounting Safety

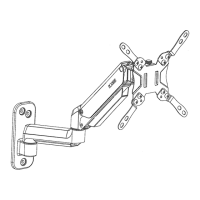
TV mount must be securely attached to the vertical wall to prevent falling, injury, and damage.

Tools Required

Supplied Parts List

Compatibility Checks

VESA Compatibility

Check if TV VESA pattern is between 75x75mm and 400x400mm for compatibility.

Wall Type Compatibility

Confirm wall is drywall with wood studs or solid concrete for safe installation.

Step 3 Select Monitor Plate Configuration

Step 4 Install VESA Plate to TV

Flat Screen TV Installation

Attach VESA plate to flat screen TVs using specified screws and washers.

Curved Screen TV Installation

Attach VESA plate to curved screen TVs using specified screws and washers.

Step 5-1 Mount Wall Plate to Wood Studs Wall

Step 5-2 Mount Wall Plate to Brick or Concrete Wall

Step 6 Hang TV onto Wall Bracket

Step 7 Adjust TV Position

Tilting Adjustment

Adjust the TV tilt angle between +10° and -10° using the provided tool.

Leveling Adjustment

Adjust the TV leveling angle between +3° and -3° for proper alignment.

Step 8 Product Dimensions

Overview

This document describes the BONTEC CT130E TV Wall Mount, providing detailed instructions for installation, technical specifications, usage features, and important safety information.

Function Description:

The BONTEC CT130E is a full-motion TV wall mount designed to securely attach a television to a vertical wall. It allows for various adjustments, including tilting and leveling, to optimize viewing angles. The mount is compatible with a range of VESA patterns, accommodating different TV sizes and models.

Important Technical Specifications:

  • VESA Compatibility: The mount supports VESA patterns from 75x75mm up to 400x400mm. This includes common patterns such as 75x75mm, 100x100mm, 200x100mm, 200x200mm, 200x300mm, 200x400mm, 300x200mm, 300x300mm, 400x200mm, 400x300mm, and 400x400mm.
  • Wall Compatibility: Designed for installation on drywall with wood studs (16-inch spacing recommended) or solid concrete/brick walls. It is explicitly stated that the mount should NOT be installed into drywall alone.
  • Tilting Angle: Adjustable from +10° to -10°.
  • Leveling Angle: Adjustable from +3° to -3°.
  • Mount Dimensions (Wall Plate): Approximately 400mm (width) x 400mm (height) for the VESA plate, and 470mm (overall width) x 300mm (overall height) for the wall arm assembly.
  • Distance from Wall: The mount allows the TV to be positioned approximately 60mm from the wall when fully retracted.
  • Hardware Included:
    • Mount Components: Wall plate (A), monitor plate (B), monitor plate extenders (C, D).
    • Mounting Hardware (for TV): M4x12 (M-A), M4x30 (M-B), M6x15 (M-C), M6x30 (M-D), M8x20 (M-E), M8x50 (M-F) screws; 5mm (M-G) and 10mm (M-H) spacers; D6 (M-I) and D8 (M-J) washers.
    • Mounting Hardware (for Wall): Lag bolts (W-A), concrete anchors (W-B), washers (W-C).
    • Tools/Accessories: Wrench (G), bubble level (M-K), cable ties (M-L), HDMI cable (M-M).
  • Required Tools (not included): 4mm Drill Bit, 10mm Masonry Bit, Phillips Screwdriver, Stud Finder, Wrench or Socket Set, Carpenter's Level.

Usage Features:

  • VESA Configuration Options: The manual provides five different configurations (A, B, C, D, E) for attaching the monitor plate and extenders to the TV, based on its VESA pattern. This ensures broad compatibility with various TV models.
  • Flat and Curved TV Support: The installation instructions differentiate between mounting to flat screen TVs and curved TVs, providing specific hardware and spacer recommendations for each type to ensure a secure fit and prevent damage.
  • Easy Installation Steps: The manual breaks down the installation process into clear, numbered steps, starting from unpacking and checking parts, to installing the VESA plate on the TV, mounting the wall plate, and finally hanging and adjusting the TV.
  • Tilting and Leveling Adjustments: Once installed, the TV can be tilted up or down by 10 degrees and leveled by 3 degrees in either direction, allowing users to achieve the optimal viewing angle and correct any minor installation misalignments.
  • Cable Management: Includes cable ties (M-L) to help organize and conceal cables, contributing to a cleaner aesthetic.
  • Included HDMI Cable: A complimentary HDMI cable (M-M) is provided, adding convenience for users.

Maintenance Features:

  • Durable Construction: While specific materials are not detailed, the inclusion of robust mounting hardware (lag bolts, concrete anchors) suggests a design intended for long-term stability and safety.
  • Pre-Installation Checks: The manual emphasizes checking all package contents for damage and ensuring the wall type is suitable before installation, which is crucial for preventing future issues and ensuring the longevity of the installation.
  • Safety Warnings: Prominent CAUTION and WARNING sections highlight the importance of secure attachment to the wall and proper installation to prevent injury and damage, implicitly guiding users towards practices that ensure the mount's long-term integrity.
  • Professional Consultation Recommended: The manual advises consulting a qualified installation contractor if there are any doubts about the directions, safety, or wall type, promoting professional assessment for complex or uncertain installations to maintain safety and functionality.
  • No Specific Maintenance Schedule: The document does not outline a specific maintenance schedule for the mount itself, implying that once correctly installed, it requires minimal ongoing maintenance beyond occasional checks for tightness or alignment if issues arise.

BONTEC CT130E Specifications

General IconGeneral
BrandBONTEC
ModelCT130E
CategoryRacks & Stands
LanguageEnglish

Related product manuals