Aspiration smoke detector LSN improved Installing the Aspiration smoke detector | en 77
Bosch Sicherheitssysteme GmbH Operation guide 2020.04 | 6.1 | F.01U.029.275
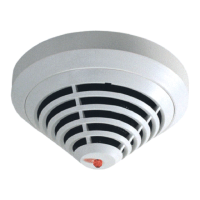
3. Connect detector module 1 to the HEAD1 connection on the motherboard using the
flatband cable. For devices with a two pipe system: Connect also the detector module 2
to the HEAD2 connection on the motherboard using the flatband cable.
4. Reconnect the display board cable to the DISPLAY connection on the motherboard.
5.3 Settings on the unit motherboard
BR
DIP
24VDC
1
LSN
BR4
BR4
1 2
BR1
1 2
HEAD1
a2 -
b2+
a1 -
b1+
HEAD2
DISPLAY
6,9 V
9 V
DIAG
1x DM-...
2x DM-...
ON
1 2 3
5 6 7
8
4
ON
1 2 3
5 6 7
84
V -
V+
V -
V+
D -
D+
V -
V+
- +
Shield
X7 24VDC
X6 ext.
Display
X8 LSN
Shield
LED1
LED2
Figure5.1: Settings on the motherboard
5.3.1 Setting the detector address
The Aspiration smoke detector address is set using the 8-pin DIP switches on the PC board
and a suitable sharp object. The default address is 0 (all DIP switches to off).
The DIP switch settings for all approved addresses are listed in the table in
DIP Switch
Settings for Detector Addresses, page 110
(0= off, 1= on).
Address
(A)
Operating mode Network structure
Loop Stub T-tap
0 Automatic address assignment in "improved
version" LSN mode
X X -
1 to 254 Manual address assignment in improved version
LSN mode
X X X
255=CL Automatic address assignment in classic LSN
mode (address range: max. 127)
X X -
x = possible, - = not possible
Notice!
It is not permitted to use different operating modes in one loop/stub/T-tap next to each
other.
 Loading...