98 en | Commissioning Aspiration smoke detector LSN improved
2020.04 | 6.1 | F.01U.029.275 Operation guide Bosch Sicherheitssysteme GmbH
Notice!
If initialization is not successful, the unit reports a collective fault (fault relay drop off). The
precise cause of the abort can be read out using the DIAG Diagnostic Software.
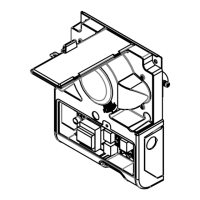
7.2.2 Air-Pressure-Dependent Calibration
2
3
1
FAS -420 series
1 2
JU1
R53
MP1
MP2
MP3
MP4
X6 ext. Display
Air-pressure-dependent calibration of the airflow sensor
1 Detector module
2 Connection terminal
"X6ext.Display"
3 Trimming
potentiometer R53
MP2/MP3 Measuring points
MP2(+) and MP3(-)
A barometer (measuring range from 0 up to 1300 mBar, resolution 1 mBar, accuracy 1mBar +/-
1 digit) and a multimeter are required to calibrate the airflow sensor dependent on air-
pressure. The following steps are required:
1. Make sure that the aspirating smoke detector has been operating for at least 30minutes.
2. Determine the height above sea level, air pressure, and ambient temperature of the
installation location and enter these values in the test log.
3. Use the air pressure correction tables to bring the calibration value in line with that of the
airflow sensor. Also enter these values into the test report. When selecting the air-
pressure-correction table, take the pipe planning into account
4. Remove the "X6 ext. Display" connection terminal from the motherboard. Connect the
multimeter to the measuring points MP2 (+) and MP3 (-). Note the polarity. On the
measuring device, select the "V-DC" range. The default voltage at the measuring points is
1.2V.
5. Using the trimming potentiometer, set R53 to the calibration value from the air-pressure-
correction table with the help of a small screwdriver. Reinsert the "X6 ext. Display"
connection terminal into the motherboard.
6. Connect the FAS-420 housing and check that it is correctly positioned.
 Loading...