Do you have a question about the Bosch PMD 7 and is the answer not in the manual?
Defines the tool's purpose for detecting metals and live wires in walls.
Lists and describes the numbered product features shown in the illustration.
Provides detailed technical specifications like scanning depth, operating temperature, and power.
Instructions for opening the battery lid and inserting batteries correctly.
Guidance on protecting the tool and adjusting to ambient temperature before use.
Details on how to operate the On/Off switch and automatic switch-off feature.
Explains how the tool detects objects below the sensor area and emphasizes safety before drilling.
Procedure for recalibrating the measuring device when needed.
Lists causes and corrective measures for the signal LED not turning on.
Addresses issues with yellow or red LED signals without metal detection.
Troubleshooting for widespread yellow/red signals indicating metal objects.
Corrective measures for detecting live cables and related issues.
Covers scenarios where a live cable is not detected or is too deep.
Explains reasons why metal objects might not be detected or are too small.
Addresses interference from electric or magnetic fields causing erratic LED behavior.
Troubleshooting for implausible results due to interference or calibration.
Action to take if the measuring tool displays continuous flashing without cause.
The Bosch PMD 7 is a digital detector designed for the precise detection of various materials within walls, ceilings, and floors. Its primary function is to identify ferrous metals, such as reinforced steel, non-ferrous metals like copper pipes, and live wires/conductors. This capability makes it an invaluable tool for professionals and DIY enthusiasts alike, ensuring safety and accuracy before undertaking tasks such as drilling, sawing, or routing.
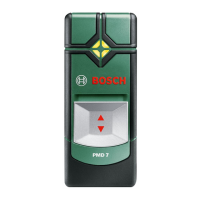
The device features a user-friendly design with several key components. A marking aid (1) is integrated to assist users in accurately pinpointing and marking detected objects. A signal LED (2) provides visual feedback on the detection status, illuminating in different colors to indicate the presence and type of material. The On/Off switch (3) allows for simple operation, while the latch of the battery lid (4) and the battery lid (5) itself provide easy access for battery insertion and replacement. The sensor area (6) is the critical part of the device that interacts with the surface to perform measurements.
For optimal performance and longevity, the PMD 7 requires proper handling and maintenance. Alkali-manganese batteries are recommended for its operation. To insert or replace batteries, the user simply presses the latch (4) and folds up the battery lid (5). It is crucial to observe the correct polarity as indicated inside the battery compartment. If the measuring tool is not going to be used for extended periods, it is advisable to remove the batteries to prevent corrosion or self-discharge.
Before initial operation, it is important to protect the measuring tool from moisture and direct sunlight. Extreme temperatures or rapid temperature variations can impair the accuracy of the device, so it should not be left in vehicles for long periods. If significant temperature changes occur, the tool should be allowed to adjust to the ambient temperature before use. Users should also avoid subjecting the measuring tool to heavy impacts or drops.
To switch on the device, the On/Off switch (3) is slid downwards. Prior to activation, ensure that the sensor area (6) is dry; if moist, it should be wiped with a soft cloth. After a brief self-test, the signal LED (2) will illuminate, indicating that the tool is ready for use. If the LED does not light up, the batteries need to be replaced. To switch off the device, the On/Off switch (3) is slid upwards. The PMD 7 also features an automatic switch-off function, activating after approximately 10 minutes of inactivity to conserve battery life. If the device has automatically switched off, the On/Off switch (3) must first be moved to the "Off" position and then back to "On" to reactivate it.
The PMD 7 operates by detecting objects beneath its sensor area (6). When scanning, it is essential to move the tool sideways across the surface. The signal LED (2) provides clear indications: a green light signifies no object detected, while a yellow light suggests a metal object is in the vicinity, or that small/low-lying metal objects are present, or that the sensor is impaired by unfavorable wall material. A red light with a continuous tone indicates a metal object has been detected, and a flashing red light with an intermittent sound signals a live wire/conductor.
When detecting metal objects, the signal LED (2) initially lights up green after switching on. As the tool approaches a metal object, the LED turns yellow and then red, with the pitch of an accompanying signal tone increasing as it gets closer. Over a metal object, the LED will be solid red, and the tone will reach its maximum pitch. Even with a yellow LED, a metal object might be present, especially small or low-lying ones, or if the wall material affects measurements. For precise location, the tool should be moved repeatedly over the surface without lifting it. The highest pitch of the signal tone indicates the center of the metal object.
For detecting "live" wires, the PMD 7 identifies wires carrying voltages between 110 V and 240 V at frequencies of 50 or 60 Hz. Other types of wires (DC, different frequencies/voltages, or non-live) may not be reliably detected but might be indicated as metal objects. When a live wire is found, the signal LED (2) flashes red, and a rapid intermittent signal tone sounds. Repeated passes over the surface help pinpoint the wire's exact location. Live wires are more easily detected when power consumers are connected and switched on. Users must ensure proper grounding by holding the tool firmly without gloves and by ensuring ladders/scaffolding are grounded, avoiding insulating footwear. Certain conditions, such as metal surfaces or high water content, can hinder reliable detection of live wires.
Before drilling, sawing, or routing, it is crucial to consult other information sources like construction plans, as environmental conditions or wall materials can reduce the tool's accuracy and scanning depth. The device should not be held near the sensor area to avoid affecting measurements.
Manual calibration is necessary if the signal LED (2) illuminates red or yellow without any metal nearby. This involves switching the device on, removing a battery, switching it off while the battery is out, reinserting the battery with correct polarity, and then holding the tool in the air away from all metal objects. The device is then switched on and off again within 3 seconds, causing the LED to flash red slowly. Finally, switching it back on within 0.5 seconds initiates a 6-second calibration process, indicated by rapid green flashes, after which the LED will be solid green, signifying readiness. If this sequence is not followed, calibration will not occur, and the process must be repeated.
For maintenance, the PMD 7 should be cleaned with a dry, soft cloth, avoiding cleaning agents or solvents. Decals or stickers, especially metal ones, should not be attached to the sensor area (6) to prevent interference with the measuring function. If the signal LED (2) flashes green, yellow, and red alternately without any metal or live cable nearby, the measuring tool requires service.
The Bosch PMD 7 is a robust and reliable tool, designed to enhance safety and precision in various construction and renovation tasks by accurately identifying hidden objects within walls, ceilings, and floors.
| Display type | - |
|---|---|
| Product color | Black, Green |
| Auto calibration | Yes |
| Built-in display | No |
| Detectable materials | Live cable, Non-ferrous metal |
| Maximum detection depth (steel) | 70 mm |
| Maximum detection depth (copper) | 60 mm |
| Maximum detection depth (live cable) | 50 mm |
| Battery life | 5 h |
| Battery type | AAA |
| Battery voltage | 1.5 V |
| Battery technology | Alkaline |
| Auto power off after | 10 min |
| Number of batteries supported | 3 |
| Storage temperature (T-T) | -20 - 70 °C |
| Operating temperature (T-T) | 0 - 40 °C |
| Weight | 150 g |
|---|